

800-551-1943
HP LaserJet 4V | 4MV Series Maintenance Kit Instructions Page 4
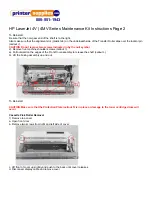
Cassette Pickup Roller Assembly
To Reinstall:
e). Thread the Pickup Roller Clutch Cable underneath the MP Drive Gears on the right end while sliding the shaft into
position.
CAUTION The next step is very important. If the clutch is not aligned properly, Paper will not feed.
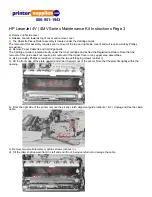
f). Be certain to align the alignment tabs with the notch on both the registration roller clutch and the pickup roller clutch.
g). Align the plastic bearing retainers on each end of the shaft so the flat portion is facing upward in proper position for the
mounting screws.
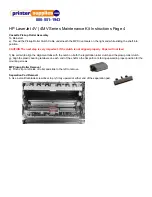
MP Pickup Roller Removal
a). Pinch clip on left side of roller and slide to the left to remove.
Separation Pad Removal
b. Use a small flat blade screwdriver to pry firmly upward at either end of the separation pad.


