


248 Chapter 16 Binary ink developer (BID)
ENWW
10
In the
Inks Properties
window, turn the pump off.
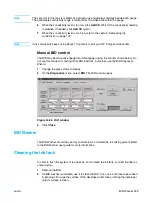
Setting the ink pump flow rate
Ink flow rate is controlled by the ink pump valves. They are located behind the ink cans
(see Figure 16-42). Rotating a valve counterclockwise opens the valve and increases the
ink flow. Rotating it clockwise closes the valve and decreases the ink flow.
Use the following procedure to set the ink pump flow rate:
1
Open the ink cabinet door.
2
Close the required ink valve all the way.
3
Turn the required ink valve regulator five and a half revolutions counterclockwise.
4
Close the ink cabinet door.
Calibrating ink density using an external densitometer
Before you start this procedure, make sure that you have an external calibrated ink
densitometer. It is important to build a solid color for calibration. Make sure you have a
sufficient amount of solids present in the ink.
1
On the control panel, click the
Adjustment
menu, and then select
Calibrate Density
.
The Calibrate Density wizard opens.
2
Press the F1 key. The online help opens.
3
Follow the procedure described in the
Help
window.
Adjusting ink conductivity
1
On the control panel, click
Get Ready
.
2
In the
Diagnostics
menu, select
Ink
.
The
Inks Properties
window opens.
3
For the tank(s) that you want to check, click
Pump
.
4
Check that the temperature of the ink is 30°
C ±1° C (86° F ±1° F). The temperature of
the ink affects the reading of the conductivity. (The current temperature of the tank
appears below the conductivity gauge.)
5
Current conductivity is indicated by a solid bar and displays digitally under each
gauge.
Figure 16-42. Ink pump flow rate regulator
Ink valve regulator
To increase ink flow rate, turn
counterclockwise
Summary of Contents for Indigo press 3050
Page 1: ...HP Indigo press 3050 User guide English version ...
Page 2: ...hp indigo press 3050 user guide ...
Page 13: ...12 Chapter 1 Preface ENWW ...
Page 23: ...22 Chapter 2 Getting started ENWW ...
Page 41: ...40 Chapter 4 HP Indigo press 3050 basics ENWW Figure 4 5 Related topics ...
Page 53: ...52 Chapter 5 The main windows ENWW ...
Page 83: ...82 Chapter 6 Operating the press ENWW ...
Page 91: ...90 Chapter 7 Operator routines ENWW Figure 7 7 Inner front wall O O O O ...
Page 99: ...98 Chapter 7 Operator routines ENWW ...
Page 136: ...ENWW 135 10PIP This chapter contains the following sections z Overview z Replacing the PIP ...
Page 189: ...188 Chapter 11 Paper transport ENWW ...
Page 219: ...218 Chapter 15 Scorotron ENWW ...
Page 257: ...256 Chapter 17 Pre transfer erase PTE ENWW ...
Page 271: ...270 Chapter 19 Chiller ENWW ...