background image

Safety warning notice

WARNING!

To reduce the possibility of heat-related injuries or of overheating the computer, do not place the 

computer directly on your lap or obstruct the computer air vents. Use the computer only on a hard, flat surface. 
Do not allow another hard surface, such as an adjoining optional printer, or a soft surface, such as pillows or rugs 
or clothing, to block airflow. Also, do not allow the AC adapter to come into contact with the skin or a soft 
surface, such as pillows or rugs or clothing, during operation. The computer and the AC adapter comply with the 
user-accessible surface temperature limits defined by the International Standard for Safety of Information 
Technology Equipment (IEC 60950).

iii

Summary of Contents for HP EliteBook x360 1020 G2

Page 1: ...HP EliteBook x360 1020 G2 Notebook PC Maintenance and Service Guide ...

Page 2: ...eptember 2017 Document Part Number 937041 001 Product notice This user guide describes features that are common to most models Some features may not be available on your computer Not all features are available in all editions of Windows This computer may require upgraded and or separately purchased hardware drivers and or software to take full advantage of Windows functionality Go to http www micr...

Page 3: ...other hard surface such as an adjoining optional printer or a soft surface such as pillows or rugs or clothing to block airflow Also do not allow the AC adapter to come into contact with the skin or a soft surface such as pillows or rugs or clothing during operation The computer and the AC adapter comply with the user accessible surface temperature limits defined by the International Standard for ...

Page 4: ...iv Safety warning notice ...

Page 5: ...Removal and replacement procedures preliminary requirements 21 Tools required 21 Service considerations 21 Plastic parts 21 Cables and connectors 21 Drive handling 22 Grounding guidelines 22 Electrostatic discharge damage 22 Packaging and transporting guidelines 23 Workstation guidelines 23 5 Removal and replacement procedures for Authorized Service Provider parts 25 Component replacement procedur...

Page 6: ...ducts only 41 Using HP Sure Start select products only 41 7 Using HP PC Hardware Diagnostics UEFI 42 Downloading HP PC Hardware Diagnostics UEFI to a USB device 43 8 Backing up restoring and recovering 44 Creating recovery media and backups 44 Creating HP Recovery media select products only 44 Using Windows tools 45 Restore and recovery 46 Recovering using HP Recovery Manager 46 What you need to k...

Page 7: ...ons and answers 56 Using HP Sure Start select models only 57 11 Power cord set requirements 58 Requirements for all countries 58 Requirements for specific countries and regions 58 12 Recycling 60 Index 61 vii ...

Page 8: ...viii ...

Page 9: ...400 nits FHD UWVA 1920 1080 eDP 1 3 UltraSlim touch display 700 nits touch display privacy Ultra HD UHD 3840 x 2160 eDP 1 3 UltraSlim UWVA touch display 400 nits touch display Memory On board soldered memory LPDDR3 1866 MHz dual channel support Supports up to 16 GB of system RAM Primary storage Supports M 2 SSD SS 2280 Supports the following M 2 SSDs 128 GB M2 SATA 3 VALUE 128 GB M2 SATA 3 SS TLC ...

Page 10: ...le NXP NPC300 I2C NFC antenna configured with NFC option External media cards Micro SD Media Reader Slot supports SD SDHC SDXC Ports Headphone Microphone Combo HDMI USB 3 1 Type C port 2 Docking HP Docking Station Keyboard pointing devices Keyboard Dura keys Backlit Backlit Privacy Spill resistant with drain ClickPad Gestures enabled by default two finger scrolling two finger pinch zoom Taps enabl...

Page 11: ...ome 64 Plus Windows 10 Home 64 Plus Single Language Windows 10 Professional 64 Windows 10 Professional 64 StF MSNA Plus For use with i7 processor and more than 4 GB RAM only Restore media DR DVD Windows 10 available with any Windows 10 operating system Windows 10 DRUSB for service only Certified Microsoft WHQL Windows 10 64 Web only support Windows 10 Enterprise 64 Windows 10 Enterprise 64 LTSB 16...

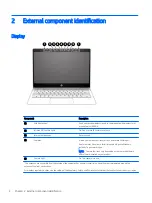
Page 12: ...s also allow a facial recognition logon to Windows instead of a password logon NOTE Camera functions vary depending on the camera hardware and software installed on your product 5 Camera light On The camera is in use The antennas are not visible from the outside of the computer For optimal transmission keep the areas immediately around the antennas free from obstructions For wireless regulatory no...

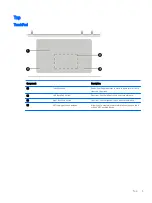
Page 13: ...activate items on the screen 2 Left TouchPad button Functions like the left button on an external mouse 3 Right TouchPad button Functions like the right button on an external mouse 4 NFC tapping area and antenna Allows you to wirelessly share information when you tap it with an NFC enabled device Top 5 ...

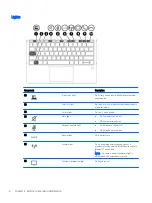
Page 14: ...puter sound is off Off Computer sound is on 5 Microphone mute light On Microphone sound is off Off Microphone sound is on 6 Num lk light On Num lock is on 7 Wireless light On An integrated wireless device such as a wireless local area network WLAN device and or a Bluetooth device is on NOTE On some models the wireless light is amber when all wireless devices are off 8 Sharing or presenting light O...

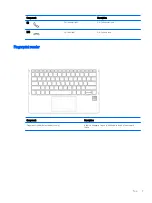
Page 15: ...all answer light On Call answer is on 10 Call end light On Call end is on Fingerprint reader Component Description Fingerprint reader select products only Allows a fingerprint logon to Windows instead of a password logon Top 7 ...

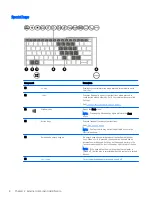
Page 16: ...used system functions See Action keys on page 9 NOTE Some products may not include all action keys in the illustration above 5 Embedded numeric keypad A numeric keypad superimposed over the keyboard alphabet keys When num lk is pressed the keypad can be used like an external numeric keypad Each key on the keypad performs the function indicated by the icon in the upper right corner of the key NOTE ...

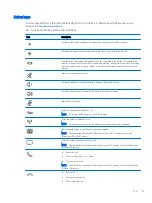
Page 17: ... incrementally while you hold down the key Increases speaker volume incrementally while you hold down the key Mutes the microphone Turns the keyboard backlight off or on NOTE To conserve battery power turn off this feature Turns the wireless feature on or off NOTE A wireless network must be set up before a wireless connection is possible Provides quick access to your Skype for Business calendar NO...

Page 18: ...gain to turn off the privacy screen NOTE To quickly turn on the highest privacy settings press fn p NOTE The action key feature is enabled at the factory You can disable this feature by pressing and holding the fn key and the left shift key The fn lock light will turn on After you have disabled the action key feature you can still perform each function by pressing the fn key in combination with th...

Page 19: ...ey To use a hot key Press the fn key and then press one of the keys listed in the following table Key Description C Turns on scroll lock E Turns on the insert function R Breaks the operation S Sends a programing query W Pauses the operation P Turns on the highest privacy settings Top 11 ...

Page 20: ...rge Connects an AC adapter that has a USB Type C connector supplying power to the computer and if needed charging the computer battery and Connects and charges most USB devices that have a Type C connector such as a cell phone camera activity tracker or smartwatch and provides high speed data transfer NOTE Cables and or adapters purchased separately may be required and Connects a display device th...

Page 21: ...ted to the jack the computer speakers are disabled 2 Security cable slot Attaches an optional security cable to the computer NOTE The security cable is designed to act as a deterrent but it may not prevent the computer from being mishandled or stolen 3 Power button When the computer is off press the button to turn on the computer When the computer is on press the button briefly to initiate Sleep W...

Page 22: ...ernal components NOTE The computer fan starts up automatically to cool internal components and prevent overheating It is normal for the internal fan to cycle on and off during routine operation 2 Speakers Produce sound 14 Chapter 2 External component identification ...

Page 23: ...r the product number or the model number Locate these numbers before you contact support Your service label will resemble one of the examples shown below Refer to the illustration that most closely matches the service label on your computer Component 1 Serial number 2 Product number 3 Warranty period 4 Model number select products only Component 1 Model name select products only 2 Product number 3...

Page 24: ...3 Illustrated parts catalog Computer major components 16 Chapter 3 Illustrated parts catalog ...

Page 25: ...r use in Italy 937419 061 For use in Spain 937419 071 For use in Denmark 937419 081 For use in Norway 937419 091 For use in Portugal 937419 031 For use in Turkey For use in Turkey F 937419 141 937419 541 For use in Greece 937419 151 For use in Latin America 937419 161 For use in Saudi Arabia 937419 171 For use in Brazil 937419 201 For use in Hungary 937419 211 For use in Russia 937419 251 For use ...

Page 26: ... L02471 051 For use in Italy L02471 061 For use in Spain L02471 071 For use in Denmark L02471 081 For use in Norway L02471 091 For use in Portugal L02471 131 For use in Turkey L02471 141 For use in Greece L02471 151 For use in Latin America L02471 161 For use in Saudi Arabia L02471 171 For use in Brazil L02471 201 For use in Hungary L02471 211 For use in Russia L02471 251 For use in Bulgaria L0247...

Page 27: ...rs 14W includes cable 937416 001 9 Rear speaker 14W 937416 001 10 System board processor is soldered with the WLAN memory thermals fans and heatsink All system boards use the following part numbers xxxxxx 001 Windows 7 or non Windows operating systems xxxxxx 601 Windows 8 1 or Windows 10 operating system Equipped with Intel Core i5 7200U processor 8 GB 937423 xxx Equipped with Intel Core i5 7300U ...

Page 28: ...y 213352 013 For use in Japan 226768 001 For use in North America 213349 015 For use in the People s Republic of China 286497 013 For use in Switzerland 213354 013 For use in Taiwan 393313 007 For use in Thailand 285096 012 For use in the United Kingdom 213351 013 For use in South Africa 361240 007 Duck Head 3 pin for Korea 2 pin for Japan 2 pin for US black 1 00 m For use in the United States 854...

Page 29: ...disassembly and reassembly can damage plastic parts Use care when handling the plastic parts Apply pressure only at the points designated in the maintenance instructions Cables and connectors CAUTION When servicing the computer be sure that cables are placed in their proper locations during the reassembly process Improper cable placement can damage the computer Cables must be handled with extreme ...

Page 30: ... Electronic components are sensitive to electrostatic discharge ESD Circuitry design and structure determine the degree of sensitivity Networks built into many integrated circuits provide some protection but in many cases ESD contains enough power to alter device parameters or melt silicon junctions A discharge of static electricity from a finger or other conductor can destroy static sensitive dev...

Page 31: ...ly Store reusable ESD sensitive parts from assemblies in protective packaging or nonconductive foam Use transporters and conveyors made of antistatic belts and roller bushings Be sure that mechanized equipment used for moving materials is wired to ground and that proper materials are selected to avoid static charging When grounding is not possible use an ionizer to dissipate electric charges Works...

Page 32: ...operator and ground To be effective the conductive must be worn in contact with the skin The following grounding equipment is recommended to prevent electrostatic damage Antistatic tape Antistatic smocks aprons and sleeve protectors Conductive bins and other assembly or soldering aids Nonconductive foam Conductive tabletop workstations with ground cords of one megohm resistance Static dissipative ...

Page 33: ...ck and can also securely erase internal drives except for encrypted self encrypting drives The HP Touchpoint Manager website http www hptouchpointmanager com provides access to the AORM lock feature The device must be unlocked using an authorized PIN from the same website before you can access HP Computer Setup and start the Windows operating system IMPORTANT A service agent cannot retrieve the PI...

Page 34: ...the computer on and then shut it down through the operating system 2 Disconnect the power from the computer by unplugging the power cord from the computer 3 Disconnect all external devices from the computer Remove the bottom cover 1 Remove the four Torx T8M2 0 4 3 screws 1 and loosen the captive screw 2 that secures the bottom cover to the computer 26 Chapter 5 Removal and replacement procedures f...

Page 35: ...urn off the computer If you are unsure whether the computer is off or in Hibernation turn the computer on and then shut it down through the operating system 2 Disconnect the power from the computer by unplugging the power cord from the computer 3 Disconnect all external devices from the computer 4 Remove the bottom cover see Bottom cover on page 26 Remove the battery 1 Disconnect the battery cable...

Page 36: ...3 Lift the battery out of the computer 3 28 Chapter 5 Removal and replacement procedures for Authorized Service Provider parts ...

Page 37: ...tem 2 Disconnect the power from the computer by unplugging the power cord from the computer 3 Disconnect all external devices from the computer 4 Remove the bottom cover see Bottom cover on page 26 5 Remove the battery see Battery on page 27 Remove the speaker assembly 1 Disconnect the front speakers from the system board 1 2 Remove the four screws securing the front speakers 2 3 Remove the plasti...

Page 38: ...Reverse this procedure to install the speaker 30 Chapter 5 Removal and replacement procedures for Authorized Service Provider parts ...

Page 39: ...nation turn the computer on and then shut it down through the operating system 2 Disconnect the power from the computer by unplugging the power cord from the computer 3 Disconnect all external devices from the computer 4 Remove the bottom cover see Bottom cover on page 26 5 Remove the battery see Battery on page 27 Remove the SSD 1 Remove the Phillips PM2 0 1 8 screw 1 that secures the drive to th...

Page 40: ...ssor 8 GB 937428 xxx Before removing the system board follow these steps 1 Turn off the computer If you are unsure whether the computer is off or in Hibernation turn the computer on and then shut it down through the operating system 2 Disconnect the power from the computer by unplugging the power cord from the computer 3 Disconnect all external devices from the computer 4 Remove the bottom cover s...

Page 41: ... Lift the right side of the system board up at an angle 1 CAUTION To avoid damaging or breaking the system board use two hands when removing the board Do not lift up on the narrow end of the board 4 Pull the flat ribbon cable through the slit in the system board 2 Component replacement procedures 33 ...

Page 42: ...d out of the computer 3 making sure the connectors on the side of the board are clear of the computer Reverse this procedure to install the system board 34 Chapter 5 Removal and replacement procedures for Authorized Service Provider parts ...

Page 43: ...onnect the power from the computer by unplugging the power cord from the computer 3 Disconnect all external devices from the computer 4 Remove the bottom cover see Bottom cover on page 26 Remove the display assembly 1 Open the computer completely and fold the display under the base enclosure 2 Remove the six Phillips screws 1 that secure the left and right brackets 3 Open the display slightly 2 4 ...

Page 44: ... 3 Disconnect all external devices from the computer 4 Remove the bottom cover see Bottom cover on page 26 5 Remove the battery see Battery on page 27 Remove the fingerprint reader board 1 Disconnect the fingerprint reader board from the system board 1 2 Remove the Phillips screw 2 that secures the assembly to the computer 3 Lift the bracket up at the screw end 3 and remove the fingerprint bracket...

Page 45: ...r by unplugging the power cord from the computer 3 Disconnect all external devices from the computer 4 Remove the bottom cover see Bottom cover on page 26 5 Remove the battery see Battery on page 27 Remove the TouchPad 1 Disconnect the NFC module antenna cable 1 from the TouchPad select models only 2 Disconnect the TouchPad cable 2 from the system board 3 Remove the five Phillips screws 3 that sec...

Page 46: ...SB port but you must first disable FastBoot 1 Turn on or restart the computer and when the HP logo appears press f9 to enter the Boot Device Options menu 2 Clear the check box for Fast Boot 3 To save your changes and exit select the Save icon in the lower right corner of the screen and then follow the on screen instructions or Select Main select Save Changes and Exit and then press enter Your chan...

Page 47: ...lect products the selections may display Restore Defaults instead of Apply Factory Defaults and Exit 3 Follow the on screen instructions 4 To save your changes and exit select the Save icon in the lower right corner of the screen and then follow the on screen instructions or Select Main select Save Changes and Exit and then press enter Your changes go into effect when the computer restarts NOTE Yo...

Page 48: ... select Check for updates and messages 3 Follow the on screen instructions 4 At the download area follow these steps a Identify the most recent BIOS update and compare it to the BIOS version currently installed on your computer Make a note of the date name or other identifier You may need this information to locate the update later after it has been downloaded to your hard drive b Follow the on sc...

Page 49: ...ly HP will not be responsible for any related liabilities TPM provides additional security for your computer You can modify the TPM settings in Computer Setup BIOS NOTE If you change the TPM setting to Hidden TPM is not visible in the operating system To access TPM settings in Computer Setup 1 Start Computer Setup See Starting Computer Setup on page 38 2 Select Security select TPM Embedded Securit...

Page 50: ...ow to correct the problem NOTE To start diagnostics on a convertible computer your computer must be in notebook mode and you must use the keyboard attached To start HP PC Hardware Diagnostics UEFI follow these steps 1 Turn on or restart the computer and quickly press esc 2 Press f2 The BIOS searches three places for the diagnostic tools in the following order a Connected USB drive NOTE To download...

Page 51: ...FI version 1 Go to http www hp com go techcenter pcdiags The HP PC Diagnostics home page is displayed 2 In the HP PC Hardware Diagnostics section select the Download link and then select Run Download any version of UEFI for a specific product 1 Go to http www hp com support 2 Select Get software and drivers 3 Enter the product name or number 4 Select your computer and then select your operating sy...

Page 52: ...ating system in cases where the hard drive is corrupted or has been replaced For information on creating recovery media see Creating HP Recovery media select products only on page 44 For information on the recovery options that are available using the recovery media see Using Windows tools on page 45 Use Windows tools to create system restore points and create backups of personal information For m...

Page 53: ...ia you can use an external optical drive purchased separately to create recovery discs If you use an external optical drive it must be connected directly to a USB port on the computer the drive cannot be connected to a USB port on an external device such as a USB hub If you cannot create DVD media yourself you can obtain recovery discs for your computer from HP You can find contact information on ...

Page 54: ... select products if you want to recover the computer s original factory partition and content or if you have replaced the hard drive you can use the Factory Reset option of HP Recovery media For more information see Recovering using HP Recovery Manager on page 46 On select products if you want to remove the Recovery partition to reclaim hard drive space HP Recovery Manager offers the Remove Recove...

Page 55: ... was installed at the factory The HP Recovery partition select products only allows System Recovery only Using the HP Recovery partition select products only The HP Recovery partition allows you to perform a system recovery without the need for recovery discs or a recovery USB flash drive This type of recovery can be used only if the hard drive is still working To start HP Recovery Manager from th...

Page 56: ...or tablets without keyboards Turn on or restart the tablet and then quickly hold down the volume up button then select f9 or Turn on or restart the tablet and then quickly hold down the volume down button then select f9 3 Select the optical drive or USB flash drive from which you want to boot 4 Follow the on screen instructions Removing the HP Recovery partition select products only HP Recovery Ma...

Page 57: ...V dc 3 5 A 65 W Temperature Operating 5 C to 35 C 41 F to 95 F Nonoperating 20 C to 60 C 4 F to 140 F Relative humidity noncondensing Operating 10 to 90 Nonoperating 5 to 95 Maximum altitude unpressurized Operating 15 m to 3 048 m 50 ft to 10 000 ft Nonoperating 15 m to 12 192 m 50 ft to 40 000 ft NOTE Applicable product safety standards specify thermal limits for plastic surfaces The device opera...

Page 58: ...l below to restore the nonvolatile memory that can contain personal data Restoring or reprogramming nonvolatile memory that does not store personal data is neither necessary nor recommended a Turn on or restart the computer and then press esc while the Press the ESC key for Startup Menu message is displayed at the bottom of the screen IMPORTANT If the Main menu displays Restore Defaults instead of...

Page 59: ...d retain the storage drive or Clear the drive contents by using a third party utility designed to erase data from an SSD or Clear the contents of the drive by using the following BIOS Setup Secure Erase command option steps IMPORTANT If you clear data using Secure Erase it cannot be recovered a Turn on or restart the computer and then press esc while the Press the ESC key for Startup Menu message ...

Page 60: ...S Security to factory default Click Yes at the warning message g Select the Main menu select Save Changes and Exit select Yes to save changes and exit and then select Shutdown h Reboot the system If the system has a Trusted Platform Module TPM and or fingerprint reader one or two prompts will appear one to clear the TPM and the other to Reset Fingerprint Sensor press or tap F1 to accept or F2 to r...

Page 61: ...puter and then press esc while the Press the ESC key for Startup Menu message is displayed at the bottom of the screen b Select the Security menu and scroll down to the Utilities menu c Select Hard Drive Tools d Under Utilities select Disk Sanitizer select the hard drive storing the data you want to clear and then follow the on screen instructions to continue 53 ...

Page 62: ... customer accessible No Yes Stores NIC configuration and NIC firmware NIC EEPROM is programmed using a utility from the NIC vendor that can be run from DOS A utility is required to write data to this memory and is available from the NIC vendor Writing data to this ROM in an inappropriate manner will render the NIC non functional DIMM Serial Presence Detect SPD configuration data 256 Bytes per memo...

Page 63: ...ally signed by Intel can be applied using this utility Bluetooth flash 2 Mbit No Yes Stores Bluetooth configuration and firmware Bluetooth flash is programmed at the factory Tools for writing data to this memory are not publicly available but can be obtained from the silicon vendor A utility is required for writing data to this memory and is made available through newer versions of the driver when...

Page 64: ...m diagnostics The UEFI BIOS provides functionality beyond that of the legacy BIOS In addition the UEFI BIOS works to initialize the computer s hardware before loading and executing the OS the run time environment allows the loading and execution of software programs from storage devices to provide more functionality such as advanced hardware diagnostics with the ability to display more detailed sy...

Page 65: ... Boot Keys a Turn on or restart the computer and then press esc while the Press the ESC key for Startup Menu message is displayed at the bottom of the screen b Select the Security menu select Secure Boot Configuration and then follow the on screen instructions c At the Secure Boot Configuration window select Secure Boot select Clear Secure Boot Keys and then follow the on screen instructions to co...

Page 66: ...st be approved by an acceptable accredited agency responsible for evaluation in the country or region where the power cord set will be used The power cord sets must have a minimum current capacity of 10 amps and a nominal voltage rating of 125 or 250 V AC as required by the power system of each country or region The appliance coupler must meet the mechanical configuration of an EN 60 320 IEC 320 S...

Page 67: ...wall plug must bear a T mark and registration number in accordance with the Japanese Dentori Law The flexible cord must be Type VCT or VCTF 3 conductor 1 00 mm conductor size The wall plug must be a two pole grounding type with a Japanese Industrial Standard C8303 7 A 125 V configuration 4 The flexible cord must be Type RVV 3 conductor 0 75 mm conductor size Power cord set fittings appliance coupl...

Page 68: ...in general household waste Follow the local laws and regulations in your area for battery disposal HP encourages customers to recycle used electronic hardware HP original print cartridges and rechargeable batteries For more information about recycling programs see the HP Web site at http www hp com recycle 60 Chapter 12 Recycling ...

Page 69: ... keyboard or USB mouse to start Computer Setup 38 computer setup 38 computer specifications 49 connector power 12 connectors service considerations 21 D display assembly removal 35 display panel product description 1 docking product description 2 drives preventing damage 22 DVD ROM Drive precautions 22 DVD RW Double Layer with SuperMulti Drive precautions 22 E electrostatic discharge 22 embedded n...

Page 70: ...1 pointing device product description 2 ports HDMI 12 product description 2 USB Type C power connector and Thunderbolt port with HP Sleep and Charge 12 power button identifying 13 power connector identifying 12 power cord set requirements 58 spare part numbers 20 power requirements product description 2 primary storage product description 1 privacy key light 6 processor product description 1 produ...

Page 71: ...rt using 41 system board removal 32 spare part numbers 19 32 system memory removing personal data from volatile 50 system recovery 46 system restore point creating 45 system restore point creating 44 T Thunderbolt port with HP Sleep and Charge identifying USB Type C 12 tools required 21 TouchPad spare part numbers 19 Touchpad removal 37 spare part number 37 TouchPad zone identifying 5 TPM settings...

Reviews: