18
2.
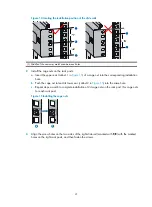
Loosen the fastening screws on the lower cable management bracket with a Phillips screwdriver.
3.
Align the keyhole standoffs on the rear of the lower cable management bracket with the keyholes
on the chassis and remove the cable management bracket.
4.
Align the keyhole standoffs on the lower expansion cable management bracket (with no mark)
with the keyholes on the chassis.
5.
Push the expansion cable management bracket forward until it makes close contact with the chassis.
Then pull the expansion cable management bracket downwards until the keyhole standoff fits into
the keyhole on the chassis.
6.
Unpack the screws come with the expansion cable management bracket and fasten them with a
Phillips screwdriver to secure the expansion cable management bracket to the chassis.
7.
Install the removed filler panel or card. For more information, see "
."
For illustration of the installation procedure for a lower cable management bracket, see callouts 2 to 7
Installing a chassis air filter (optional)
Chassis air filters are installed at the air intake vents to prevent dust from entering the chassis. Chassis air
filters of the 12500E switches are optional. You can order them as needed.
If you have ordered chassis air filters, HP recommends you to install the air filters before mounting the
switch to the rack.
•
12508E
—The air filter is located at the front of the chassis. For the installation procedures, see
"Installing an air filter on a 12508E."
•
12518E
—The air filter is located at the rear of the chassis. For the installation procedures, see
"Installing an air filter on a 12518E."
Installing an air filter on a 12508E
1.
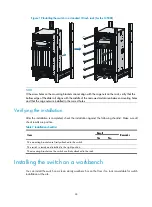
Hold the notches of the front plastic panel at the bottom part of the chassis, and gently pull the
plastic panel out.
2.
Unpack the air filter, attach it to rear of the plastic panel, align installation holes on the air filter
with the screw holes on the plastic panel, and secure the air filter to the plastic panel with screws.
3.
Mount the plastic panel back to the chassis.


