background image


11

2.3


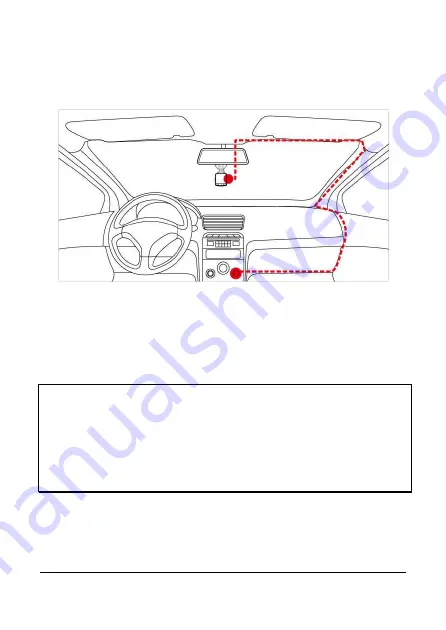
Connecting to Power 

Use only the supplied car adapter to power up the camcorder and charge 
the built-in battery. 


1.


Connect one end of the car adapter to the USB connector of the 
camcorder. USB port input: DC 5V / 1A. 

2.


Plug the other end of the car charger to the cigarette lighter socket 
of your vehicle. Once the vehicle engine is started, the camcorder 
automatically turns on. Car charger input: DC 12 / 24V. 


Note:   

1. To use the products of the attached power charger only, please do not use other 

brand power charger, in order to avoid equipment burn or cause the battery 
explosion. 

2. When first use this camcorder, please charging to battery full. 
3. Please take note if the environment temperature reaches 45°C or above, the car 

adapter still can supply power to camcorder, but it will not charge the Lithium-ion 
battery. This is the characteristic of Lithium-ion and is not a malfunction.   


Summary of Contents for f530

Page 1: ...f530 Car Camcorder User Manual ...

Page 2: ...mory Card 8 2 2 Installing in Vehicles 9 2 2 1 Mount to Windshield 9 2 2 2 Adjust the camcorder position 10 2 3 Connecting to Power 11 2 4 LED Indicator 12 2 5 Powering the Camcorder On Off 13 2 5 1 Manual Power On Off 13 2 5 1 1 Power On 13 2 5 1 2 Power Off 13 2 5 1 3 Reset the camcorder 13 2 5 2 Set the Date and Time 14 3 Using the Car Recorder 15 3 1 Recording Videos 15 3 1 1 Record videos whi...

Page 3: ...ng Screen 17 3 1 5 Taking Snapshot 18 3 2 Playback Videos and Photos 19 3 2 1 Playing Videos Viewing Photos 19 3 2 2 The Playback Screen 20 3 2 3 Deleting Files 21 4 Adjusting the Settings 22 4 1 Using the Menu 22 4 2 Menu Tree 23 5 Specifications 25 ...

Page 4: ...ever there is no guarantee that interference will not occur in a particular installation If this equipment does cause harmful interference to radio or television reception which can be determined by turning the equipment off and on the user is encouraged to try to correct the interference by one or more of the following measures Reorient or relocate the receiving antenna Increase the separation be...

Page 5: ...natural resources and ensure that it is recycled in a manner that protects human health and environment CE Regulatory Notice The product herewith complies with the requirements of the Low Voltage Directive 2014 35 EU the EMC Directive 2014 30 EU the Battery directive 2006 66 EC and the RoHS Directive 2011 65 EC Battery warning Never dismantle crush or pierce the battery or allow the battery to sho...

Page 6: ...e that the installation position is not hindered by the tinted window Caution Use the authorized charger only Never disassemble or attempt repair of this product Doing so may damage the camcorder cause electric shock and void your product warranty Never short circuit the battery Set up time and date accurately before you use this camcorder Exposing the camcorder to open flames can cause explosion ...

Page 7: ...Imaging HDR Super HD 2304 1296 Up to 150 Degree Wide Angle Glass Lens IR Filter Built in G sensor Motion Detection Collision Detection Emergency Recording File Advanced Driver Assistance Systems ADAS 1 2Package Contents The package contains the following items In case there is any missing or damaged item contact your dealer immediately Camcorder Bracket CD ROM Quick start guide Car adapter ...

Page 8: ...own Button 3 Memory Card Slot 10 Enter Button 4 USB Connector 11 Speaker 5 Back Button 12 Wide Angle Lens 6 LED Indicator 13 Microphone 7 LCD Panel 14 HD Mini HDMI Connector Note To operate the camcorder press the corresponding buttons 5 8 9 10 according to guide icons shown the screen ...

Page 9: ...rned on This may damage the memory card 2 It is recommended to use a 32GB Class 10 or above micro SD card 3 Please format the micro SD cards before the initial use 4 If the screen shows Low Speed Card while recording it means the writing speed of the memory card is too slow Please replace it with a higher speed memory card 5 If Card is too fragmented is displayed while recording it means the card ...

Page 10: ... you hear a click 2 Before installing the bracket please use alcohol to clean the windshield and suction cup of the bracket Wait for dry and press suction cup on the windshield 3 Hold the base firmly on the windshield and press down the clamp to mount the car holder to the windshield Make sure the base is securely locked in place ...

Page 11: ...10 2 2 2 Adjust the camcorder position 1 Loose the knob to swivel the device vertically or horizontally 2 Then tighten the knob to make sure the camcorder is securely locked in place Knob ...

Page 12: ...ed the camcorder automatically turns on Car charger input DC 12 24V Note 1 To use the products of the attached power charger only please do not use other brand power charger in order to avoid equipment burn or cause the battery explosion 2 When first use this camcorder please charging to battery full 3 Please take note if the environment temperature reaches 45 C or above the car adapter still can ...

Page 13: ...car adapter to charge the battery battery is full charged 2 4LED Indicator Status Explanation LED Indicator Color Power off battery charging Green Power off battery full charged LED light off Power on battery charging Green Power on battery full charged LED light off Recording Recording and screen off Flash red ...

Page 14: ... up to the OFF position Before taking out memory card please wait until power off sequence completed and the screen turn off Do not take out memory card during power off sequence to prevent recorded video loss or corruption 2 5 1 3 Reset the camcorder In rare occasions the camcorder may experience an error for unknown reasons In this case please press OK button for at least 8 seconds to turn off t...

Page 15: ...e do the following 1 Press the button to enter the OSD menu 2 Press the button to select Date Time and press the button 3 Press the button to adjust the value and press the button to move to another field 4 Repeat step 3 until the date and time setting is complete ...

Page 16: ...ote On some cars the recording will continue when the engine is switched off If this happens please manually turn off the cigarette lighter or remove the car adapter from the cigarette lighter 3 1 2 Record all other types of videos 1 Press the button to start recording 2 Press the button to stop recording Note 1 It can be configured to save a video file for every 3 or 5 minutes of recording 2 The ...

Page 17: ...tically trigger the emergency recording The recording will last 20 seconds after collision 2 The emergency recording file is created as a new file which will be protected to avoid being overwritten by normal cycling recording 4G memory card can save up to 5 emergency video files and 8G or above memory card can save up to 10 emergency video files The alert message of Emergency files are full will p...

Page 18: ... date and time 3 Guide icon Menu Press the button to enter the OSD menu 4 Guide icon Playback Press the button to switch to Playback mode 6 Battery Indicates the remaining battery power 7 Guide icon Stop Press the button to stop the recording 8 Guide icon Emergency Press the button to continuously record the video in one file until the recording is manually stopped ...

Page 19: ...Snapshot You can also use this camcorder to take snapshots of the current scene From the standby screen press the button to take a snapshot Note If recording is in progress press the button to stop the recording first ...

Page 20: ...l screen Note From the standby screen you can directly enter Playback mode by pressing button The last recorded video is displayed on the screen 3 2 1 Playing Videos Viewing Photos To play videos do the following 1 If recording is in progress press the button to stop recording 2 Press the button to enter the OSD menu 3 Press the button to select File Playback and press the button 4 Press the butto...

Page 21: ...enabled in the Settings menu 3 Guide icon Back Press the button to return to file selection display 4 Guide icon Previous Press the button to view the previous video photo 5 Guide icon Next Press the button to view the next video photo 6 Guide icon Pause Press the button to pause the video playback 7 Total recorded time Indicates total recorded time 8 Current Duration Indicates the elapsed time 9 ...

Page 22: ...button 4 Press the button to select the file category and press the button 5 Press the button to select the file that you want to delete and press the button to enter the Delete menu 6 Press the button to select an option Item Description Delete One Delete the current file Delete All Delete all files 7 Press the button to confirm delete Note Deleted files cannot be recovered Ensure the files have ...

Page 23: ...y OSD menus 1 If recording is in progress press the button to stop recording 2 Press the button to open the OSD menu 3 Press the button to select a menu option and press the button to enter the selected menu 4 Press the button to select the desired setting and press the button to confirm the setting 5 Press the button to exit the menu ...

Page 24: ...1920 X 1080 p30 HDR 1280 X 720 p60 Photo Resolution Set the photo resolution 13M 4800 X 2700 9M 4000 X 2250 4M 2688 X 1512 Image Quality Set different image quality for the recording videos S Fine Fine Normal EV Set the exposure compensation Press button to set the exposure level You may customize it between 2 0 2 0 ADAS Detect Enable Disable Lane Departure Warning Systems LDWS Low Light Warning S...

Page 25: ...nd is in good condition Motion Detection can record continuously for about 30 minutes On Off Collision Detection The camcorder will automatically trigger emergency recording when tremor of a collision is detected Off low medium high Frequency Reduce flicker on LCD Auto 60Hz 50Hz Language Set the on screen display menu language According to the actual shipping regions File Deletion Delete the file ...

Page 26: ...2 0 f 2 6mm Focus range 0 5m Infinity Video Resolution WFHD 2560 x 1080 30fps Super HD 2304 x 1296 30fps Full HD 1920 x 1080 30fps HDR HD 1280 x 720 60fps Format MOV Still image Photograph In Photo mode available resolutions are 13 Megapixel 4800 x 2700 9 Megapixel 4000 x 2250 4 Megapixel 2688 x 1512 Format DCF JPEG Shutter Electronic shutter Auto 1 2 1 2000 sec G Sensor 3 Axis G Force sensor ISO ...

Page 27: ...ce Mini USB Battery Built in 470mAH Li polymer rechargeable This battery is NOT replaceable Operating Temperature 0 50 C Operating Humidity 20 70 RH Storage Temperature 20 80 C Dimensions 65 x 70 x 27 mm Weight Approx 92g without memory card ...

Reviews: