background image

Entering a DriveLock password

Be sure that the hard drive is inserted into the computer (not into an optional docking device or
external MultiBay).

At the 

DriveLock Password

 prompt, type your user or master password (using the same kind of

keys you used to set the password), and then press 

enter

.

After 2 incorrect attempts to enter the password, you must shut down the computer and try again.

Changing a DriveLock password

To change a DriveLock password in Computer Setup, follow these steps:

1.

Turn on the computer, and then press 

esc

 while the “Press the ESC key for Startup Menu”

message is displayed at the bottom of the screen.

2.

Press 

f10

 to enter Computer Setup.

3.

Use a pointing device or the arrow keys to select 

Security


>


DriveLock

, and then press 

enter

.

4.

Enter the BIOS Administrator password, and then press 

enter

.

5.

Use a pointing device or the arrow keys select Set DriveLock Password, and then press 

enter

.

6.

Use the arrow keys to select an internal hard drive, and then press 

enter

.

7.

Use a pointing device or the arrow keys to select 

Change Password

.

8.

When prompted, type your current password, and then press 

enter

.

9.

When prompted, type a new password, and then press 

enter

.

10.

When prompted, type the new password again to confirm, and then press 

enter

.

11.

To save your changes and exit Computer Setup, click the 

Save

 icon in the lower-left corner of

the screen, and then follow the on-screen instructions.

– or –

Use the arrow keys to select 

File


>


Save Changes and Exit

, and then press 

enter

.

Your changes go into effect when the computer restarts.

Removing DriveLock protection

To remove DriveLock protection in Computer Setup, follow these steps:

1.

Turn on the computer, and then press 

esc

 while the “Press the ESC key for Startup Menu”

message is displayed at the bottom of the screen.

2.

Press 

f10

 to enter Computer Setup.

3.

Use a pointing device or the arrow keys to select 

Security


>


DriveLock

, and then press 

enter

.

4.

Enter the BIOS Administrator password, and then press 

enter

.

5.

Use a pointing device or the arrow keys to select 

Set DriveLock Password

, and then press

enter

.

Using passwords

55

Summary of Contents for EliteBook 820 G1

Page 1: ...Getting Started HP Notebook ...

Page 2: ...uide describes features that are common to most models Some features may not be available on your computer To obtain the latest information in this guide contact support For U S support go to http www hp com go contactHP For worldwide support go to http welcome hp com country us en wwcontact_us html Software terms By installing copying downloading or otherwise using any software product preinstall...

Page 3: ...other hard surface such as an adjoining optional printer or a soft surface such as pillows or rugs or clothing to block airflow Also do not allow the AC adapter to come into contact with the skin or a soft surface such as pillows or rugs or clothing during operation The computer and the AC adapter comply with the user accessible surface temperature limits defined by the International Standard for ...

Page 4: ...iv Safety warning notice ...

Page 5: ...ting to a wireless network 16 Connecting to an existing WLAN 16 Setting up a new WLAN network 16 Configuring a wireless router 17 Protecting your WLAN 17 4 Navigating using the keyboard touch gestures and pointing devices 18 Using the keyboard 18 Identifying the hot keys 18 Using keypads 19 Using the embedded numeric keypad 19 Turning the embedded numeric keypad on and off 20 Switching key functio...

Page 6: ...o 26 VGA 26 DisplayPort 27 6 Power management 28 Shutting down the computer 28 Refreshing your software content with Intel Smart Connect Technology 29 Setting power options 29 Using power saving states 29 Initiating and exiting Sleep 29 Initiating and exiting Hibernation 30 Using the power meter and power settings 30 Setting password protection on wakeup 30 Using battery power 30 Finding additiona...

Page 7: ... smart card 39 Using a USB device 39 Connecting a USB device 40 Removing a USB device 40 Using optional external devices 40 Using optional external drives 41 8 Drives 42 Handling drives 42 Using hard drives 42 Removing or replacing the service door 43 Removing the service door 43 Replacing the service door 43 Replacing or upgrading the hard drive 44 Removing the hard drive 44 Installing a hard dri...

Page 8: ... 58 Installing an optional security cable 58 Using the fingerprint reader select models only 59 Locating the fingerprint reader 59 10 Maintenance 60 Inserting or removing the battery 60 Removing or replacing the service door 62 Removing the service door 62 Replacing the service door 63 Replacing or upgrading the hard drive 64 Removing the hard drive 64 Installing a hard drive 64 Adding or replacin...

Page 9: ...8 Downloading a BIOS update 78 Using MultiBoot 80 About the boot device order 80 Choosing MultiBoot preferences 80 Setting a new boot order in Computer Setup 80 Dynamically choosing a boot device using the f9 prompt 81 Setting a MultiBoot Express prompt 81 Entering MultiBoot Express preferences 82 Using HP PC Hardware Diagnostics UEFI select models only 82 Downloading HP PC Hardware Diagnostics UE...

Page 10: ...x ...

Page 11: ...nce Guide For instructions on accessing this guide see Finding information on page 2 Get to know your computer Learn about your computer features See Getting to know your computer on page 4 and Navigating using the keyboard touch gestures and pointing devices on page 18 for additional information Find installed software Access a list of the software preinstalled on the computer Select Start All Pr...

Page 12: ...ldwide support go to http welcome hp com country us en wwcontact_us html Operating system information Software driver and BIOS updates Troubleshooting tools How to access support Regulatory Safety and Environmental Notices To access this guide Select Start Help and Support User Guides Regulatory and safety information Battery disposal information Safety Comfort Guide To access this guide Select St...

Page 13: ...rinted format you may request a printed copy from http www hp com go orderdocuments or write to North America Hewlett Packard MS POD 11311 Chinden Blvd Boise ID 83714 USA Europe Middle East Africa Hewlett Packard POD Via G Di Vittorio 9 20063 Cernusco s Naviglio MI Italy Asia Pacific Hewlett Packard POD P O Box 200 Alexandra Post Office Singapore 9115077 When you request a printed copy of your war...

Page 14: ...nal mouse 3 TouchPad on off button Turns the TouchPad on and off 4 TouchPad zone Moves the pointer and selects or activates items on the screen 5 Left TouchPad button Functions like the left button on an external mouse 6 Right pointing stick button Functions like the right button on an external mouse 7 Right TouchPad button Functions like the right button on an external mouse 4 Chapter 2 Getting t...

Page 15: ...ernation 2 Caps lock light On Caps lock is on 3 Microphone mute light On Microphone is muted 4 Num lock light On Num lock is on 5 Wireless light White An integrated wireless device such as a wireless local area network WLAN device is on Amber All wireless devices are off 6 Mute light Amber Computer sound is off Off Computer sound is on Top 5 ...

Page 16: ...the button briefly to exit Hibernation If the computer has stopped responding and Microsoft Windows shutdown procedures are ineffective press and hold the power button for at least 5 seconds to turn off the computer To learn more about your power settings Select Start Control Panel System and Security Power Options For more information see the HP Notebook Reference Guide 2 Speakers 2 Produce sound...

Page 17: ...Component Description 4 Volume mute button Mutes and restores speaker sound 5 Fingerprint reader select models only Allows a fingerprint logon to Windows instead of a password logon Top 7 ...

Page 18: ...ute frequently used system functions when pressed in combination with the fn key For more information see Navigating using the keyboard touch gestures and pointing devices on page 18 5 Embedded numeric keypad When the keypad is turned on it can be used like an external numeric keypad Each key on the keypad performs the function indicated by the icon in the upper right corner of the key 6 num lk ke...

Page 19: ... The computer is connected to external power and the battery is charged from 90 to 99 percent Blinking amber A battery that is the only available power source has reached a low battery level When the battery reaches a critical battery level the battery light begins blinking rapidly Off The battery is fully charged 4 Hard drive light Blinking white The hard drive is being accessed Amber HP 3D Drive...

Page 20: ...is connected to the jack the computer speakers are disabled NOTE Be sure that the device cable has a 4 conductor connector that supports both audio out headphone and audio in microphone 2 DisplayPort Connects an optional digital display device such as a high performance monitor or projector 3 USB 3 0 ports 2 Connect optional USB 3 0 devices and provide enhanced USB power performance 4 Memory card ...

Page 21: ...an to cycle on and off during routine operation 3 External VGA monitor port Connects an external VGA monitor or projector 4 USB 3 0 charging port Connects an optional USB device The USB charging port can also charge select models of cell phones and MP3 players even when the computer is off NOTE A USB charging port also referred to as a powered USB port allows you to charge connected USB devices St...

Page 22: ... On The webcam is in use 5 Webcam select models only Records video and captures still photographs To use the webcam select Start All Programs Communication and Chat HP Webcam 6 Internal display switch Turns off the display or initiates Sleep if the display is closed while the power is on NOTE The display switch is not visible from the outside of the computer The antennas are not visible from the o...

Page 23: ...revent an unresponsive system replace the wireless module only with a wireless module authorized for use in the computer by the governmental agency that regulates wireless devices in your country or region If you replace the module and then receive a warning message remove the module to restore computer functionality and then contact support through Help and Support Bottom 13 ...

Page 24: ...prevent the service door from being accidentally removed 3 Vents 2 Enable airflow to cool internal components NOTE The computer fan starts up automatically to cool internal components and prevent overheating It is normal for the internal fan to cycle on and off during routine operation 14 Chapter 2 Getting to know your computer ...

Page 25: ... help you set up a new Internet account or configure the computer to use an existing account Internet Services Offers available in some locations This utility assists with signing up for a new Internet account and configuring the computer to use an existing account To access this utility select Start All Programs Communication and Chat ISP provided icons available in some locations These icons may...

Page 26: ...ect to NOTE If no WLANs are listed you may be out of range of a wireless router or access point NOTE If you do not see the WLAN you want to connect to click Open Network and Sharing Center and then click Set up a new connection or network A list of options is displayed You can choose to manually search for and connect to a network or to create a new network connection 5 Click Connect 6 If the netw...

Page 27: ...ork Then follow the on screen instructions NOTE It is recommended that you initially connect your new wireless computer to the router by using the network cable provided with the router When the computer successfully connects to the Internet you can disconnect the cable and then access the Internet through your wireless network Protecting your WLAN When you set up a WLAN or access an existing WLAN...

Page 28: ...ates Hibernation and the information stored in system memory is saved to the hard drive The function of the fn f3 hot key can be changed For example you can set the fn f3 hot key to initiate Hibernation instead of Sleep In all Windows operating system windows references to the sleep button apply to the fn f3 hot key fn f4 Switches the screen image among display devices connected to the system For ...

Page 29: ...ight Using keypads The computer includes an embedded numeric keypad The computer also supports an optional external numeric keypad or an optional external keyboard that includes a numeric keypad Using the embedded numeric keypad Component Description 1 fn key Turns the embedded numeric keypad on and off when pressed in combination with the num lk key NOTE The embedded numeric keypad will not funct...

Page 30: ... while the keypad is off press and hold the fn key while pressing the keypad key To use the standard function of a keypad key while the keypad is on Press and hold the fn key to type in lowercase Press and hold fn shift to type in uppercase Using an optional external numeric keypad Keys on most external numeric keypads function differently according to whether num lock is on or off Num lock is tur...

Page 31: ...ick buttons as you would the left and right buttons on an external mouse Using the TouchPad To move the pointer slide one finger across the TouchPad in the direction you want the pointer to go Use the left and right TouchPad buttons like the buttons on an external mouse Turning the TouchPad off and on To turn the TouchPad off and on quickly double tap the TouchPad on off button The TouchPad light ...

Page 32: ...ports a variety of gestures To use TouchPad gestures place two fingers on the TouchPad at the same time NOTE TouchPad gestures are not supported in all programs To view the demonstration of a gesture 1 Click the Show hidden icons icon in the notification area at the far right of the taskbar 2 Click the Synaptics Pointing Device icon and then click Pointing Device Properties 22 Chapter 4 Navigating...

Page 33: ...hen click Settings 4 Select the check box next to the gesture that you want to turn on or off 5 Click Apply and then click OK Scrolling Scrolling is useful for moving up down or sideways on a page or image To scroll place two fingers slightly apart on the TouchPad and then drag them across the TouchPad in an up down left or right motion NOTE Scrolling speed is controlled by finger speed Pinching Z...

Page 34: ...Media keys Audio On your HP computer you can play music CDs download and listen to music stream audio content from the web including radio record audio or mix audio and video to create multimedia To enhance your listening enjoyment attach external audio devices such as speakers or headphones Connecting speakers You can attach wired speakers to your computer by connecting them to a USB port or the ...

Page 35: ...adsets to your computer follow the device manufacturer s instructions WARNING To reduce the risk of personal injury lower the volume setting before putting on headphones earbuds or a headset For additional safety information see the Regulatory Safety and Environmental Notices Checking audio functions on the computer NOTE For best results when recording speak directly into the microphone and record...

Page 36: ...ithout needing to connect to a network To enhance your viewing enjoyment use one of the video ports on the computer to connect an external monitor projector or TV Your computer may have one or more of the following external video ports VGA DisplayPort IMPORTANT Be sure that the external device is connected to the correct port on the computer using the correct cable Check the device manufacturer s ...

Page 37: ...ayPort you need a DisplayPort cable purchased separately NOTE One DisplayPort device can be connected to the DisplayPort port on the computer The information displayed on the computer screen can be simultaneously displayed on the DisplayPort device To connect a video or audio device to the DisplayPort 1 Connect one end of the DisplayPort cable to the DisplayPort port on the computer 2 Connect the ...

Page 38: ...ll be unused and disconnected from external power for an extended period Although you can turn off the computer with the power button the recommended procedure is to use the Windows shutdown command NOTE If the computer is in the Sleep state or in Hibernation you must first exit Sleep or Hibernation before shutdown is possible by briefly pressing the power button 1 Save your work and close all ope...

Page 39: ...AUTION To reduce the risk of possible audio and video degradation loss of audio or video playback functionality or loss of information do not initiate Sleep while reading from or writing to a disc or an external media card NOTE You cannot initiate any type of networking connection or perform any computer functions while the computer is in the Sleep state Initiating and exiting Sleep With the compu...

Page 40: ...over the power meter icon To use Power Options or to change the power plan click the power meter icon and select an item from the list Different power meter icons indicate whether the computer is running on battery or external power The icon also displays a message if the battery has reached a low or critical battery level Setting password protection on wakeup To set the computer to prompt for a p...

Page 41: ...r care and storage to maximize battery life Information on battery types specifications life cycles and capacity To access battery information Select Start Help and Support Learn Power Plans Frequently Asked Questions Using Battery Check Help and Support provides information on the status of the battery installed in the computer To run Battery Check 1 Connect the AC adapter to the computer NOTE Th...

Page 42: ... power meter icon in the notification area shows a low or critical battery notification NOTE For additional information about the power meter see Using the power meter and power settings on page 30 If the computer is on or in the Sleep state the computer remains briefly in the Sleep state and then shuts down and loses any unsaved information Resolving a low battery level Resolving a low battery le...

Page 43: ...Removing a battery that is the sole power source for the computer can cause loss of information To prevent loss of information save your work and shut down the computer through Windows before removing the battery 1 Remove the service door See Removing or replacing the service door on page 43 Setting power options 33 ...

Page 44: ... or remove any external media cards that you are not using Decrease screen brightness Before you leave your work initiate Sleep or shut down the computer Storing a user replaceable battery CAUTION To reduce the risk of damage to a battery do not expose it to high temperatures for extended periods of time If a computer will be unused and unplugged from external power for more than 2 weeks remove th...

Page 45: ...charge the computer battery while you are onboard aircraft WARNING To reduce potential safety issues use only the AC adapter provided with the computer a replacement AC adapter provided by HP or a compatible AC adapter purchased from HP NOTE For information on connecting to AC power see the Setup Instructions poster provided in the computer box External AC power is supplied through an approved AC ...

Page 46: ... apply to computers with user replaceable batteries 1 Shut down the computer 2 Remove the battery on the computer 3 Connect the AC adapter to the computer and then plug it into an AC outlet 4 Turn on the computer If the power lights turn on the AC adapter is working properly If the power lights remain off the AC adapter is not functioning and should be replaced Contact support for information on o...

Page 47: ...ur computer see the Getting to know your computer on page 4 section Inserting a memory card CAUTION To reduce the risk of damage to the memory card connectors use minimal force to insert a memory card 1 Hold the card label side up with the connectors facing the computer 2 Insert the card into the memory card reader and then press in on the card until it is firmly seated You will hear a sound when ...

Page 48: ...ut of the slot Using smart cards NOTE The term smart card is used throughout this chapter to mean both smart cards and Java Cards A smart card is a credit card sized accessory that carries a microchip containing memory and a microprocessor Like personal computers smart cards have an operating system to manage input and output and they include security features to protect against tampering Industry...

Page 49: ...device such as a USB keyboard mouse drive printer scanner or hub Some USB devices may require additional support software which is usually included with the device For more information about device specific software see the manufacturer s instructions These instructions may be provided with the software on disc or on the manufacturer s website The computer has at least 1 USB port that supports USB...

Page 50: ...nector do not pull on the cable to remove the USB device CAUTION To reduce the risk of loss of information or an unresponsive system use the following procedure to safely remove the USB device 1 To remove a USB device save your information and close all programs associated with the device 2 Click the remove hardware icon on the Windows desktop in the notification area at the far right of the taskb...

Page 51: ...he computer To disconnect a powered external device turn off the device disconnect it on the computer and then unplug the AC power cord Using optional external drives Removable external drives expand your options for storing and accessing information A USB drive can be added by connecting the drive to a USB port to the computer NOTE HP external USB optical drives should be connected to the powered...

Page 52: ...arged before writing to media If a drive must be mailed place the drive in a bubble pack mailer or other suitable protective packaging and label the package FRAGILE Avoid exposing a drive to magnetic fields Security devices with magnetic fields include airport walk through devices and security wands Airport conveyer belts and similar security devices that check carry on baggage use X rays instead ...

Page 53: ...he optional screw is being used or if the screw is not in used simply slide the release latch to the right 3 NOTE If you want to use the optional security screw it is stored inside the service door 2 Slide the service door towards the front of the computer 4 and lift to remove the service door 5 Replacing the service door Replace the service door after accessing the battery memory module slot hard...

Page 54: ...ng the hard drive from the hard drive bay Do not remove the hard drive while the computer is on in the Sleep state or in Hibernation If you are not sure whether the computer is off turn the computer on by pressing the power button Then shut down the computer through the operating system Removing the hard drive To remove a hard drive 1 Save your work and shut down the computer 2 Disconnect AC power...

Page 55: ...rds and then remove the drive Installing a hard drive NOTE Your computer may look slightly different from the illustration in this section To install the hard drive 1 Place the hard drive into the hard drive bay 1 ensuring that the cloth tab remains on top Using hard drives 45 ...

Page 56: ...al and because of this the hard drive works harder to locate files thus slowing down the computer Disk Defragmenter consolidates or physically reorganizes the fragmented files and folders on the hard drive so that the system can run more efficiently NOTE It is not necessary to run Disk Defragmenter on solid state drives After you start Disk Defragmenter it works without supervision However dependi...

Page 57: ...ctions Using HP 3D DriveGuard HP 3D DriveGuard protects the hard drive by parking the drive and halting data requests under either of the following conditions You drop the computer You move the computer with the display closed while the computer is running on battery power A short time after the end of one of these events HP 3D DriveGuard returns the hard drive to normal operation NOTE Because sol...

Page 58: ... the taskbar or in the Mobility Center If the software is actively protecting the drive a green check mark is superimposed over the icon If the software has been disabled a no symbol is superimposed over the icon If the software has parked the drive due to a shock event an orange cone is superimposed over the icon 48 Chapter 8 Drives ...

Page 59: ...uter HP Client Security in combination with a password smart card contactless card registered face scenes registered fingerprints or other authentication credential Unauthorized access to Computer Setup f10 BIOS administrator password in Computer Setup Unauthorized access to the contents of a hard drive DriveLock password or Automatic DriveLock password in Computer Setup Unauthorized startup from ...

Page 60: ... a Windows security feature You can also use the same password for more than one Computer Setup feature Use the following tips for creating and saving passwords When creating passwords follow requirements set by the program Do not use the same password for multiple applications or websites and do not reuse your Windows password for any other application or website Use HP Client Security s Password...

Page 61: ... of these passwords see the following topics Managing a BIOS administrator password To set change or delete this password follow these steps Setting a new BIOS administrator password 1 Turn on or restart the computer and then press esc while the Press the ESC key for Startup Menu message is displayed at the bottom of the screen 2 Press f10 to enter Computer Setup 3 Use a pointing device or the arr...

Page 62: ...or the arrow keys to select Security Change Password and then press enter 4 When prompted type your current password 5 When prompted for the new password leave the field empty and then press enter 6 Read the warning To continue select YES 7 When prompted to type your new password again leave the field empty and then press enter 8 To save your changes and exit Computer Setup click the Save icon in ...

Page 63: ...or the master password The owner of the user password should be the day to day user of the protected hard drive The owner of the master password may be either a system administrator or the day to day user The user password and the master password can be identical You can delete a user password or master password only by removing DriveLock protection from the drive DriveLock protection can be remov...

Page 64: ...eLock confirmation is case sensitive 13 To save your changes and exit Computer Setup click the Save icon in the lower left corner of the screen and then follow the on screen instructions or Use the arrow keys to select File Save Changes and Exit and then press enter Your changes go into effect when the computer restarts 54 Chapter 9 Security ...

Page 65: ... an internal hard drive and then press enter 7 Use a pointing device or the arrow keys to select Change Password 8 When prompted type your current password and then press enter 9 When prompted type a new password and then press enter 10 When prompted type the new password again to confirm and then press enter 11 To save your changes and exit Computer Setup click the Save icon in the lower left cor...

Page 66: ...veLock features Entering an Automatic DriveLock password To enable an Automatic DriveLock password in Computer Setup follow these steps 1 Turn on or restart the computer and then press esc while the Press the ESC key for Startup Menu message is displayed at the bottom of the screen 2 Press f10 to enter Computer Setup 3 Use a pointing device or the arrow keys to select Security Automatic DriveLock ...

Page 67: ...s type viruses in the Search box in Help and Support Using firewall software Firewalls are designed to prevent unauthorized access to a system or network A firewall can be a software program you install on your computer and or network or it can be a solution made up of both hardware and software There are two types of firewalls to consider Host based firewalls Software that protects only the compu...

Page 68: ...rity HP Client Security software is preinstalled on select computer models This software can be accessed through Windows Control Panel It provides security features that help protect against unauthorized access to the computer networks and critical data For more information see the HP Client Security software Help Installing an optional security cable NOTE A security cable is designed to act as a ...

Page 69: ...re and fill in your user names and passwords in supported websites and applications Locating the fingerprint reader The fingerprint reader is a small metallic sensor that is located in one of the following areas of your computer On the right side of the keyboard Depending on your computer model the reader may be oriented horizontally or vertically Both orientations require that you swipe your fing...

Page 70: ...tery bay aligning the tabs on the battery 1 with the notches on the computer and then press the battery down until it is seated 2 Slide the battery release latch 2 to lock the battery into place 3 Align the notches on the battery 1 with the tabs on the computer and then press down to close the battery 2 The battery automatically locks into place To remove the battery 60 Chapter 10 Maintenance ...

Page 71: ...shut down the computer through Windows before removing the battery 1 Remove the service door See Removing or replacing the service door on page 62 2 Slide the two battery release latches to the unlocked position 1 You will be able to see red beneath the latches Using the cloth tab tilt the battery up 2 and then lift it 3 out of the enclosure Inserting or removing the battery 61 ...

Page 72: ...ce door Remove the service door to access the battery memory module slot hard drive regulatory label and other components To remove the service door 1 With the computer turned over slide the service door release latch to the unlock position 1 and 2 remove the screw if the optional screw is being used or if the screw is not in used simply slide the release latch to the right 3 NOTE If you want to u...

Page 73: ... front edge of the computer 1 2 Slide the service cover forwards 2 until it snaps into place 3 With the battery bay toward you slide the service door release latch to the right 3 and if you choose to insert and tighten the optional screw 4 to hold the service door in place Slide the release latch to the left to lock the service door 5 NOTE If you want to use the optional screw it is stored inside ...

Page 74: ... system Removing the hard drive To remove a hard drive 1 Save your work and shut down the computer 2 Disconnect AC power and external devices connected to the computer 3 Turn the computer upside down on a flat surface 4 Remove the service door see Removing or replacing the service door on page 62 and the battery see Inserting or removing the battery on page 60 5 Loosen the 4 hard drive door screws...

Page 75: ...serting or removing the battery on page 60 and the service door see Removing or replacing the service door on page 62 4 Turn the computer right side up and then reconnect AC power and external devices to the computer 5 Turn on the computer Replacing or upgrading the hard drive 65 ...

Page 76: ...es are identical To add or replace a memory module CAUTION To prevent information loss or an unresponsive system Shut down the computer before adding or replacing memory modules Do not remove a memory module while the computer is on in the Sleep state or in Hibernation If you are not sure whether the computer is off or in Hibernation turn the computer on by pressing the power button Then shut down...

Page 77: ...place it in an electrostatic safe container 6 Insert a new memory module CAUTION To prevent damage to the memory module hold the memory module by the edges only Do not touch the components on the memory module a Align the notched edge 1 of the memory module with the tab in the memory module slot b With the memory module at a 45 degree angle from the surface of the memory module compartment press t...

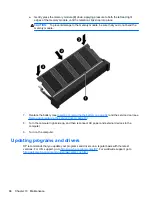
Page 78: ...battery on page 32 and the service door see Removing or replacing the service door on page 43 8 Turn the computer right side up and then reconnect AC power and external devices to the computer 9 Turn on the computer Updating programs and drivers HP recommends that you update your programs and drivers on a regular basis with the latest versions For U S support go to http www hp com go contactHP For...

Page 79: ...eaning agents can get trapped in the scratches Cleaning procedures Follow the procedures in this section to safely clean your computer WARNING To prevent electric shock or damage to components do not attempt to clean your computer while it is turned on Turn off the computer Disconnect external power Disconnect all powered external devices CAUTION Do not spray cleaning agents or liquids directly on...

Page 80: ...TouchPad and keyboard do not let liquids drip between the keys This can permanently damage internal components To clean and disinfect the TouchPad and keyboard use a soft microfiber cloth or chamois moistened with one of the cleaning solutions listed previously or use an acceptable germicidal disposable wipe To prevent keys from sticking and to remove dust lint and particles from the keyboard use ...

Page 81: ...models only or an optional external optical drive Backing up your information Creating a system image select models only Scheduling automatic backups select models only Creating system restore points Recovering individual files Restoring the computer to a previous state Recovering information using recovery tools NOTE For detailed instructions perform a search for these topics in Help and Support ...

Page 82: ... 1 Select Start All Programs Security and Protection HP Recovery Disc Creator 2 Select Driver DVD or Windows DVD 3 From the drop down menu select the drive for burning the recovery media 4 Click the Burn button to start the burning process Backing up your information Recovery after a system failure is as good as your most recent backup Immediately after software setup you should create system repa...

Page 83: ... provides the following tools to recover your files Windows recovery tools You can use Windows Backup and Restore to recover information you have previously backed up You can also use Windows Startup Repair to fix problems that might prevent Windows from starting correctly f11 recovery tools You can use the f11 recovery tools to recover your original hard drive image The image includes the Windows...

Page 84: ...recovering information using the Windows tools perform a search for these topics in Help and Support Using f11 recovery tools CAUTION Using f11 recovery tools completely erases hard drive contents and reformats the hard drive All files you have created and any software installed on the computer are permanently removed The f11 recovery tool reinstalls the operating system and HP programs and driver...

Page 85: ...ing system as well as drivers software and utilities To initiate recovery using a Windows 7 operating system DVD NOTE This process takes several minutes NOTE Your computer may not come equipped with an internal optical drive In order to use the operating system DVD you may need to plug in an external optical drive 1 If possible back up all personal files 2 Restart the computer and then insert the ...

Page 86: ... Menu message is displayed at the bottom of the screen 2 Press f10 to enter Computer Setup Navigating and selecting in Computer Setup To navigate and select in Computer Setup follow these steps 1 Turn on or restart the computer and then press esc while the Press the ESC key for Startup Menu message is displayed at the bottom of the screen NOTE You can use either a pointing device TouchPad pointing...

Page 87: ...uter Setup NOTE Restoring defaults will not change the hard drive mode To return all settings in Computer Setup to the values that were set at the factory follow these steps 1 Turn on or restart the computer and then press esc while the Press the ESC key for Startup Menu message is displayed at the bottom of the screen 2 Press f10 to enter Computer Setup 3 Use a pointing device or the arrow keys t...

Page 88: ...nstall a BIOS update only when the computer is connected to reliable external power using the AC adapter Do not download or install a BIOS update while the computer is running on battery power docked in an optional docking device or connected to an optional power source During the download and installation follow these instructions Do not disconnect power on the computer by unplugging the power co...

Page 89: ... Start Computer 2 Click your hard drive designation The hard drive designation is typically Local Disk C 3 Using the hard drive path you recorded earlier open the folder on your hard drive that contains the update 4 Double click the file that has an exe extension for example filename exe The BIOS installation begins 5 Complete the installation by following the on screen instructions NOTE After a m...

Page 90: ...r turns on or restarts Choosing MultiBoot preferences You can use MultiBoot in the following ways To set a new boot order that the computer uses each time it is turned on by changing the boot order in Computer Setup To dynamically choose the boot device by pressing esc while the Press the ESC key for Startup Menu message is displayed at the bottom of the screen and then pressing f9 to enter the Bo...

Page 91: ...uter Setup and set the computer to display the MultiBoot startup location menu each time the computer is started or restarted follow these steps 1 Turn on or restart the computer and then press esc while the Press the ESC key for Startup Menu message is displayed at the bottom of the screen 2 Press f10 to enter Computer Setup 3 Use a pointing device or the arrow keys to select System Configuration...

Page 92: ...un diagnostic tests to determine if the computer hardware is functioning properly The tool runs outside of the operating system to isolate hardware failures from issues that may be caused by the operating system or other software components To start HP PC Hardware Diagnostics UEFI 1 Turn on or restart the computer quickly press esc and then press f2 After pressing f2 the BIOS searches three places...

Page 93: ... www hp com 2 Click Support Drivers and then click the Drivers Software tab 3 Enter the product name in the text box and then click Search 4 Select your computer model and then select your operating system 5 In the Diagnostic section click HP UEFI Support Environment or Click Download and then select Run Using HP PC Hardware Diagnostics UEFI select models only 83 ...

Page 94: ...ntact support For U S support go to http www hp com go contactHP For worldwide support go to http welcome hp com country us en wwcontact_us html Here you can Chat online with an HP technician NOTE When support chat is not available in a particular language it is available in English E mail support Find support telephone numbers Locate an HP service center 84 Chapter 13 Support ...

Page 95: ...ow your computer on page 4 Service label Provides important information to identify your computer When contacting support you will probably be asked for the serial number and possibly for the product number or the model number Locate these numbers before you contact support NOTE Your service labels will resemble one of the examples shown below Refer to the illustration that most closely matches th...

Page 96: ... the countries or regions in which the devices have been approved for use SIM subscriber identity module label select models only Provides the ICCID Integrated Circuit Card Identifier of the SIM This label is located inside the battery bay HP Mobile Broadband Module service label select models only Provides the serial number of the HP Mobile Broadband Module This label is located inside the batter...

Page 97: ...ndalone DC power source it should be powered only with an AC adapter or a DC power source supplied and approved by HP for use with this computer The computer can operate on DC power within the following specifications Input Power Rating Operating voltage and current 19 5V dc 2 31 A 45 W 19 5 V dc 3 33 A 65 W NOTE This product is designed for IT power systems in Norway with phase to phase voltage n...

Page 98: ...5 F Nonoperating 20 C to 60 C 4 F to 140 F Relative humidity noncondensing Operating 10 to 90 10 to 90 Nonoperating 5 to 95 5 to 95 Maximum altitude unpressurized Operating 15 m to 3 048 m 50 ft to 10 000 ft Nonoperating 15 m to 12 192 m 50 ft to 40 000 ft 88 Chapter 14 Specifications ...

Page 99: ...e to the computer damage to a drive or loss of information Shut down the computer Take along a backup of your information Keep the backup separate from the computer When traveling by air carry the computer as hand luggage do not check it in with the rest of your bags CAUTION Avoid exposing a drive to magnetic fields Security devices with magnetic fields include airport walk through devices and sec...

Page 100: ...egulations for each country or region on your itinerary Check the power cord and adapter requirements for each location in which you plan to use the computer Voltage frequency and plug configurations vary WARNING To reduce the risk of electric shock fire or damage to the equipment do not attempt to power the computer with a voltage converter kit sold for appliances 90 Appendix A Traveling with the...

Page 101: ...ional tools that do not require an Internet connection Contact support For U S support go to http www hp com go contactHP For worldwide support go to http welcome hp com country us en wwcontact_us html Choose from the following types of support Chat online with an HP technician NOTE When chat is not available in a particular language it is available in English E mail support Find support telephone...

Page 102: ...nstructions direct you to unplug the computer unplug it after being properly grounded and before removing a cover Keep components in their electrostatic safe containers until you are ready to install them Avoid touching pins leads and circuitry Handle electronic components as little as possible Use nonmagnetic tools Before handling components discharge static electricity by touching an unpainted m...

Page 103: ... computer 69 components bottom 13 display 12 front 9 left side 11 right side 10 top 4 Computer Setup BIOS administrator password 51 DriveLock password 53 navigating and selecting 76 restoring factory settings 77 computer traveling 34 89 connector power 10 conservation power 34 critical battery level 29 critical updates software 58 D digital card inserting 37 removing 38 supported formats 37 Disk C...

Page 104: ...8 L labels Bluetooth 86 HP Mobile Broadband Module 86 regulatory 86 service 85 SIM 86 wireless certification 86 WLAN 86 latches service door release 14 legacy support USB 76 lights battery 9 caps lock 5 hard drive 9 microphone mute 5 num lock 5 power 5 9 webcam 12 wireless 5 low battery level 32 M maintenance Disk Cleanup 47 Disk Defragmenter 46 media activity controls 24 media hot keys 24 memory ...

Page 105: ... TouchPad buttons 4 using 21 TouchPad gestures pinching 23 scrolling 23 zooming 23 TouchPad zone identifying 4 traveling with the computer 34 86 89 troubleshooting resources 91 turning off the computer 28 U unresponsive system 28 USB 3 0 port 10 USB cable connecting 40 USB devices connecting 40 description 39 removing 40 USB hubs 39 USB legacy support 76 USB ports identifying 10 11 user password 5...

Reviews: