background image

Installation Note E4400-90252

 7

Install the Option UN9 (UN8 + UN9) Hardware

The following procedures describe how to install the hardware for the Option UND upgrade.

Remove the instrument covers

1. Turn the power switch off and unplug the signal generator.

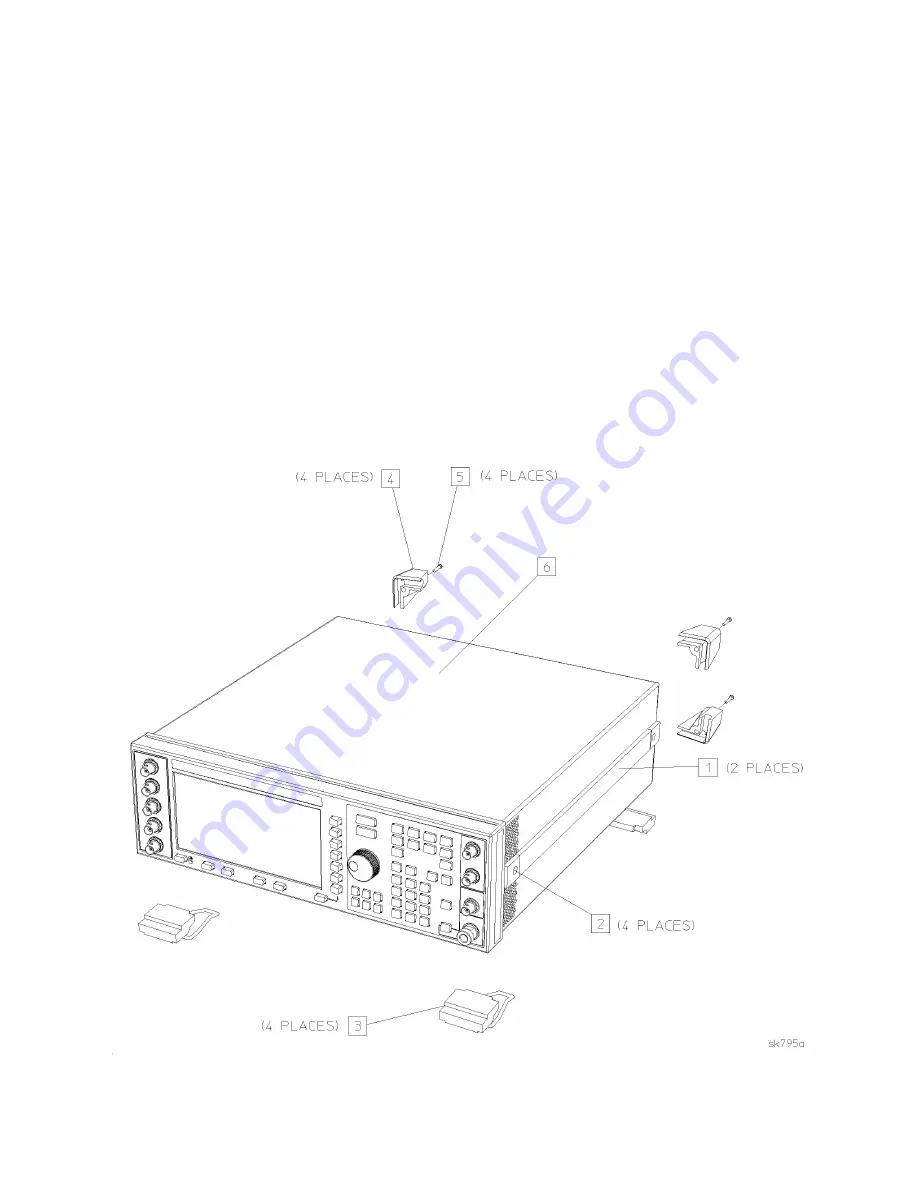
2. Remove the two strap handles (item 1 in Figure 1) from each side of the signal generator by

loosening the two screws (item 2 in Figure 1) on each handle.

3. Remove the four bottom feet (item 3 in Figure 1).

4. Remove the four rear feet (item 4 in Figure 1) from the signal generator by removing the four

screws (item 5 in Figure 1) that secure them.

5. Slide the instrument cover (item 6 in Figure 1) off the back of the signal generator.

6. Remove the top cover by removing the 11 screws that secure it.

7. Remove the bottom cover by removing the 15 screws that secure it.

Figure 1

Top Cover Removal

Summary of Contents for E4430B

Page 1: ...r E4400 90252 Printed in USA August 1999 Installation Note HP ESG D Series Signal Generators HP E4430B HP E4431B HP E4432B and HP E4433B Upgrade Standard ESG D B Add Option UN9 UN8 UN9 HP Kit Part Number E4400 60185 ...

Page 2: ...rd to this material including but not limited to the implied warranties of merchantability and fitness for a particular purpose Hewlett Packard shall not be liable for errors contained herein or for incidental or consequential damages in connection with the furnishing performance or use of this material Copyright 1999 Hewlett Packard Company ...

Page 3: ...firmware 4 Verify the firmware 5 Recalibrate and reassemble the RF signal generator After Option UN9 UN8 UN9 has been installed the following major steps need to be performed to verify the operation of the signal generator 1 Activate Option UN9 UN8 UN9 2 Internally recalibrate the instrument Product Affected ESG D Series Signal Generators Models Affected HP E4430B HP E4431B HP E4432B and HP E4433B...

Page 4: ...ocket 5 8 Socket 5 5 mm Hand torque driver 9 in lbs socket 9 32 Hand torque driver 6 in lbs socket 3 16 Long nose pliers Scissors WARNING Before you disassemble the instrument turn the power switch off and unplug the instrument Failure to unplug the instrument can result in personal injury CAUTION Electrostatic discharge ESD can damage or destroy electronic components All work on electronic assemb...

Page 5: ...Data Generator A8J1 8120 5063 10 1 W5 SYMBOL SYNC to motherboard UN3 4 SYMBOL SYNC to Data Generator A8J3 8120 5063 11 1 W15 dual arbitrary waveform generator A5 to BASEBAND GEN REF 13 MHz 8120 5055 12 1 W16 dual arbitrary waveform generator A5J2 to Q OUT 8120 5055 13 1 W17 dual arbitrary waveform generator A5J1 to I OUT 8120 5055 14 1 W18 rear panel interface board A17 to dual arbitrary waveform ...

Page 6: ...enerator The green LED should again be lit and the instrument will perform a check 3 When the display is lit check to see if the ERR annunciator is displayed 4 If the ERR annunciator is displayed review the error messages in the queue by pressing Utility Error Info The first error message in the queue will be shown in the text area of the display Refer to the service guide for information about th...

Page 7: ... of the signal generator by loosening the two screws item 2 in Figure 1 on each handle 3 Remove the four bottom feet item 3 in Figure 1 4 Remove the four rear feet item 4 in Figure 1 from the signal generator by removing the four screws item 5 in Figure 1 that secure them 5 Slide the instrument cover item 6 in Figure 1 off the back of the signal generator 6 Remove the top cover by removing the 11 ...

Page 8: ...instrument rear panel 1 Disconnect A16W1 from the power supply A4 A16W1 can be accessed through an opening on the bottom of the power supply shield item 1 in Figure 2 2 Disconnect the COHERENT CARRIER cable W12 from the rear panel Figure 2 A16W1 Location ...

Page 9: ...r Panel 8 Remove the screws securing the line module and the nut that attaches the green ground wire 9 Loosen the nut that secures the COHERENT CARRIER cap Also remove the screw that holds the chain and remove it from the rear panel 10 Loosen the nut that secures the serial tag and remove it 11 Remove three BNC cables BASEBAND GEN REF IN I OUT and Q OUT and set the standard rear panel aside 12 Pul...

Page 10: ...out single UN9 label and attach to the serial tag option location This identifies the instrument as having Option UN9 UN8 UN9 installed 10 Reinstall the line module using the two flat head screws Make certain that the ground plug is pointed down Torque to 9 in lbs 11 Replace the nut that attaches the ground wire from the line module to the ground stud on the rear panel Torque to 9 in lbs Install t...

Page 11: ...T connector to W1 2 Remove the nut and washer that secures the front panel Q INPUT connector to W2 3 Remove the existing INPUT overlay from the left side of the front panel Use Safety Solvent Cleaner to remove any remaining glue from the front panel CAUTION Always read and follow all precautions and directions for the Safety Solvent Cleaner Figure 4 Front Panel ...

Page 12: ... nut and spring washer Torque to 21 in lbs 9 Install W5 in the SYMBOL SYNC hole Attach it to the BNC with a hex nut and spring washer Torque to 21 in lbs Install the Option UN9 UN8 UN9 board assemblies Refer to Figure 5 for the following procedure 1 Insert the A8 generator 8M assembly into the motherboard connector A14J4 2 Insert the A7 real time baseband generator assembly into the motherboard co...

Page 13: ...Installation Note E4400 90252 13 Figure 5 Option UN9 UN8 UN9 Top View ...

Page 14: ... A15 daughterboard INT I 5 Verify all cables listed in Table 1 are installed and routed as shown in Figure 6 Table 1 Cable Routing front to rear Cable Description Reference Designator Color Number Connection Point to Point Ribbon Cable Interconnect W19 A7P300 to A8P3 BASEBAND GENREF IN W15 8 Rear Panel to A7P403 Q OUT W16 9 Rear Panel to A7P404 I OUT W17 09 Rear Panel to A7P405 DATA W3 5 Front Pan...

Page 15: ...Installation Note E4400 90252 15 Figure 6 Cables W25 and W26 ...

Page 16: ...conditions NOTE If you enable an option that does not have the required hardware installed the menus for that option will be activated but they will be inoperable despite what the menus may seem to indicate Calibrate the signal generator and verify performance 1 Press Preset Utility Instrument Adjustments Hardware Options Calibrate Selected Items 2 Press Start Calibration and Store Results The cal...

Reviews: