background image

b.

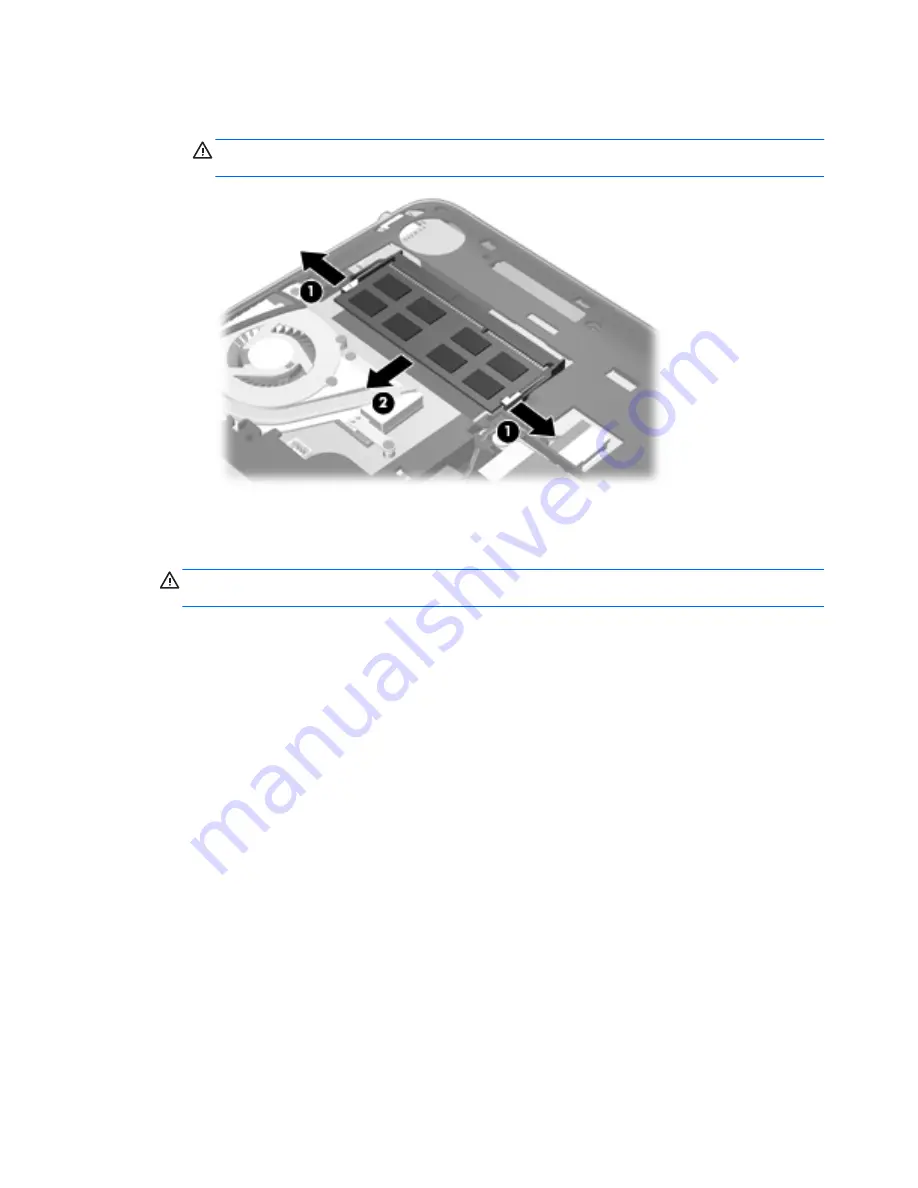
Grasp the edge of the memory module 

(2)

, and then gently pull the memory module out of

the memory module slot.

CAUTION:

To prevent damage to the memory module, hold the memory module by the

edges only. Do not touch the components on the memory module.

c.

To protect a memory module after removal, place it in an electrostatic-safe container.

4.

Insert a new memory module:

CAUTION:

To prevent damage to the memory module, hold the memory module by the edges

only. Do not touch the components on the memory module.

a.

Align the notched edge 

(1)

 of the memory module with the tab in the memory module slot.

b.

With the memory module at a 45-degree angle from the surface of the memory module
compartment, press the module 

(2)

 into the memory module slot until it is seated.

30

Chapter 6   Maintenance

Summary of Contents for Compaq Mini Series

Page 1: ...HP Mini and Compaq Mini Getting Started ...

Page 2: ...ble for technical or editorial errors or omissions contained herein First Edition May 2011 Document Part Number 647468 001 Product notice This guide describes features that are common to most models Some features may not be available on your computer Software terms By installing copying downloading or otherwise using any software product preinstalled on this computer you agree to be bound by the t...

Page 3: ...other hard surface such as an adjoining optional printer or a soft surface such as pillows or rugs or clothing to block airflow Also do not allow the AC adapter to come into contact with the skin or a soft surface such as pillows or rugs or clothing during operation The computer and the AC adapter comply with the user accessible surface temperature limits defined by the International Standard for ...

Page 4: ...iv Safety warning notice ...

Page 5: ...QuickWeb 12 4 Networking 14 Using an Internet service provider ISP 14 Connecting to a wireless network 15 Connecting to an existing WLAN 15 Setting up a new WLAN network 16 Configuring a wireless router 16 Protecting your WLAN 16 5 Keyboard and pointing devices 17 Using the keyboard 17 Identifying the hotkey 17 Using the action keys 17 Using pointing devices 20 Setting pointing device preferences ...

Page 6: ...drive 28 Replacing the memory module 29 7 Backup and recovery 32 Restore 32 Creating restore media 33 Performing a system restore 33 Restoring using the dedicated recovery partition select models only 34 Restoring using the restore media 34 Changing the computer boot order 35 Backing up your information 36 Using Windows Backup and Restore 36 Using Windows system restore points 36 When to create re...

Page 7: ...Operating environment 41 Index 42 vii ...

Page 8: ...viii ...

Page 9: ...tes For more information refer to the HP Notebook Reference Guide For instructions on accessing this guide refer to Finding information on page 2 Get to know your computer Learn about your computer features Refer to Getting to know your computer on page 4 and Keyboard and pointing devices on page 17 for additional information Create recovery discs or a recovery flash drive Recover the operating sy...

Page 10: ...t Start Help and Support User Guides or Select Start All Programs HP HP Documentation Power management features How to maximize battery life How to use the multimedia features of the computer How to protect the computer How to care for the computer How to update the software Help and Support To access Help and Support select Start Help and Support NOTE For country or region specific support go to ...

Page 11: ...tart All Programs HP HP Documentation View Warranty Information or Go to http www hp com go orderdocuments Warranty information You may find the expressly provided HP Limited Warranty applicable to your product located with the electronic guides on your computer and or on the CD DVD provided in the box Some countries regions may provide a printed HP Limited Warranty in the box In countries regions...

Page 12: ...omponent Description 1 TouchPad zone Moves the pointer and selects or activates items on the screen 2 Left TouchPad button Functions like the left button on an external mouse 3 Right TouchPad button Functions like the right button on an external mouse 4 Chapter 2 Getting to know your computer ...

Page 13: ... on Off Caps lock is off 2 Mute light Amber Computer sound is off Off Computer sound is on 3 Wireless light White An integrated wireless device such as a wireless local area network WLAN device and or a Bluetooth device is on Amber All wireless devices are off Top 5 ...

Page 14: ...formation when pressed in combination with the esc key 3 Windows logo key Displays the Windows Start menu 4 Windows applications key Displays a shortcut menu for items beneath the pointer 5 Action keys Execute frequently used system functions Front Component Description Speakers 2 Produce sound 6 Chapter 2 Getting to know your computer ...

Page 15: ...ff slide the switch to turn on the computer When the computer is on slide the switch briefly to initiate Sleep When the computer is in the Sleep state slide the switch briefly to exit Sleep When the computer is in Hibernation slide the switch briefly to exit Hibernation If the computer has stopped responding and Windows shutdown procedures are ineffective slide and hold the power switch for at lea...

Page 16: ...ional security cable to the computer NOTE The security cable is designed to act as a deterrent but it may not prevent the computer from being mishandled or stolen 6 RJ 45 network jack and cover Connects a network cable 8 Chapter 2 Getting to know your computer ...

Page 17: ...d prevent overheating It is normal for the internal fan to cycle on and off during routine operation 5 Hard drive light Blinking white The hard drive is being accessed 6 USB port Connects an optional USB device 7 Audio out headphone jack Audio in microphone jack Connects optional powered stereo speakers headphones earbuds a headset or television audio Also connects an optional headset microphone W...

Page 18: ...s still photographs To use the webcam select Start All Programs HP HP MediaSmart HP MediaSmart Webcam 5 Webcam light On The webcam is in use The antennas are not visible from the outside of the computer For optimal transmission keep the areas immediately around the antennas free from obstructions To see wireless regulatory notices refer to the section of the Regulatory Safety and Environmental Not...

Page 19: ...s access to the hard drive and the memory module and wireless device compartments CAUTION To prevent an unresponsive system replace the wireless module only with a wireless module authorized for use in the computer by the governmental agency that regulates wireless devices in your country or region If you replace the module and then receive a warning message remove the module to restore computer f...

Page 20: ... with one or more people at a time You can also make long distance phone calls to land lines Widgets Start using widgets for news weather social networking stocks a calculator sticky notes and more You can also use Widget Manager to add more widgets to the HP QuickWeb Home screen NOTE For additional information about using HP QuickWeb refer to the HP QuickWeb software Help Starting HP QuickWeb To ...

Page 21: ...NOTE For more information refer to the HP QuickWeb software Help Starting HP QuickWeb 13 ...

Page 22: ...ge 16 Wired You can access the Internet by connecting to a wired network For information on connecting to a wired network refer to the HP Notebook Reference Guide Using an Internet service provider ISP Before you can connect to the Internet you must establish an ISP account Contact a local ISP to purchase Internet service and a modem The ISP will help set up the modem install a network cable to co...

Page 23: ... all regions You have selected an unlisted ISP and the ISP has provided you with information such as a specific IP address and POP3 and SMTP settings To access the Windows Connect to the Internet Wizard and instructions for using it select Start Control Panel Network and Internet Network and Sharing Center NOTE If you are prompted within the wizard to choose between enabling or disabling Windows F...

Page 24: ...ter manufacturer or your ISP The Windows operating system also provides tools to help you set up a new wireless network To use the Windows tools to set up your network select Start Control Panel Network and Internet Network and Sharing Center Set up a new connection or network Set up a new network Then follow the on screen instructions NOTE It is recommended that you initially connect your new wir...

Page 25: ...tion fn esc Displays information about system hardware components and the system BIOS version number Using the action keys Action keys are customized actions that are assigned to specific keys at the top of the keyboard The icons on the f1 through f12 keys represent the action key functions To use an action key press and hold this key to activate the assigned function Using the keyboard 17 ...

Page 26: ...system For example if a monitor is connected to the computer pressing this key alternates the screen image from computer display to monitor display to simultaneous display on both the computer and the monitor Most external monitors receive video information from the computer using the external VGA video standard The switch screen image key can also alternate images among other devices that are rec...

Page 27: ...1 Mutes or restores speaker sound f12 Turns the wireless feature on or off NOTE This key does not establish a wireless connection To establish a wireless connection a wireless network must also be set up Using the keyboard 19 ...

Page 28: ... access Mouse Properties select Start Devices and Printers Then right click the device representing your computer and select Mouse settings Using the TouchPad To move the pointer slide one finger across the TouchPad in the direction you want the pointer to go Use the left and right TouchPad buttons like the buttons on an external mouse Navigating To move the pointer slide one finger across the Tou...

Page 29: ...tion To turn the gestures on and off 1 Click the Show hidden icons icon in the notification area at the far right of the taskbar 2 Right click the Synaptics Pointing Device icon and then click TouchPad Properties 3 Select the check box next to the gesture that you want to turn on or off 4 Click Apply and then click OK Scrolling Scrolling is useful for moving up down or sideways on a page or image ...

Page 30: ...enabled at the factory Rotating Rotating allows you to rotate items such as photos To rotate anchor your left forefinger in the TouchPad zone Move the right forefinger around the anchored finger in a sweeping motion moving from 12 o clock to 3 o clock To reverse the rotation move your right forefinger from 3 o clock to 12 o clock NOTE Rotating must be done within the TouchPad zone NOTE Rotating is...

Page 31: ...6 Maintenance Replacing the battery Removing or replacing the vanity cover Replacing the hard drive Replacing the memory module 23 ...

Page 32: ...uter 3 Unplug the power cord from the AC outlet 4 With the display closed position the computer upside down on a flat surface with the battery bay toward you 5 Insert the battery 1 into the battery bay until the battery release latch 2 snaps into place 6 Slide the battery locking latch 3 to the right to lock the battery into the battery bay 24 Chapter 6 Maintenance ...

Page 33: ...he computer 2 Disconnect all external devices connected to the computer 3 Unplug the power cord from the AC outlet 4 With the display closed position the computer upside down on a flat surface with the battery bay toward you 5 Slide the battery locking latch 1 to the left to unlock the battery NOTE You can identify when the battery locking latch is unlocked by the red icon that appears in the latc...

Page 34: ...y label and other components To remove the vanity cover 1 Remove the battery 1 refer to Removing the battery on page 25 2 Slide the release latch 2 to the right to release the vanity cover 3 Lift the back edge 3 of the vanity cover and then remove the cover 4 from the computer Replacing the vanity cover Replace the vanity cover after accessing the memory module slot hard drive regulatory label and...

Page 35: ...3 Replace the battery 3 refer to Inserting the battery on page 24 Removing or replacing the vanity cover 27 ...

Page 36: ... on the hard drive cable connector 1 and then pull it up to disconnect the hard drive cable connector from the system board 7 Carefully remove the hard drive cable from the cable routing channel 8 Remove the 3 hard drive screws 2 9 Grasp the tab on the hard drive and lift the hard drive 3 out of the hard drive bay Installing a hard drive 1 Grasp the tab on the hard drive and lower the hard drive 1...

Page 37: ...emory module in the memory module slot WARNING To reduce the risk of electric shock and damage to the equipment unplug the power cord and remove all batteries before installing a memory module CAUTION Electrostatic discharge ESD can damage electronic components Before beginning any procedure ensure that you are discharged of static electricity by touching a grounded metal object To replace the mem...

Page 38: ...val place it in an electrostatic safe container 4 Insert a new memory module CAUTION To prevent damage to the memory module hold the memory module by the edges only Do not touch the components on the memory module a Align the notched edge 1 of the memory module with the tab in the memory module slot b With the memory module at a 45 degree angle from the surface of the memory module compartment pre...

Page 39: ...into place CAUTION To prevent damage to the memory module be sure that you do not bend the memory module 5 Replace the vanity cover refer to Replacing the vanity cover on page 26 6 Replace the battery refer to Inserting the battery on page 24 7 Reconnect external power and external devices 8 Turn on the computer Replacing the memory module 31 ...

Page 40: ...ve that you can create using HP Recovery Manager HP recommends that you use this software to create either a set of recovery discs or a recovery flash drive immediately after software setup If for some other reason you need to restore your system this can be achieved using the HP Recovery partition select models only without the need for recovery discs or a recovery flash drive To check for the pr...

Page 41: ... RW and double layer DVD RW are not compatible with the HP Recovery Manager software The computer must be connected to AC power during this process Only one set of recovery discs or one recovery flash drive can be created per computer NOTE If you are creating recovery discs number each disc before inserting it into the optical drive If necessary you can exit the program before you have finished cr...

Page 42: ... and settings during this process To restore the computer from the recovery partition follow these steps 1 Access HP Recovery Manager in either of the following ways Select Start All Programs HP HP Recovery Manager HP Recovery Manager or Turn on or restart the computer and then press esc while the Press the ESC key for Startup Menu message is displayed at the bottom of the screen Then press f11 wh...

Page 43: ...9 for boot options 3 Select Internal CD DVD ROM Drive from the boot options window To change the boot order for a recovery flash drive 1 Insert the flash drive into a USB port 2 Restart the computer 3 Press esc while the computer is restarting and then press f9 for boot options 4 Select the flash drive from the boot options window Performing a system restore 35 ...

Page 44: ...estore allows you to back up individual files or back up the entire computer image Guidelines Be sure that the computer is connected to AC power before you start the backup process Allow enough time to complete the backup process Depending on file sizes it may take over an hour To create a backup 1 Select Start Control Panel System and Security Backup and Restore 2 Follow the on screen instruction...

Page 45: ...ty System 2 In the left pane click System Protection 3 Click the System Protection tab 4 Follow the on screen instructions Restore to a previous date and time To revert to a restore point created at a previous date and time when the computer was functioning optimally follow these steps 1 Select Start Control Panel System and Security System 2 In the left pane click System Protection 3 Click the Sy...

Page 46: ...http www hp com go contactHP NOTE For worldwide support click Contact HP worldwide on the left side of the page or go to http welcome hp com country us en wwcontact_us html Here you can Chat online with an HP technician NOTE When technical support chat is not available in a particular language it is available in English E mail HP Customer Support Find HP Customer Support worldwide telephone number...

Page 47: ...latory information about the computer The regulatory label is located under the vanity cover of the computer Wireless certification label or labels select models only Provide information about optional wireless devices and the approval markings of some of the countries or regions in which the devices have been approved for use If your computer model includes one or more wireless devices one or mor...

Page 48: ...andalone DC power source it should be powered only with an AC adapter or a DC power source supplied and approved by HP for use with this computer The computer can operate on DC power within the following specifications Input power Rating Operating voltage and current 19 5 V dc 2 05 A 40 W NOTE This product is designed for IT power systems in Norway with phase to phase voltage not exceeding 240 V r...

Page 49: ...35 C 41 F to 95 F Nonoperating 20 C to 60 C 4 F to 140 F Relative humidity noncondensing Operating 10 to 90 10 to 90 Nonoperating 5 to 95 5 to 95 Maximum altitude unpressurized Operating 15 m to 3 048 m 50 ft to 10 000 ft Nonoperating 15 m to 12 192 m 50 ft to 40 000 ft Operating environment 41 ...

Page 50: ...top 4 connector power 9 D Digital Media Slot identifying 7 E esc key identifying 6 external monitor identifying 9 F f11 34 fn key identifying 6 17 H hard drive installing 28 removing 28 replacing 28 hard drive light 9 headphone audio out jack 9 hotkeys description 17 HP Recovery Manager 33 I input power 40 integrated webcam light identifying 10 internal microphone identifying 10 Internet connectio...

Page 51: ...rk jack identifying 8 rotating TouchPad gesture 22 S scrolling TouchPad gesture 21 security cable slot 8 serial number 39 serial number computer 39 setup of WLAN 16 SIM slot identifying 11 slots Digital Media 7 speakers identifying 6 supported discs 33 system recovery 33 system restore points 36 T temperature specifications 41 TouchPad buttons 4 using 20 TouchPad gestures pinching 22 rotating 22 s...

Page 52: ......

Reviews: