background image

1-14

Chapter 1


HP 3000/9x9KS and HP 9000/K2x0/K4x0/Kx70/Kx80 Memory Upgrade Installation

Installation Procedure (HP 3000/9x9KS and HP 9000/K2x0/K4x0/Kx70/Kx80)

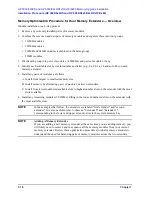
Memory Optimization Procedure for Single Memory Extenders — Overview


CAUTION

To prevent damage to memory boards and system components from electrostatic 
discharge, always wear a grounded wrist strap when working on or around the system, 
and when handling printed circuit boards.

Module Installation is a 6-step process

1. Remove any currently installed memory modules.

2. Combine the removed and new memory modules and organize them into four groups:

512MB modules

256MB modules

• 128MB modules and 64MB modules (combined in the same group)

• 32MB modules

3. Divide each group into pairs of modules  (4 SIMMs) and single modules (2 SIMMs), if any.

4. Identify each slot by its slot number and letter (0a, 0b, 1a, 1b, and so on) on the extender.

5. Install any pairs of modules  as follows:

A. Install from largest to smallest memory size.

B. Install from lowest numbered to highest number slots.

6. When all pairs of modules  have been installed, install any remaining old or new modules:

A. Install from largest to smallest memory size. 

B. Install from lowest numbered available slots to highest number slots.

NOTE

512MB Memory Modules are only supported on Kx70/Kx80 systems. 

NOTE

Kx70/Kx80 systems with four to six CPUs that use the minimum 256MB memory size 
REQUIRE that the memory consist of at least four SIMMs (two modules). 

Summary of Contents for 3000/939KS

Page 1: ...System Memory Upgrade Guide HP 3000 9x9KS and HP 9000 Kxx0 Part No A2375 90009 Printed in USA January 1998 Edition 6 E0198 ...

Page 2: ...he U S Government is subject to restrictions as set forth in subparagraph c 1 ii of the Rights in Technical Data and Computer Software clause at DFARS 252 227 7013 for DOD agencies and subparagraphs c 1 and c 2 of the Commercial Computer Software Restricted Rights clause at FAR 52 227 19 for other agencies HEWLETT PACKARD COMPANY 3000 Hanover Street Palo Alto California 94304 U S A Reproduction ad...

Page 3: ...throughout the manual Minor changes and updates were also incorporated Reader Comments Reader Comments We welcome your comments about our documentation If you have editorial suggestions or recommend improvements for this document please write to us You can reach us through e mail at hardwaredocs cup hp com or by sending your letter to Documentation Manager M S 5657 Hewlett Packard Company 8000 Foo...

Page 4: ...uide contains technical information about the following models Model 939KS Model K100 Model 959KS Model K200 Model 969KS Model K400 Model 979KS Model K210 Model K210 Model K410 Model K220 Model K250 Model K260 Model K370 Model K380 Model K420 Model K450 Model K460 Model K570 Model K580 ...

Page 5: ...v ...

Page 6: ... 13 Memory Optimization Procedure for Single Memory Extenders Overview 1 14 Procedure for Single Memory Extenders Detailed 1 15 Memory Optimization Procedure for Dual Memory Extenders Overview 1 18 Procedure for Dual Memory Extenders Detailed 1 19 If You Still Get Warning Messages 1 22 SIMM Removal and Installation 1 25 Removing SIMMs 1 25 Installing SIMMs 1 25 After All SIMMs Are Installed 1 27 S...

Page 7: ...ing the Installation 3 2 Possible Causes 3 3 Memory Error Codes and Warning Messages 3 3 Memory Error Codes 3 3 Console Warning Messages 3 5 AppendixA OS Requirements and Diagnostic Support for Memory Modules OS Requirements for 64MB 256MB and 512 MB Modules A 1 Obtaining Software Patches for HP UX Operating Systems A 2 How to subscribe to HP SupportLine Patch notifications A 2 Electronic Mail A 2...

Page 8: ...vii Contents ...

Page 9: ...pter 2 HP 9000 K100 Memory Upgrade Installation Chapter 3 Power On and Verification If you have an HP 9000 K100 server refer to Chapter 2 of this guide for memory upgrade installation procedures appropriate to that server Contents of This Chapter This chapter describes memory upgrade installation on HP 3000 K9x9KS and HP 9000 K2x0 K4x0 Kx70 Kx80 computers Verifying the current PDC Checking Existin...

Page 10: ...strap one conductive sheet and one anti static foam pad Always wear a grounded wrist strap when working on or around the system and when handling printed circuit boards Treat all assemblies components and interface connections as static sensitive Perform all removal and installation in a work area where potential static sources are minimized preferably an anti static work station Avoid working in ...

Page 11: ... Using On Line Diagnostics If on line diagnostics are not present on your system use the Boot Console Handler procedure to verify the current version 1 At the system prompt enter sysdiag 2 At the sysdiag prompt enter sysmap 3 At the sysmap prompt enter cpumap The output of cpumap will display the current PDC revision See Table A 1 Appendix A Using the Boot Console Handler 1 Log on as root and ente...

Page 12: ...ssword This will take you to the Patch Database Main screen If you are a first time user a Click on your geographic region under Register Now b Review the Terms and Conditions page At the bottom of the page you may accept the terms and conditions and proceed to the registration page c Complete the registration information requested d Once the registration information has been successfully transmit...

Page 13: ...s 3 At the Password prompt enter your e mail address as the password 4 Change to the directory containing the firmware patches cd firmware_patches hp cpu If desired review the contents of the directory by using the ls command For each patch there is an accompanying text file patchfilename txt The text file contains the patch description and the instructions for creating the patch tape 5 Download t...

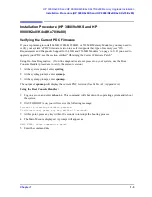
Page 14: ...0 K2x0 K4x0 Kx70 Kx80 Memory Upgrade Installation Installation Procedure HP 3000 9x9KS and HP 9000 K2x0 K4x0 Kx70 Kx80 Checking Existing System Memory If You Have an HP 9000 K2x0 K4x0 Kx70 Kx80 Reboot the System Then Halt the Boot Process ...

Page 15: ...ears on the LCD Display Turn key to Standby and Back On After Rebooting Your System Type ma to Get the Main Menu After rebooting your HP 9000 K2x0 K4x0 Kx70 Kx80 or HP 3000 9x9KS system the Boot Console Interface prompt PDC should appear on your console display Type ma at the prompt to get to the Main menu then proceed to the steps on the following page to check existing system memory Type in at t...

Page 16: ...K2x0 K4x0 Kx70 Kx80 Memory Upgrade Installation Installation Procedure HP 3000 9x9KS and HP 9000 K2x0 K4x0 Kx70 Kx80 Type me at the Information Menu to Check Memory System Shutdown Turn the system key switch to Standby fully counterclockwise ...

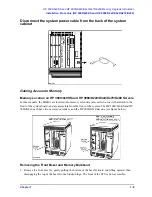
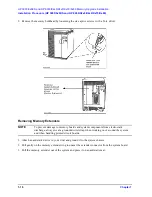
Page 17: ...s In these models the SIMMs are inserted into memory extenders also called carriers that attach to the front of the system board and are accessible from the front of the system The HP 3000 9x9KS and HP 9000 K4x0 each have two memory extenders and the HP 9000 K2x0 has one see figure below Removing the Front Bezel and Memory Bulkhead 1 Remove the front bezel by gently pulling the bottom of the bezel...

Page 18: ...ders NOTE To prevent damage to memory boards and system components from electrostatic discharge always wear a grounded wrist strap when working on or around the system and when handling printed circuit boards 1 Attach an antistatic device to your wrist and ground it to the system chassis 2 Pull gently on the memory extender ring to unseat the extender connector from the system board 3 Pull the mem...

Page 19: ...Chapter 1 1 11 HP 3000 9x9KS and HP 9000 K2x0 K4x0 Kx70 Kx80 Memory Upgrade Installation Installation Procedure HP 3000 9x9KS and HP 9000 K2x0 K4x0 Kx70 Kx80 ...

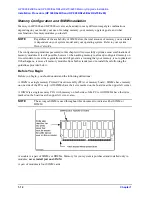
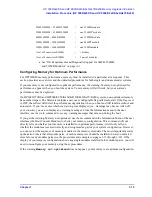
Page 20: ...ever when adding memory to already configured memory on two extenders to meet these guidelines and still generate a warning that your memory is not optimized If that happens remove all memory modules from both extenders and re install them following the guidelines provided below Before You Begin Before you begin you should understand the following definitions A SIMM is a single memory Printed Circ...

Page 21: ...arning messages that came up during the boot If you get the warning Memory not optimized use the me command in the Information Menu of the user interface the Boot Console Handler to check your memory configuration This command will not directly tell you whether your memory is installed for optimum performance it will only tell you whether the modules are seated correctly and recognized as part of ...

Page 22: ... modules 128MB modules and 64MB modules combined in the same group 32MB modules 3 Divide each group into pairs of modules 4 SIMMs and single modules 2 SIMMs if any 4 Identify each slot by its slot number and letter 0a 0b 1a 1b and so on on the extender 5 Install any pairs of modules as follows A Install from largest to smallest memory size B Install from lowest numbered to highest number slots 6 W...

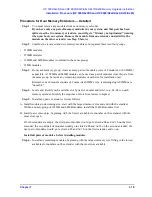
Page 23: ...as a pair of modules since they are from the same group Set aside any remaining modules of each size for installation last Remember each module consists of 2 same size SIMMs Any remaining single SIMMs are unusable Step 4 Locate and identify each available slot by its slot number and letter e g 0a 0b on the memory extender Identify the sequence of available slots from lowest to highest Step 5 Insta...

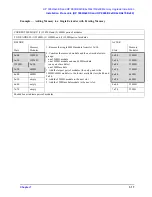
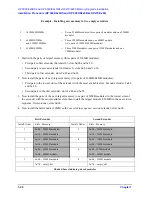
Page 24: ...air of 256MB modules 2 Six 64MB SIMMs and two 32MB SIMMs Three 128MB modules and one 64MB module 2 pairs of 128MB 64MB modules 3 Two 16MB SIMMs One 32MB module Install Order Slots Memory First pair of modules 0a 0b 256MB module 1a 1b 256MB module Second pair of modules 2a 2b 128MB module 3a 3b 128MB module Third pair of modules 4a 4b 128MB module 5a 5b 64MB module Remaining module 6a 6b 32MB modul...

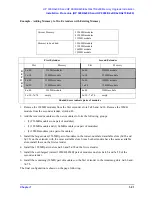
Page 25: ...3a 3b 2 Combine the removed module and the new modules into groups one 256MB module one 128MB module and one 64MB module one pair of modules one 32MB module 3 Add the largest pair of modules the only quad is the 128MB 64MB module to the lowest available slots 4a 4b and 5a 5b 4 Add the 256MB module to the next slot 5 Add the 32MB modulemodule to the next slot Slots Memory Modules 0a 0b 128MB 0a 0b ...

Page 26: ... from largest to smallest memory size B Install memory by alternating pairs of modules between extenders C Install from lowest numbered available slots to highest number slots on the extender with the most slots available 6 Install any remaining modules 2 SIMMs filling in the lowest numbered slots on the extender with the most available slots NOTE In the examples that follow the extenders are labe...

Page 27: ...modules of each size for installation last Remember each module consists of 2 same size SIMMs Any remaining single SIMMs are unusable Step 4 Locate and identify each available slot by its slot number and letter e g 0a 0b on each memory extender Identify the sequence of slots from lowest to highest Step 5 Install any pairs of modules first as follows A Install modules in decreasing size start with ...

Page 28: ...32MB modules in the lowest slots of the extender with the most available slots then install the largest module 256MB in the next slot in sequence first extender slots 6a 6b 4 Now install the last module 32MB in the next slot in sequence second extender slots 6a 6b 1 14 128MB SIMMs Seven 256MB modules three pairs of modules and one 256MB module 2 6 64MB SIMMs and 2 32MB SIMMs Three 128MB modules an...

Page 29: ...s Since both extenders have the same available slots install them on the first extender 4 Install the 128MB pair in slots 4a 4b and 5a 5b on the first extender 5 Install the next largest mixed 128MB 64MB pair of modules on slots 4a 4b and 5a 5b of the second extender 6 Install the remaining 32MB pair of modules on the first extender in the remaining slots 6a 6b and 7a 7b The final configuration is...

Page 30: ...igured memory on two extenders to meet these guidelines and still generate a warning that your memory is not optimized If that happens remove all memory modules from both extenders and re install them following the guidelines provided If the Memory not optimized warnings persist contact your HP Support representative if assistance is required A F T E R First Extender Second Extender Slot Memory Sl...

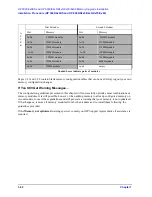
Page 31: ... K2x0 K4x0 Kx70 Kx80 Blank Memory Configuration Tables Extender 0 Extender 1 Slot Memory Slot Memory 0a 0b 1a 1b 0a 0b 1a 1b 2a 2b 3a 3b 2a 2b 3a 3b 4a 4b 5a 5b 4a 4b 5a 5b 6a 6b 7a 7b 6a 6b 7a 7b Extender 0 Extender 1 Slot Memory Slot Memory 0a 0b 1a 1b 0a 0b 1a 1b 2a 2b 3a 3b 2a 2b 3a 3b 4a 4b 5a 5b 4a 4b 5a 5b 6a 6b 7a 7b 6a 6b 7a 7b ...

Page 32: ...9x9KS and HP 9000 K2x0 K4x0 Kx70 Kx80 Extender 0 Extender 1 Slot Memory Slot Memory 0a 0b 1a 1b 0a 0b 1a 1b 2a 2b 3a 3b 2a 2b 3a 3b 4a 4b 5a 5b 4a 4b 5a 5b 6a 6b 7a 7b 6a 6b 7a 7b Extender 0 Extender 1 Slot Memory Slot Memory 0a 0b 1a 1b 0a 0b 1a 1b 2a 2b 3a 3b 2a 2b 3a 3b 4a 4b 5a 5b 4a 4b 5a 5b 6a 6b 7a 7b 6a 6b 7a 7b ...

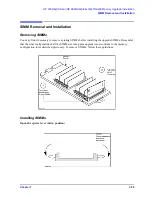
Page 33: ...tion Removing SIMMs You may find it necessary to remove existing SIMMs before installing the upgrade SIMMs Remember that the final configuration of all the SIMMs existing plus upgrade must conform to the memory configuration rules described previously To remove SIMMs follow these guidelines Installing SIMMs Open the ejector lever down position ...

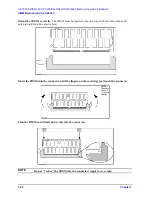
Page 34: ...MMs correctly The SIMM must be inserted only one way with the white stripe and notch toward the white ejector lever Insert the SIMM into the connector until the fingers on the card edge just touch the connector Push the SIMM card firmly and evenly into the connector NOTE Do not rocker the SIMM into the connector Apply force evenly ...

Page 35: ... All SIMMs Are Installed After all SIMMs have been inserted check them to ensure that they are seated evenly and that all SIMMS are the same height an incorrectly seated SIMM may stick out above the others Also verify that all SIMM pairs are configured correctly according to the SIMM rules described previously in this guide ...

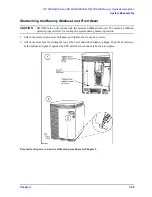
Page 36: ... Reassembly System Reassembly Reinstalling Memory Extender s 1 Push the memory extender into the memory extender bay while aligning the extender with the top and bottom metal rails 2 When the connectors meet the system board push the extender gently into the mating connector on the system board ...

Page 37: ...ed The memory bulkhead permits proper airflow for cooling the system during normal operation 1 Attach the memory processor bulkhead and tighten the six captive screws 2 Attach the front bezel by sliding the top of the bezel under the hidden top hinge Drop the bezel down at the bottom and push it against the SPU until the two bottom tabs click into place Proceed to the power on and verification pro...

Page 38: ...1 30 Chapter1 HP 3000 9x9KS and HP 9000 K2x0 K4x0 Kx70 Kx80 Memory Upgrade Installation System Reassembly ...

Page 39: ...2x0 K4x0 Kx70 Kx80 server refer to Chapter 1 of this guide for memory upgrade installation procedures appropriate to those servers Contents of This Chapter This chapter describes the steps required to install a memory upgrade on HP 9000 K100 servers including Checking Existing System Memory System Shutdown Gaining Access to Memory Memory Configuration Memory SIMM Installation System Reassembly ...

Page 40: ...strap when working on or around the system and when handling printed circuit boards Treat all assemblies components and interface connections as static sensitive Perform all removal and installation in a work area where potential static sources are minimized preferably an anti static work station Avoid working in carpeted areas and keep body movement to a minimum while removing and installing boar...

Page 41: ...HP 9000 K100 Memory Upgrade Installation Installation Procedure HP 9000 K100 Halt the Boot Process Type ma at the Boot Console Interface Prompt PDC to Get to the Main Menu then Type in to get to the Information Menu ...

Page 42: ...2 4 Chapter2 HP 9000 K100 Memory Upgrade Installation Installation Procedure HP 9000 K100 Type me to Check Memory Turn the system key switch to standby fully counterclockwise ...

Page 43: ...back of the system cabinet Gaining Access to System Memory Memory Location in HP 9000 K100 Servers In the HP 9000 K100 server memory SIMMs are inserted directly into the system board from the rear of the system cabinet Removing the Memory Bulkhead To gain access to memory remove the memory bulkhead from the rear of the system chassis ...

Page 44: ...ade goals and the memory size you use Memory for your system is purchased and installed only in modules which are pairs of SIMMs of the same size SIMM sizes are 16MB 32MB 64MB and 128MB which can be combined to form pairs of modules of 32MB 64MB 128MB and 256MB correspondingly The SIMMs each have their size marked on the board near the upper left corner See Configuring Memory for Optimum Performan...

Page 45: ...tem components from electrostatic discharge always wear a grounded wrist strap when working on or around the system and when handling printed circuit boards Removing SIMMs After removing the Memory Bulkhead as previously described the SIMMs can be removed You may find it necessary to remove existing SIMMs before installing the upgrade SIMMs Remember that the final configuration of all the SIMMs ex...

Page 46: ...0 Open the Ejector Lever Down Position Orient the SIMMs Correctly Each SIMM must be inserted only one way The white stripe and notch on the end of the SIMM must be toward the upper ejector lever Orienting the SIMM is done in two steps First insert the lower corner into the connector slot at the bottom to align the SIMM ...

Page 47: ...pgrade Installation Installation Procedure HP 9000 K100 Insert the SIMM Card Partway Until the Fingers On the Card Edge Just Touch the Connector Close the Ejector Lever Up Position Push the SIMM Card Firmly and Evenly Into the Connector ...

Page 48: ... seated SIMM may stick out above the others Also verify that all SIMM pairs are configured correctly according to the SIMM rules described previously in this guide You will probably need to use a small flashlight to visually check the SIMMs Reattach the Memory Bulkhead The memory cover plate has to be replaced before normal system operation resumes The cover plate is required for system cooling an...

Page 49: ... may result in the following types of problems at power on The boot process could be stopped Log warning and display hex codes Console warning messages If any of these problems appear the probable cause is that the memory extenders are incorrectly seated To correct the problem 1 Turn off power to the system 2 Halt the boot process by pressing any key within the 10 second period provided by the sys...

Page 50: ...in at the Main menu prompt to get to the Information menu 5 Type me at the Information menu prompt to verify that the amount of memory displayed conforms to the amount of memory you have installed see Figure 3 1 Figure 3 1 Verifying Installation of System Memory Upgrade with the ME Command If There Is a Problem Verifying the Installation Incorrectly installed SIMMs or configuration violations may ...

Page 51: ...rectly installed certain memory error codes may appear on the front panel LCD display In addition warning messages may appear on the console display after the system is booted Memory Error Codes Memory error codes are displayed on the front panel liquid crystal display LCD The memory error codes listed in Table 3 1 on page 4are those that indicate the possibility that memory extenders or SIMMs hav...

Page 52: ...7306 Address test failed on bank Failed SIMM pair see Note 1 7307 ECC test failed on bank Failed SIMM pair see Note 1 7308 Single bit memory error caused HPMC Failed SIMM pair see Note 1 7401 No memory SIMMs installed Poor seating of SIMM pair 7500 No RAM found No SIMM pairs installed or they are not seated 7501 Not enough good memory to run Operating System Incorrect memory configuration or insuf...

Page 53: ...mand in the SERVICE menu for error information WARNING Memory has been initialized but not tested as a result of FASTBOOT being enabled To test memory disable the FASTBOOT command in the MAIN menu and reboot the system WARNING Memory configuration is not optimiZed for performance refer to the System Installation or Memory Installation manuals for memory configuration guidelines WARNING Memory SIMM...

Page 54: ...3 6 Chapter3 Power On and Verification Installation Verification ...

Page 55: ...HSS 6795 for on line diagnostic support Requires PDC Rev 2 2 or later to run Requires Patch PHSS 6797 for on line diagnostic support Requires PDC Rev 2 2 or later to run On line diagnostic support provided on the OS K250 K260 K450 K460 Os not supported OS not supported Requires PDC Rev 36 25 or later to run On line diagnostic support provided on the OS K370 K570 OS not supported OS not supported K...

Page 56: ...of patches issued prior to subscription Copies of the HP SupportLine User s Guide RZ WR VXEVFULEH WR 3 6XSSRUW LQH 3DWFK QRWLILFDWLRQV OHFWURQLF 0DLO To automatically receive future NEW patch notifications from the HP SupportLine send an e mail message no SUBJECT line required to support support mayfield hp com The TEXT portion of the message should contain instructions for the type of service wan...

Reviews: