Hoymiles DTU-Pro-S User Manual Download Page 13

© 2021 Hoymiles Power Electronics Inc. All rights reserved.

12

Data Transfer Unit User Manual

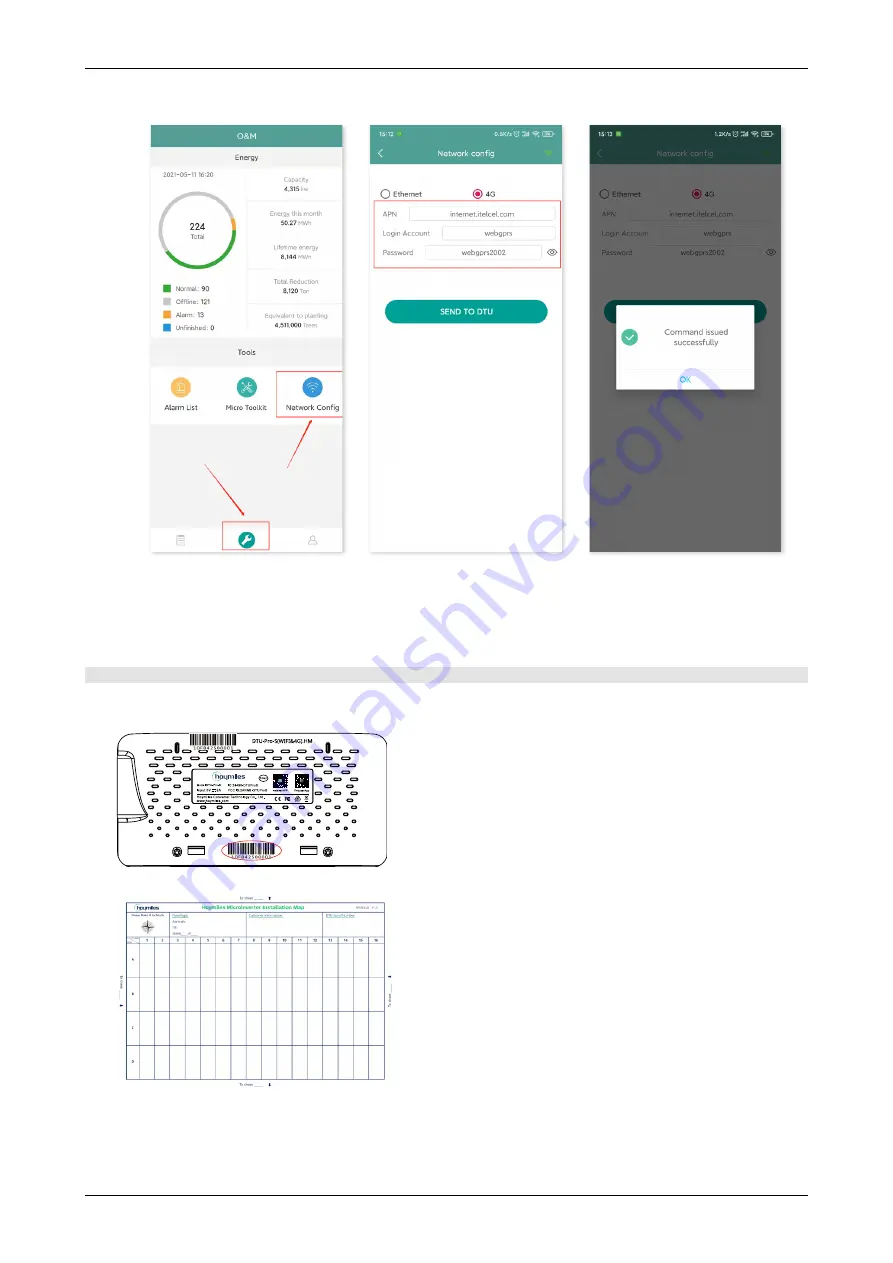
Go back to “Network Config” interface and select “4G”.
Please get APN information from your telecom operator and modify APN accordingly.

Click “Send to DTU” and a popup box will appear. Confirm and exit.

Note: Once the command is successfully issued, you will exit the Network Config page and the DTU 
will start to connect to the network after 30 seconds.

6.3  Complete Installation Map

Please complete the installation map.
A)  Peel the serial number label (as circled below) from the DTU and place it on the installation map.

B)  Complete system information of the installation map shown as follows.

Summary of Contents for DTU-Pro-S

Page 1: ...Open Energy for All Data Transfer Unit USER MANUAL DTU Pro S Region Global V202111 hoymiles com ...

Page 2: ...onal Features 05 4 1 Export Management Function RS485 port 05 4 2 DRM Port for Australia and New Zealand only 05 5 Installation Planning and Preparation 06 5 1 Pre installation 06 5 2 Dimensions 06 5 3 System Installation Steps 07 6 DTU Installation 08 6 1 Installation Instructions 08 6 2 Online Setting 08 6 3 Complete Installation Map 12 7 Micro Toolkit 13 7 1 Connect to the DTU 13 7 2 Field Comm...

Page 3: ...ry to repair DTU without Hoymiles permission If the DTU is damaged please send it back to your installer for repair replacement Disassembling DTU without Hoymiles permission will invalidate the remaining warranty period Please read all the instructions and warnings in the technical specifications carefully Do not use Hoymiles products in a way that is not suggested by the manufacturer Otherwise it...

Page 4: ...nformation of PV modules to the DTU which is the hardware basis of the module level monitoring With conversion efficiency up to 96 7 and MPPT efficiency up to 99 9 Hoymiles microinverters rank among the first class in the industry worldwide 2 2 DTU DTU is the key component in Hoymiles microinverter system It works as the communication gateway between the Hoymiles microinverters and S Miles Cloud T...

Page 5: ...m Indicator F Wi Fi Antenna G RS485 H DRM Port for Australia New Zealand only I Ethernet Port J USB Port K Reset Bottom L Power Port M Sub 1G Antenna 3 2 For 4G Version C AB DE F Item Description A SIM Card Slot B SD Card Slot C DTU Power Indicator D DTU Communication Indicator with server E DTU Communication Indicator with microinverter F DTU Alarm Indicator G 4G Antenna H RS485 I DRM Port For Au...

Page 6: ...ion in an accurate way the meter needs to be installed at the output of the PV system Load Consumption Power Production Potential PV Power 5 kW Export Limitation 0 kW Export Limitation kW kW 35 30 25 20 15 10 5 0 4 00 6 00 12 00 16 00 20 00 35 30 25 20 15 10 5 0 4 00 6 00 12 00 16 00 20 00 Note Please refer to Hoymiles technical note Power Export Management System for more details 4 2 DRM Port for...

Page 7: ...DTU can monitor may be reduced Note The maximum number of modules is only possible in open space when installation conditions detailed in DTU and microinverter manuals are fulfilled and the microinverter and DTU are properly placed apart as required 5 1 2 Environmental Requirements for DTU Installation The DTU should be installed away from dust liquid acidic or corrosive gas The ambient temperatur...

Page 8: ...t be done correctly in order to complete these steps on site 1 Install the PV modules and microinverters 2 Locate the DTU 8 Site creation 9 Add microinverter ID 10 View data on S Miles Cloud 3 Connect the microinverter to the grid 4 Power on DTU 5 Connect DTU with Internet 7 Mount the DTU on the wall optional 6 Use Micro Toolkit for onsite inspection optional Check the communication between microi...

Page 9: ... ground and more than 0 8 m away from the corner Note To prevent signal attenuation please do not install the DTU above metal or concrete D Choose the installation method Option 1 Mount the DTU on the wall 9 Mount the bracket on the wall Please choose at least two screw holes one from each side to fix the bracket the M4 screws need to prepare by the installer 9 Fix DTU Pro S to the bracket s upper...

Page 10: ... For 4G version 4G SIM card and APN 9 For Ethernet Ethernet cable D Set up the DTU connection on mobile phone 9 Open the Installer app on smart phone tablet and log in Click O M on the bottom of the page and then Network Config 9 Select the DTU s wireless network and click Connect The network name of the DTU consists of DTUP and product serial number In the following example the DTU ID is 65200316...

Page 11: ... Connect the router to the DTU Ethernet port with a Lan cable Go back to Network Config interface and select Ethernet Click Send to DTU and a popup box will appear Confirm and exit 9 For Wi Fi Go back to Network Config interface Select Wi Fi and complete the Wi Fi configuration Select the available Wi Fi and enter the password ...

Page 12: ...r Electronics Inc All rights reserved 11 Data Transfer Unit User Manual Click Send to DTU and a popup box will appear Confirm and exit 9 For 4G Insert the SIM Card into the SIM Card slot on the side of DTU until it clicks ...

Page 13: ...o DTU and a popup box will appear Confirm and exit Note Once the command is successfully issued you will exit the Network Config page and the DTU will start to connect to the network after 30 seconds 6 3 Complete Installation Map Please complete the installation map A Peel the serial number label as circled below from the DTU and place it on the installation map B Complete system information of th...

Page 14: ...on after the PV power station is complete so that the operation of microinverter can be monitored without Site Creation 7 1 Connect to the DTU 9 Open the Installer app on smart phone tablet and log in 9 Click O M on the bottom of the page and then Micro Toolkit 9 Select the DTU s wireless network and click Connect The network name of the DTU consists of DTUP and product serial number and is passwo...

Page 15: ...O M and enter Micro Toolkit 2 If you have already created the power station on the monitoring platform you can directly view the data and information on the overview page 7 2 2 Add Microinverter If power station is not yet created on the platform you need to type in microinverter SN to view power station data as instructed below 1 Click Power generation button ...

Page 16: ... button to add the microinverter to the list The microinverter added here is only used for on site debugging and it will not be uploaded to the server nor can it replace the power station creation on S Miles Cloud 3 You can add microinverter via Automatic Search or typing in the microinverter ID or scanning the ID ...

Page 17: ...ved 16 Data Transfer Unit User Manual 4 The search result of microinverters and microinverter added will be displayed in the list Tap the button on the right if you want to delete it 5 Confirm that the microinverter ID in the list is correct and tap save ...

Page 18: ...an see the list of the microinverter and PV power of each microinverter 2 If you want to see more details of one microinverter just click the serial number then you can check the input and output data on the page shown as below Note If the microinverter signal is so weak that the real time data are not updated move the DTU closer to the microinverter ...

Page 19: ...7 2 4 View Communication Status with Microinverter 1 Re enter Micro Toolkit and tap Connection Status 2 On this page you can check the signal strength between the DTU and each microinverter Tap the signal icon to enter the respective microinverter page signal quality is constantly refreshing ...

Page 20: ...a Transfer Unit User Manual 3 You can also Tap the button to switch the signal quality and real time data page Note If the microinverter has no signal please check whether the microinverter is powered on or refer to the microinverter user manual for troubleshooting ...

Page 21: ...ck Installation Guide for S Miles Cloud Online Registration for detailed account creation instructions 8 1 Site Creation 1 Install Hoymiles Installer app by searching Hoymiles in the App Store IOS or the Play Store Android 2 Open the app and log in with your installer account and password If you are a new installer with Hoymiles please apply for an Installer account from your distributor in advanc...

Page 22: ...ansfer Unit User Manual 3 Select the Station tab on the bottom and then select on the right top side of the page to add station Fill in the station details and press Next Select one from the three types of plant Home Plant Enterprise Plant and Large Professional Plant ...

Page 23: ... 2021 Hoymiles Power Electronics Inc All rights reserved 22 Data Transfer Unit User Manual 4 Select owner for the plant Create a new one if there is none ...

Page 24: ...lectronics Inc All rights reserved 23 Data Transfer Unit User Manual 5 Press Add DTU ID Scan or manually input the DTU ID 6 Scan or manually input the microinverter ID Press Finish when all microinverter IDs have been input ...

Page 25: ...nc All rights reserved 24 Data Transfer Unit User Manual 7 Customize the layout based on the installation or click the tick box on the top right to select preset layouts Then tap Next 8 Save the design layout and fill in the information ...

Page 26: ...ap Next 10 Please enter the currency unit and your electricity price Click the Networking button and tap Save to complete the site creation 11 The new site will appear on the station list under the Installer account 12 Please wait about 30 minutes and the station will appear online where you can see the ID of all microinverters ...

Page 27: ...p by searching Hoymiles in App Store IOS or Play Store Android B Log in with the password and username that have been set up by the installer on the previous step C Customers will be able to view all details once the data start to upload If it s the first power station created normally it takes around 30 mins for the data to come through D Customers can also view power generation details on the S ...

Page 28: ...s Inc All rights reserved 27 Data Transfer Unit User Manual 8 3 Browse Station on Webpage Log in to your account and browse the station on webpage 8 4 View Phone App Download the app on your mobile phone and view station information ...

Page 29: ... DTU please complete the installation according to the instructions in this manual Otherwise data on the monitoring platform may be lost 2 Log in to your account on the web Select Devices Action Device Maintenance for the plants that need a DTU replacement 3 Click Replace Device enter the current device SN and click OK to complete DTU replacement ...

Page 30: ...roinverter communication Fault State LED States LED Indicator Status Description All Firmware upgrading Starting up DTU power on DTU power off DTU is communicating with Hoymiles S Miles Cloud Internet disconnected Internet connected and server disconnected Local app connected DTU is connecting to microinverters No MI ID Please create power station on the web MI IDs Incomplete Normal DTU alarm occu...

Page 31: ...ion LED LED Indicator 4 RUN Cloud MI ALM APP S Miles Toolkit Power Supply Adapter Type External adapter Adapter input voltage frequency 100 to 240 V AC 50 or 60Hz Adapter output voltage current 5V 2A Power consumption Typ 1 5W Max 3 0W Typ 2 5W Max 5 0W Mechanical Data Ambient temperature 20 C to 55 C Dimensions W H D 200mm 101mm 29mm without antennas Weight 0 20 kg Installation method Wall mounti...

Reviews: