background image

CHARGING THE DEVICE

• ensure that the charging port is clean and dry. 

• make sure that there is no dust, debris or dirt inside the port. 

• plug the charger into a grounded wall outlet. The charging 

indicator light on the charger will be green. 

• connect the cable with the power supply (100v ~ 240v; 50/60 hz).

• align and connect the 3-pin charging cable into the charging 

port of the hoverboard. Do not force or bend the charging cable 

into the charging port, as it may cause the prongs to bend or break. 

• once attached to the board, the charging indicator light on the 

charger should change to “RED”, indicating that your device is now 

being charged. 

• when the “RED” indicator light on your charger turns to “GREEN”, 

then your device is fully charged. 

• a full charge may take up to 5 hours. While charging, you will see 

a blue flashing light on the scooter, which also indicates charging. 

Do not charge for more than 5 hours.  

• after fully charging your hoverboard, unplug the charger from 

your device and from the power outlet. 

BATTERY SPECIFICATIONS

Battery Type: Rechargeable lithium-ion battery

Charge Time: Up to 5 hours

Voltage: 36V

Initial Capacity: 4.0 Ah

BATTERY MAINTENANCE

The lithium-ion battery is built into the device. Do not disassemble 

the device to remove the battery or attempt to separate it from the 

device.

• When charging the device, please use the enclosed 3-pin 

charging cable or otherwise ensure that the battery charging 

conditions are met.

• Do not connect or attach the device or the battery to a power 

supply plug or directly to a car’s cigarette lighter.

• Do not place the device or batteries near a fire, or into direct sunlight. 

Heating the device and/or the battery can cause additional heating, 

breaking, or ignition of the battery inside the device.

• Do not continue charging the battery if it does not recharge 

within the specified charging time. Doing so may cause the battery 

to become hot, rupture, or ignite.

To preserve natural resources, please recycle or dispose of batteries 

properly. This product contains lithium-ion batteries. Local, state, or 

federal laws may prohibit disposal of lithium-ion batteries in ordinary 

trash. Consult your local waste authority for information regarding 

available recycling and/or disposal options.

• Do not attempt to modify, change, or replace your battery.

• Do not use your device if the battery begins to emit odor, 

overheats, or begins to leak.

• Do not touch any leaking materials or breathe fumes emitted.

• Do not allow children and animals to touch the battery.

• The battery contains dangerous substances, do not open the 

battery, or insert anything into the battery.

• Please only use the charger provided by Hover-1.

• Do not attempt to charge the device if the battery has discharge 

or emits any substances. In that case, immediately distance yourself 

from the battery in case of fire or explosion.

• Lithium-ion batteries are considered to be hazardous materials. 

Please follow all local, state and federal laws in regards to recycling, 

handling and disposing of Lithium-ion batteries.

CHARGING YOUR HOVERBOARD

BATTERY CARE / MAINTENANCE

19

Summary of Contents for H1-RGPRO

Page 1: ...OPERATION MANUAL H1 RGPRO RANGER PRO ...

Page 2: ...r a properly fitted helmet that complies with CPSC or CE safety standards when you ride your scooter Correct Fitting Make sure your helmet covers your forehead Incorrect Fitting Forehead is exposed and vulnerable to serious injury ...

Page 3: ...n learn operating skills by reading the product manual and watching videos This manual includes all operating instructions and precautions and users must read it carefully and follow the instructions Hover 1 can not be held liable for damage or injury caused by failure to understand and follow the warnings and instructions in this manual ATTENTION 1 Use only the supplied charger with this scooter ...

Page 4: ...er liquids to prevent against electric shock explosion and or injury to yourself and damage to the device Do not use the device if it has been dropped or damaged in any way Repairs to electrical equipment should only be performed by the manufacturer Improper repairs voids the warranty and may place the user at serious risk Do not puncture or harm the exterior surface of the product in any way Keep...

Page 5: ...tand and perform all of the safety instructions and to be able to assume the hazards inherent in unit use should not use the hoverboard In this manual the above symbol with the word NOTES indicates instructions or relevant facts the user should remember prior to using the device In this manual the above symbol with the word CAUTION indicates a hazardous situation which if not avoided can cause min...

Page 6: ...d to give you the information you need for the safe operation and maintenance of your hoverboard Please read it thoroughly before riding your hoverboard PACKAGE CONTENTS Hover 1 RANGER PRO Electric Scooter Charger Charging Cable Operation Manual FEATURES PARTS 1 Fender 7 LED Light 2 Right Foot Mat 8 Charge Port located in rear 3 Running Indicator 9 Power Button located in rear 4 Battery Indicator ...

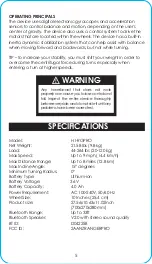
Page 7: ...en entering a turn at higher speeds Model H1 RGPRO Net Weight 21 58 lbs 9 8 kg Load 44 264 lbs 20 120 kg Max Speed Up to 9 mph 14 4 km h Max Distance Range Up to 8 miles 12 8 km Max Incline Angle 15 degrees Minimum Turning Radius 0 Battery Type Lithium ion Battery Voltage 36 V Battery Capacity 4 0 Ah Power Requirement AC 100 240V 50 60 Hz Wheel Size 10 Inches 25 4 cm Product size 27 56x10 63x11 02...

Page 8: ... When the user steps off the scooter mats it will automatically initiate self calibration When riding the scooter you must ensure you are stepping on the foot mats Do not step or stand on any other area of your scooter The hoverboard may vibrate or spin in one direction if weight and pressure are applied to only one foot mat BATTERY INDICATOR The display board is located in the middle of the hover...

Page 9: ...ode 8 If pairing is unsuccessful turn off the hoverboard first and re pair following the aforementioned steps 9 If your smart phone is out of range or the battery is low on your hoverboard your speaker may disconnect from your smart device and the hoverboard will say Disconnected To reconnect follow the aforementioned steps or recharge your scooter NOTE Once you have paired the hoverboard speaker ...

Page 10: ...e free Hover 1 App in order to access certain features of your hoverboard such as GPS and skill mode Using a QR code reader hold the camera on your smartphone over the below QR code to download the Hover 1 App Feel free to search Hover 1 in your device App store SMART PHONE APP 8 For IOS For Android ...

Page 11: ...not function correctly please contact our Customer Support Center Ensure the battery is fully charged before riding your scooter Please wear all appropriate safety and protective gear as previously mentioned in the User Manual before operating your hoverboard Make sure to wear comfortable clothes and flat closed toe shoes when operating your device Please carefully read the User Manual which will ...

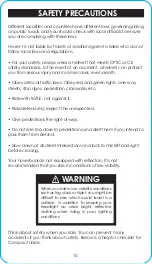
Page 12: ...t against it Ride defensively expect the unexpected Give pedestrians the right of way Do not ride too close to pedestrians and alert them if you intend to pass them from behind Slow down at all street intersections and look to the left and right before crossing Your hoverboard is not equipped with reflectors It is not recommended that you ride in conditions of low visibility Think about safety whe...

Page 13: ...feet off your hoverboard while driving is dangerous and may cause the hoverboard to stop or veer sideways Do not operate the hoverboard while under the influence of drugs and or alcohol Do not operate the hoverboard when you are restless or sleepy Do not ride your hoverboard off of curbs ramps or attempt to operate in a skate park empty pool Misuse of your hoverboard voids the manufacturer warrant...

Page 14: ...fire and explosion accidents Before riding ensure that tires are in good condition and have sufficient tread remaining Do not operate near swimming pools or other bodies of water 12 To reduce the risk of injury adult supervision is required Never use in roadways near motor vehicles on or near steep inclines or steps swimming pools or other bodies of water always wear shoes and never allow more tha...

Page 15: ... or vibrate making it difficult to step on evenly with your other foot When you are ready shift your weight to the foot already placed on the device and step on with your second foot quickly and evenly as described in the diagram below Find your center of gravity If your weight is distributed correctly on the foot mats and your center of gravity is level you should be able to stand on your device ...

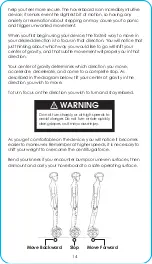
Page 16: ...of gravity determines which direction you move accelerate decelerate and come to a complete stop As described in the diagram below tilt your center of gravity in the direction you wish to move To turn focus on the direction you wish to turn and stay relaxed As you get comfortable on the device you will notice it becomes easier to maneuver Remember at higher speeds it is necessary to shift your wei...

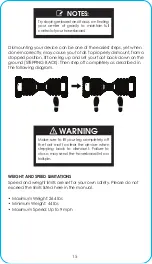
Page 17: ... AND SPEED LIMITATIONS Speed and weight limits are set for your own safety Please do not exceed the limits listed here in the manual Maximum Weight 264 lbs Minimum Weight 44 lbs Maximum Speed Up to 9 mph WARNING Make sure to lift your leg completely off the foot mat to clear the device when stepping back to dismount Failure to do so may send the hoverboard into a tailspin Try staying relaxed and f...

Page 18: ...ended periods frequent starts and stops idling and frequent acceleration or deceleration will decrease overall distance If your hoverboard is unbalanced vibrating or not turning properly you can follow the below steps to calibrate it First place the hoverboard on a flat horizontal surface such as the floor or a table The foot mats should be even with each other and not tilted forward or backward M...

Page 19: ...re than 15 degrees forward or backward Battery voltage is too low The device is still charging During operation the platform self initiates to tilt due to excess speed Overheating or motor temperature is too high The device has been rocking back and forth over 30 seconds If the system enters protection mode the alarm indicator will light up and the board will vibrate This typically occurs when the...

Page 20: ...time the device engine will power off and stop after 15 seconds WARNING When the hoverboard turns off during a Safety Alert all operation systems will halt Do not continue attempting to ride the hoverboard when the system initiates a stop Turn your hoverboard off and back on to unlock it from a Safety Lock 18 ...

Page 21: ...ue flashing light on the scooter which also indicates charging Do not charge for more than 5 hours after fully charging your hoverboard unplug the charger from your device and from the power outlet BATTERY SPECIFICATIONS Battery Type Rechargeable lithium ion battery Charge Time Up to 5 hours Voltage 36V Initial Capacity 4 0 Ah BATTERY MAINTENANCE The lithium ion battery is built into the device Do...

Page 22: ...any leaking materials or breathe fumes emitted Do not allow children and animals to touch the battery The battery contains dangerous substances do not open the battery or insert anything into the battery Please only use the charger provided by Hover 1 Do not attempt to charge the device if the battery has discharge or emits any substances In that case immediately distance yourself from the battery...

Page 23: ...as it may explode or combust Do not expose the device to contact with sharp objects as this will cause scratches and damage Do not allow the device fall from high places as doing so may damage the internal circuitry Do not attempt to disassemble the device Use only the charger provided by Hover 1 CARE MAINTENANCE WARNING Avoid using water or other liquids for cleaning If water or other liquids ent...

Page 24: ...de reasonable protection against harmful interference in a residential installation This equipment generates uses and can radiate radio frequency energy and if not installed and used in accordance with the instructions may cause harmful interference to radio communications However there is no guarantee that interference will not occur in a particular installation If this equipment does cause harmf...

Page 25: ...23 For warranty information Please visit us at www hover 1 com WARRANTY Affix Serial Number Label Here ...

Page 26: ... RideHover1 RideHover1 RideHover1 www Hover 1 com ...

Reviews: