background image

• To avoid damage to the Helios’s internal circuitry, do not expose it to liquid, 

moisture, or humidity.

• Do not use abrasive cleaning solvents to clean the Helios.

• Do not expose the Helios to extremely high or low temperatures, as this 

will shorten the life of the device, destroy the battery, and/or distort certain 

plastic parts.

• Do not dispose of the Helios in fire as it may explode or combust.

• Do not let the Helios come into contact with sharp objects, as this will 

cause scratches and damage.

• Do not let the Helios fall from high places, as doing so may damage the 

internal circuitry.

• Do not attempt to disassemble the Helios.

• Use only the charger provided by Hover-1.

• Use only the manufacturer’s authorized replacement parts. 

CARE & MAINTENANCE

WARNING

To reduce the risk of injury, adult supervision is 

required. Never use in roadways, near motor vehicles, 

on or near steep inclines or steps, swimming pools, or 

other bodies of water. Always wear shoes, and never allow 

more than one rider at a time.

WARNING

Avoid using water or other liquids for cleaning. If water or 

other liquids enter the Helios, it will cause permanent damage 

to the internal components.

WARNING

Users who disassemble the Helios without permission will 

void the warranty.

11

Summary of Contents for H1-HLOS

Page 1: ...OPERATION MANUAL H1 HLOS HELIOS ELECTRIC FOLDING SCOOTER ...

Page 2: ...ear a properly fitted helmet that complies with CPSC or CE safety standards when you ride your E Scooter Correct Fit Make sure your helmet covers your forehead Incorrect Fit Forehead is exposed and vulnerable to serious injury 1 ...

Page 3: ...ent has been reached and it should be replaced Do not ride in an abusive manner In this manual the CAUTION sign indicates a hazardous situation which if not avoided can cause minor or moderate injury CAUTION WARNING In this manual the WARNING sign indicates a hazardous situation which if not avoided can cause serious injury or death Great care should be taken with the Hover 1 Helios when folding a...

Page 4: ...an learn how to ride the Helios by reading the operation manual and watching videos All users are responsible for any consequences caused by violating warning contents or proper operations Hover 1 can not be held liable ATTENTION 1 Use only the supplied charger from Hover 1 with this E Scooter 2 The operating temperature range of the charger is 32 F 104 F 0 C 40 C 3 The operating temperature range...

Page 5: ...event electric shock explosion and or injury to yourself and damage to the E Scooter Do not use the E Scooter if it has been dropped or damaged in any way Repairs to electrical equipment should only be performed by the manufacturer Improper repairs void the warranty and may place the user at serious risk Do not puncture or harm the exterior surface of the E Scooter in any way Keep the device free ...

Page 6: ... Helios Do not operate if you are pregnant or have a heart condition Persons with any mental or physical conditions that may make them susceptible to injury or impair their physical or mental capabilities to recognize understand and perform all of the safety instructions and assume the hazards inherent in operation should not use the Helios Please keep your serial number on file for warranty claim...

Page 7: ...f the WARRANTY section of this manual in the event that your Hover 1 Helios is lost or stolen The first rule of safe riding is to use common sense Different localities and countries have different laws about riding electric transportation devices on public roads You should check with local officials to ensure you are complying with local traffic law requirements Hover 1 is not liable for tickets o...

Page 8: ...n low visibility conditions ensure your LED headlightisturnedon andthatyouarewearingbright reflectiveclothing Do not ride above your skill level Ensure you have had enough practice with all functions and features of your Helios Do not ride too fast with increased speed comes increased risk If you are moving at a higher speed small bumps can create strong impacts leading to a higher risk of injury ...

Page 9: ...skate park empty pool or in any way similar to a skateboard Misuse of your Helios voids the manufacturer warranty and may lead to injury or damage Do not abuse your Helios Doing so can damage your unit and cause failure to the operating system which may lead to injury Physical abuse including dropping your Helios voids the manufacturer warranty Do not operate in or near puddles of water mud sand s...

Page 10: ...pt to operate the Helios with two or more people Do not carry anything while riding the Helios Individuals with lack of balance should not attempt to operate the Helios Young children and the elderly should not operate the Helios At higher speeds always take longer stopping distances into consideration Do not attempt to jump on or off your Helios Do not attempt any stunts or tricks with your Helio...

Page 11: ...raking distance during wet conditions WARNING There may be additional risk of injury if you use your E Scooter incorrectly This includes but is not limited to Jumping your E Scooter Riding over debris or obstacles Performing stunts Riding off road Riding fast Racing other riders Riding in an unusual manner The aforementioned examples add stress to each part of your E Scooter and can lead to long t...

Page 12: ...ll from high places as doing so may damage the internal circuitry Do not attempt to disassemble the Helios Use only the charger provided by Hover 1 Use only the manufacturer s authorized replacement parts CARE MAINTENANCE WARNING To reduce the risk of injury adult supervision is required Never use in roadways near motor vehicles on or near steep inclines or steps swimming pools or other bodies of ...

Page 13: ...oids the manufacturer warranty Do not connect or attach the E Scooter or the battery to a power supply plug or directly to a car s cigarette lighter DonotplacetheE Scooternearafireorleaveitoutindirectsunlight Heating the E Scooter can break or ignite the battery inside the device Do not continue charging the battery if it does not recharge within the specified charging time Doing so may cause the ...

Page 14: ...animals to touch the battery The battery contains dangerous substances do not open the battery or insert anything into the battery Do not attempt to charge the E Scooter if the battery has discharge or emits any substances In that case immediately distance yourself from the battery in case of fire or explosion WARNING WARNING SEEK IMMEDIATE MEDICAL ASSISTANCE IF YOU ARE EXPOSED TO ANY SUBSTANCE TH...

Page 15: ...umatic tires 10 front rear Front drum and rear disc brakes D058376 2AANZHLOS UL2272 certified Model Net Weight Max Supported Weight Min Supported Weight Max Speed Max Range Battery Type Motor Power Battery Voltage Battery Capacity Power Requirement Folding Size Open Size Tire Type Tire Size Brake Type BT ID FCC ID UL Certification SPECIFICATIONS PARTS LIST A B D E C D 2 Battery Keys E Phone Mount ...

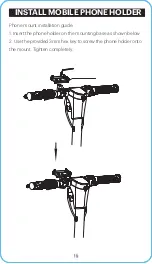
Page 16: ...MOBILE PHONE HOLDER 15 Phone mount installation guide 1 Insert the phone holder on the mounting base as shown below 2 Use the provided 3mm hex key to screw the phone holder onto the mount Tighten completely 15 ...

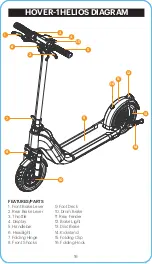
Page 17: ...9 14 12 FEATURES PARTS 1 Front Brake Lever 2 Rear Brake Lever 3 Throttle 4 Display 5 Handlebar 6 Headlight 7 Folding Hinge 8 Front Shocks 9 Foot Deck 10 Drum Brake 11 Rear Fender 12 Brake Light 13 Disc Brake 14 Kickstand 15 Folding Clip 16 Folding Hook 16 ...

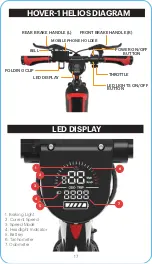
Page 18: ...ISPLAY LED LIGHTS ON OFF BUTTON LED DISPLAY REAR BRAKE HANDLE L FRONT BRAKE HANDLE R MOBILE PHONE HOLDER BELL FOLDING CLIP THROTTLE 1 2 5 6 3 4 7 1 Braking Light 2 Current Speed 3 Speed Mode 4 Headlight Indicator 5 Battery 6 Tachometer 7 Odometer 17 ...

Page 19: ...vatedifferentspeedmodes ensuretheHeliosispoweredonandnot in motion Press the power button 2 times The speed mode number will appear on your display to indicate which speed mode is activated 1 Eco Mode 2 Default Mode 3 Sport Mode KICK TO START For safety reasons the Helios will not accelerate unless it is already moving atleast1 8mph 3km h Youmustpushoffthegroundwithyourfoottoget the Helios moving ...

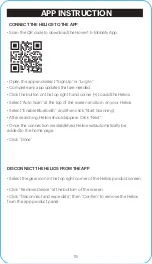
Page 20: ...en Click Remove Device at the bottom of the screen Click Disconnect and wipe data then Confirm to remove the Helios from the app product panel Click the button on the top right hand corner to add the Helios Select Auto Scan at the top of the screen and turn on your Helios Select Enable Bluetooth and then click Start Scanning After searching Helios should appear Click Next Once the connection is es...

Page 21: ...ect the 1 pin charging cable into the charging port of the Helios DO NOT FORCE OR BEND THE CHARGING CABLE AS IT MAY CAUSE THE PRONGS TO BEND OR BREAK The charging indicator light on the charger itself should change to red indicating that your E Scooter is now being charged When the red indicator light on your charger changes to green then your E Scooter is fully charged After fully charging your H...

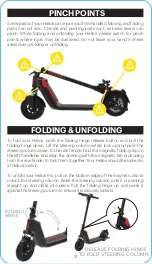
Page 22: ...fety lock up and push the steering column down to the rear fender Find the magnetic folding clip on the left handlebar and align the opening with the magnetic tab protruding from the rear fender to lock them together Your Helios should be locked in a folded position To unfold your Helios Pro pull on the bottom edge of the magnetic clip to unlock the steering column Raise the steering column until ...

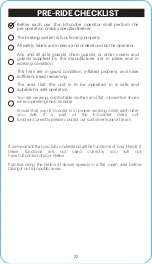
Page 23: ...ad remaining The area that the unit is to be operated in is safe and suitable for safe operation You are wearing comfortable clothes and flat closed toe shoes when operating the E Scooter Ensure that your E Scooter is in proper working order each time you ride If a part of the E Scooter does not function correctly please contact our customer support team It is important that you fully understand a...

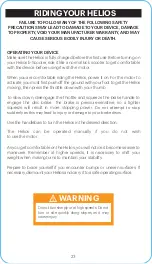
Page 24: ...throttle and squeeze the brake handle to engage the disc brake The brake is pressure sensitive so a tighter squeeze will result in more stopping power Do not attempt to stop suddenly as this may lead to injury or damage to your brake discs Use the handlebars to turn the Helios in the desired direction The Helios can be operated manually if you do not wish to use the motor As you get comfortable on...

Page 25: ...gher operating range than a heavier user Ambient Temperature Please ride and store the E Scooter in recommended temperatures This will increase operating range battery life and overall performance of your device Speed and Riding Style Maintaining a moderate and consistent speed while riding produces maximum operating range Traveling at high speeds for extended periods of time frequent starts and s...

Page 26: ...ces uneven too steep unsafe etc Battery voltage is too low The E Scooter is still charging The E Scooter is overheating or the motor temperature is too high When the battery is about to run out of power the battery icon will flash If any or both tires are blocked the device will stop after 10 seconds When the battery level has depleted below protection mode the motor will power off after 15 second...

Page 27: ... can be determined by turning the equipment off and on the user is encouraged to try to correct the interference by one or more of the following measures Reorient or relocate the receiving antenna Increase the separation between the equipment and receiver Connect the equipment into an outlet on a circuit different from that to which the receiver is connected Consult the dealer or an experienced ra...

Page 28: ...de E4 MOS mainboard MOS tube failure the mainboard needs to be replaced Error code E6 controller instrument communication failure the controller needs to be replaced Error code E7 battery over voltage protection the battery needs to be replaced Error code E9 brake failure the brake needs to be replaced Error code E8 controller error the controller needs to be replaced Affix Serial Number Label Her...

Page 29: ... RideHover1 RideHover1 Hover1Rideables www Hover 1 com ...

Reviews: