Hotpoint Ultima DWF70 Instructions For Installation And Use Manual Download Page 6

ARISTON DISHWASHER - Instructions for installation and use

D

ISHWASHER

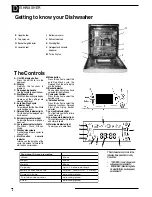
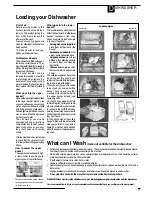
Getting to know your Dishwasher

The Controls

A. ON-OFF display button

Press this button to turn the
display on.

B. Display

Displays the functions in
progress.

C. Door opening handle

Use the handle to open the door.

D. Start/Reset button

With Start, the wash cycle begins,
whereas all the settings are
cleared with Reset.

E. Auto Duo-Wash cycle

indicator light
To remind you that the Duo-Wash
cycle has been set.

F. Delayed Start  indicator light

This indicates that delayed start
has been set.

G. Extra drying indicator light

To indicate that extra drying has
been set.

H. Cycle phase indicator lights

Pre-Wash, Wash, Rinses,
Drying.

I. Wash cycle symbols

A wide range of wash cycles to
choose from.

L. Multifunction numeric

indicator
Informs you the duration of the
cycle, the amount of time left to
wait and any error codes.
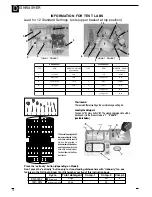
E. Upper basket

F. Top spray arm

G. Basket height adjuster

H. Lower basket

I.

Bottom spray arm

J. Salt container cap

K. Washing filter

L. Detergent and rinse aid

dispenser

M. ‘Turbo Dry’ fan

This dishwasher conforms to the
following European Community
Directives:

73/23/EEC (Low Voltage) and

subsequent amendments;

89/336/EEC (Electromagnetic

Compatibility) and subsequent
amendments;

M. Mode button

Press this button to select the
auto Duo-Wash cycle, the
Delayed Start, the extra drying
and the half load.

N. Basket indicator

Shows which basket you have
selected for the Half Load.

P. Cycle select button

Press this button to select the
desired cycle.

S. ‘Selection’ button

Press this button to select the
following functions: Delayed
Start, Extra Drying, Basket
selection.

T. Low salt indicator light

This light tells you that is is time
to add more salt.

U. Low rinse aid indicator light

This light tells you that it is time to
add more rinse aid.

Q. Water leak indicator light

To warn you of a water leak.

I

E

F

G

N

H

T

U

L

Q

s

c

i

t

s

i

r

e

t

c

a

r

a

h

C

l

a

c

i

n

h

c

e

T

h

t

d

i

W

m

c

0

6

h

t

p

e

D

m

c

0

6

t

h

g

i

e

H

m

c

5

8

y

t

i

c

a

p

a

C

s

g

n

i

t

t

e

s

e

c

a

l

p

4

1

o

t

p

u

e

r

u

s

s

e

r

P

r

e

t

a

W

s

n

i

a

M

)

r

a

b

0

1

3

,

0

(

a

P

M

1

a

P

K

0

3

e

g

a

t

l

o

V

r

e

w

o

P

e

t

a

l

p

g

n

i

t

a

r

e

e

s

r

e

w

o

p

r

e

b

r

o

s

b

a

l

a

t

o

T

e

t

a

l

p

g

n

i

t

a

r

e

e

s

e

s

u

F

e

t

a

l

p

g

n

i

t

a

r

e

e

s

Summary of Contents for Ultima DWF70

Page 1: ...Instructions for Installation and Use Ultima DWF70 DWM75 60cm free standing Dishwasher...

Page 2: ...s Service Hotpoint Guarantee Key Contacts 3 4 5 6 7 8 9 10 11 11 12 13 14 15 16 17 18 19 Back Cover Retention of this Instruction Book This Instruction Book must be kept handy for reference as it cont...

Page 3: ...ea chargewillbemade Itisstronglyadvisedthatthisworkiscarriedout byaqualifiedelectrician Ifthedomesticwiringincludesaresidualcurrent operatedcircuit breaker ensurethatitconformstothelatestregulations S...

Page 4: ...the heating elementduringorstraightafter awashcycle 10 Iftheappliancemalfunctions turnoffthewaterinlettapand disconnecttheplugfromthe wallsocket Thenreadthe sectionentitled Troubleshooting Ifyou cann...

Page 5: ...uringinstallationanduse DONOTpositionthestandpipenear anelectricaloutlet ENSUREthatthedrainhoseisnot kinkedanditisroutedasshownin thediagram Thestandpipeshouldhaveabore ofatleast38mm 11 2 Itshould bei...

Page 6: ...ispenser M Turbo Dry fan Thisdishwasherconformstothe followingEuropeanCommunity Directives 73 23 EEC LowVoltage and subsequentamendments 89 336 EEC Electromagnetic Compatibility andsubsequent amendmen...

Page 7: ...S toselectthedelayedstartby1 to24hours Ifyoupressthisbutton again theword OFF isdisplayed noselectionmade Eachtimethebuttonispressed a beepwillsound Onceyouhave madeyourselectionmakesurethe door is s...

Page 8: ...7 O C E e l c y c y l d n e i r f y l l a t n e m n o r i v n E n o i t p m u s n o c y g r e n e w o l h t i w y t r i d y l l a m r o n r o f e l b a t i u s s l e v e l s e h s i d d n a s n a p s...

Page 9: ...whichisintended fordishwasheruse The salt container is situated underneaththelowerbasket fillit upasfollows 1 Pull out the lower basket completely unscrew and removethecontainercap 2 If it is the firs...

Page 10: ...sappeardulloryoucan seecircularstains The amount of rinse aid needstobereducedifthe dishesarestickyoryoucan seewhitestreaks WerecommendGlist3in1foruseinallHotpointdishwashers Brilliantcleaningisguaran...

Page 11: ...lace mugs and cups as well as long sharp knives and serving cutlery Afterloadingthedishes remember to check that the spray arms can turnfreelywithouthittingagainstany dishes First of all Before placin...

Page 12: ...lades pointingdownwards take care with knife blades Positionthemsothatthey don ttouch e 2 2 2 2 2 2 2 2 2 2 5 3 3 3 3 5 3 3 3 3 3 3 3 3 1 1 1 1 1 1 7 8 1 1 1 1 1 1 4 4 4 4 4 4 4 4 2 4 4 4 4 2 5 5 5 5...

Page 13: ...ARISTON DISHWASHER Instructions for installation and use 13 D ISHWASHER User Quick Guide...

Page 14: ...supplyhose removethefilterand cleanitcarefullyunderrunningwater Then returnthefiltertoitsplaceand tightenthewatersupplyhoseback intoposition Unplug the appliance Beforecarryingoutanycleaningor mainten...

Page 15: ...tbeenused Dishwasher stops suddenly duringawashcycle Therehasbeenapowercut Watersupplyhasbeeninterrupted Knocking sound can be heard insidethedishwasher A spray arm is knocking against dishes Rattling...

Page 16: ...16ARISTONDISHWASHER Instructionsforinstallationanduse D ISHWASHER Notes...

Page 17: ...ARISTON DISHWASHER Instructions for installation and use 17 D ISHWASHER Notes...

Page 18: ...All repairs include a parts and labour guarantee for 12 months from the date of the repair If you require any information or have any questions about your appliance our operators are on hand with hel...

Page 19: ...to the following provisions that your appliance Has been installed and used correctly in accordance with this instruction booklet Has been used solely for domestic purposes and is located on domestic...

Page 20: ...co uk Republic of Ireland 1850 302 200 Note Our operators will require the following information Model number Serial number Extended Warranties UK 08709 088 088 Open 8 to 8 Mon Sun www theservicecent...

Reviews: