background image

FREEZER - MODELS RZA31,RZA33,RZM31,RZM33

INSTRUCTIONS FOR INSTALLATION & USE

GETTING STARTED:

To ensure that your freezer runs reliably and efficiently follow these steps.

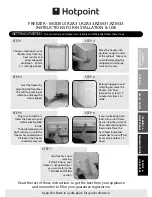
Choose a location for your

freezer, away from any

heat sources and 

allow adequate

ventilation  - 30mm 

(1

1

/

4

inch) gap above.

Level the freezer by

adjusting the front feet.

This will stop rocking or

vibration and keep the

door aligned.

Plug in and switch on.

Allow the freezer to cool

before placing food

inside.

The high temperature

light will stay on until the

freezer has cooled down.

All food in the freezer

should be covered.

Move the freezer into
position, using the sides
of the cabinet. Take care
to avoid damaging the
refrigerant circuit pipe
work on the rear.

Before plugging in and
switching on, leave the
freezer in its final 
location for at least 15
minutes to allow it to 
settle.

If you are freezing fresh
food, turn on fast freeze
by pressing the switch 24
hours before placing the
food inside. Place the
fresh food inside and
remember to turn off fast
freeze 
after another  24
hours.

Read the rest of these instructions to get the best from your appliance 

and remember to fill in your guarantee registration.

Keep this Book in a safe place for quick reference.

STEP 1

STEP 2

STEP 3

STEP 4

STEP 5

STEP 6

SAFET

Y  & 

INST

ALL

A

TION

C

ONTR

OLS

USEFUL  AD

VICE

CLEANING  &

MAINTENANCE

TR
OUBLESHOO

TING

SER

VICE  &

GU
AR
ANTEE

Your freezer is now

working.

If after 24 hours your

freezer is not operating as

you want, refer to the

TROUBLESHOOTING

section.

STEP 7

Summary of Contents for RZA31

Page 1: ...Take care to avoid damaging the refrigerant circuit pipe work on the rear Before plugging in and switching on leave the freezer in its final location for at least 15 minutes to allow it to settle If y...

Page 2: ...zer for instance for defrosting Do not use any mechanical devices for defrosting other than any which may have been supplied with the freezer as they may cause damage Only use this freezer for storing...

Page 3: ...g sounds caused by vibration 3 Minimum space required to open door The freezer needs a space of 600mm 24 inches in front to allow the door to open When positioning the freezer next to a unit a gap of...

Page 4: ...ing on leave the freezer standing in its final location for at least 15 minutes to allow it to settle Fitting a Freezer under a Work Top To minimise running costs Hotpoint recommend fitting a vent to...

Page 5: ...NCE WITH THE FOLLOWING CODE Green Yellow Earth Blue Neutral Brown Live If you change the plug the colour of wires in the mains lead may not correspond with the colour of the markings identifying termi...

Page 6: ...ually suitable If you need to adjust the temperature turn the control wheel Clockwise higher number Colder Anti clockwise lower number Warmer 6 You can check the temperature of the freezer compartment...

Page 7: ...freezer motor will run continuously for extra cooling Red High Temperature Warning Light The red temperature warning light will come on when the freezer is first switched on or when the temperature i...

Page 8: ...d is loaded leave fast freeze on for 24 hours to freeze the food as quickly as possible Maximum freezing capacity 15kg in 24 hours Note Don t forget to turn fast freeze off after 24 hours 7 8 Pre Free...

Page 9: ...tainers with lids are ideal Select chilled and frozen food last when shopping transport in a cool bag and place in freezer as soon as possible after arriving home Avoid opening the door unnecessarily...

Page 10: ...n to children directly from the freezer the low temperature may cause freezer burns Store ice cream towards the top front of the freezer and remove from freezer 15 30 minutes before serving Ensure foo...

Page 11: ...When using the frozen food storage drawers ensure that they are pushed fully back before closing the door Food can be separated into different storage drawers for easy identification When lifting or...

Page 12: ...ost tube is stored in the floor of the freezer Insert the tube into the groove situated in the floor at the front of the freezer Place a container beneath the tube to collect the defrost water 4 As th...

Page 13: ...warm water and washing up liquid to wipe the exterior surface dry thoroughly WARNING Do not use abrasive powder household cleaner bleach or wax polish to clean your freezer they leave a smell in the f...

Page 14: ...o the bottom right hand side of the appliance Unscrew the foot and footplate fitted to the bottom left hand side of the appliance 7 Refit the hinge bracket and the footplate to the opposite sides of t...

Page 15: ...nce just been loaded with a large quantity of food The light will go out once all the food has reached the correct temperature 3 Check door has been closed properly The Amber light is on 1 The fast fr...

Page 16: ...can be louder when it first switches on This sound will reduce over the first few months Gases flowing through the pipes can produce gurgling bubbling roaring or humming noises The temperature contro...

Page 17: ...and used correctly in accordance with this instruction booklet Has been used solely for domestic purposes and is located on domestic premises ie not for commercial or trade use Has been properly conne...

Page 18: ...the UK with over 1100 of our own fully trained engineers All repairs include a parts and labour guarantee for 12 months from the date of the repair If you require any information or have any questions...

Page 19: ...Notes...

Page 20: ...iday 8am to 7 30pm Saturday 8 30am to 5 30pm Sunday 9 30am to 3 30pm www hotpointservice co uk Republic of Ireland 1850 302 200 Note Our operators will require the following information Model number S...

Reviews: