8
Your dishwasher may not work properly.
Before contacting the Service Centre check if the problem can be solved by going through the following list.
TROUBLESHOOTING
MAINTENANCE AND TROUBLESHOOTING GUIDE
For more information, maintenance procedures and troubleshooting,
see the
Use and Care Guide
The
Use and Care Guide
can be obtained by:
• After-Sales Service; phone number see in warranty booklet.
• download from website:
docs.hotpoint.eu
• use QR code
TECHNICAL DATASHEET
The technical data containing the energy consumption data can be
downloaded from the website:
docs.hotpoint.eu
CONTACTING AFTER-SALES SERVICE
When you contact the After-Sales Service,
you must provide the codes shown on the
rating plate attached to the left or right side
inside the door of the dishwasher. The pho-
ne number is listed in the warranty booklet
or on the website:
www.hotpoint.eu
IEC 436
:
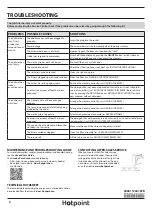
PROBLEMS
POSSIBLE CAUSES
SOLUTIONS
The dishwasher
won’t start
or does not
respond to com-
mands.
The appliance has not been plugged in
properly.
Insert the plug into the socket.
Power outage.
The dishwasher starts automatically when the power returns.
The dishwasher door is not closed.
Vigorously push the door until you hear the “click”.
It does not respond to commands.
Switch off the appliance by pressing the
ON/OFF
button, switch it back on
after approximately one minute and reset the program.
The dishwasher
won’t drain.
The wash cycle has not fi nished yet.
Wait until the wash cycle fi nishes.
The drain hose is bent.
Check that the drain hose is not bent
(see INSTALATION INSTRUCTION).
The sink drain pipe is blocked.
Clean the sink drain pipe.
The fi lter is clogged up with food residues.
Clean the fi lter
(see CLEANING THE FILTER ASSEMBLY).
The dishwasher
makes
excessive noise.
The dishes are rattling against each
Position the crockery correctly
(see LOADING THE RACKS).
An excessive amount of foam has been
produced.
The detergent has not been measured out correctly or it is not suitable for
use in dishwashers
(see FILLING THE DETERGENT DISPENSER).
Reset dishwa-
sher by pressing the DRAIN button
(see OPTIONS AND FUNCTIONS)
and run
new program without detergent.
The dishes are
not clean.
The crockery has not been arranged
properly.
Arrange the crockery correctly
(see LOADING THE RACKS).
The spray arms cannot rotate freely, being
hindered by the dishes.
Arrange the crockery correctly
(see LOADING THE RACKS).
The wash cycle is too gentle.
Select an appropriate wash cycle
(see PROGRAMS TABLE).
An excessive amount of foam has been
produced.
The detergent has not been measured out correctly or it is not suitable for use
in dishwashers
(see FILLING THE DETERGENT DISPENSER).
The cap on the rinse aid compartment has
not been shut correctly.
Make sure the cap of the rinse aid dispenser is closed.
The fi lter is soiled or clogged.
Clean the fi lter assembly
(see CARE AND MAINTENANCE).
There is no salt.
Fill the salt reservoir
(see FILLING THE SALT RESERVOIR).
400011260187B
05/2018 mk - Xerox Fabriano


