


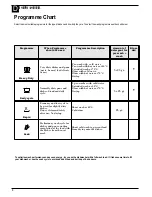


12
D
ISHWASHER
Care and Cleaning
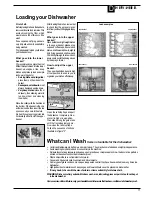
The filter assembly
• If you want consistent good results
from your dishwasher, you need to
clean the filter assembly.
• Remove the larger food particles
trapped inside the cup “C” and the
semi-circular filter A after each
wash; pull the cup handle upwards
to remove them. Just rinse them
under running water.
• The entire filter assembly should
be cleaned thoroughly once a month:
cup C + semi-circular filter A +
cylindrical filter B. Rotate filter “B”
anticlockwise to remove it.
For cleaning, use a non metallic
brush.
Reassemble the filter parts (as
shown in the figure) and reinsert the
whole assembly into the
dishwasher. Position it into its
housing and press downwards.
The dishwasher is not to be used
without filters. Improper replacement
of the filters may reduce the
efficiency of the wash and even
damage your dishwasher.
Cleaning the spray arms.
Food residue may become
encrusted onto the spray arms and
block the holes where water comes
out. Check the spray arms regularly
and clean them once in a while.
DO NOT use solvents or abrasives
to clean the exterior and rubber parts
of your appliance, do not use
solvents or abrasive cleaning
products. Use a cloth dampened
with lukewarm soapy water only.
If there are any stains on the surface
of the appliance interior, use a cloth
dampened with water and a little
white vinegar, or a cleaning product
specifically made for dishwashers.
1
2
A
B
C
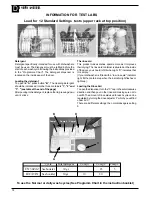
Cleaning the Water Inlet
Filter
Periodically clean the water inlet filter
(see figure 2 under "Installation")
located on the outlet of the water
supply tap. After turning off the water
tap, unscrew the end of the water
supply hose, remove the filter and
clean it carefully under running water.
Then, return the filter to its place and
tighten the water supply hose back
into position.
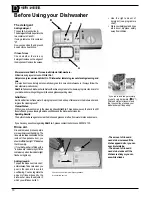
Unplug the appliance.
Before carrying out any cleaning or
maintenance on the dishwasher,
always remove the plug from the
electricity socket.
After every wash.
When the wash cycle has ended,
always remember to turn off the
water supply tap and to leave the
appliance door ajar. This way,
moisture and bad odours will not be
trapped inside.
The seals.
One of the factors that cause
unpleasant odours to form inside the
dishwasher is food that remains
trapped in the seals. Periodic
cleaning using a damp sponge will
prevent this from occurring.
Going away
If the dishwasher is not going to be
used for some time, carry out the
following:
• run a cycle with the dishwasher
empty.
• switch off at the electrical socket
and unplug.
• turn off the water supply tap,
disconnect the inlet hose and
allow to drain.
• fill the rinse aid dispenser.
• leave the door ajar, to prevent the
build up of unpleasant odours
inside the dishwasher.
Before using the dishwasher after a
long break, plug in and switch on at
the electrical socket. Reconnect the
inlet hose and turn on the water
supply tap. Check there are no
deposits of rust inside the water
pipe, if there are allow water to run
from the supply tap for a few
minutes.
Moving the appliance.
Drain water from the dishwasher.
Secure all loose parts. Only
transport in an upright position.
• If not kept upright during transport,
any water remaining inside may
seep into the control module and
cause subsequent errors with
programme functions.
Disconnecting the dishwasher.
When disconnecting the dishwasher
it is important that tasks are carried
out in the correct sequence.
• switch off at the mains and remove
the plug from the socket.
• turn off the water supply.
• disconnect drain and water inlet
hose.
• pull out the dishwasher, carefully,
withdrawing hoses at the same
time.
Summary of Contents for BFI62
Page 1: ...Instructions for Installation and Use Dishwasher Model BFI62...
Page 2: ......
Page 4: ......
Page 19: ......