background image

10

D

ISHWASHER

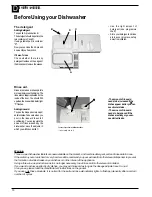
Rinse aid.

Rinse aid makes dishes sparkle
more as it improves their drying. The
rinse aid container is situated on the
inside of the door. You should fill it
up when the rinse aid indicator light
T” flashes.

Adding rinse aid.
To open the dispenser, turn cap C
anticlockwise. Take care when you
pour in the rinse aid to avoid it
overflowing. You can regulate the
amount of rinse aid used by the
dishwasher, move the adjuster F
which you will find under lid C.

The detergent

Adding detergent
To open lid A, press button B.
The detergent should be put into the
two containers C and D.
If using a tablet, put it in container
"D".
Now you can close the lid: press it
down until you hear it click.

If it won't close
Check whether there is any
detergent residue on the edges of
the dispenser. Remove the excess.

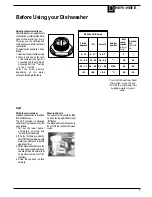
You can choose from six different positions.

It is normally set to  4.

Before Using your Dishwasher

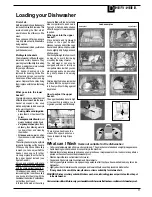
- The amount of rinse aid
needs to be increased if the
dishes appear dull or you can
see circular stains.
- The amount of rinse aid
needs to be reduced if the
dishes are sticky or you can
see white streaks.

• Use the right amount of

detergent (see programme
chart).

• Store your detergent and rinse

aid in a cool, dry place, safely
away from children.

Warning
Three-in-one dishwasher tablets are now available on the market, and combine detergent, salt and rinse aid all in one.
If the water in your area is hard or very hard, we still recommend you pour extra salt into the relevant dispenser to prevent
the formation of white streaks on your dishes or on the interior of the appliance.
Using a three-in-one product means it is no longer necessary to put rinse aid into the relevant container.
If you want to achieve perfectly dry dishes, you may add rinse aid as long as the dosage adjuster is set to no.2.
In any case, please read the manufacturer's instructions on the packet.
If you use only these products, it is normal for the salt and rinse aid indicator lights to flash permanently after a certain
number of cycles.

B

D

C

A

F

C

Summary of Contents for BFI 680

Page 1: ...Instructions for Installation and Use Dishwasher Model BFI 680...

Page 2: ...me familiar with the appliance and safety warnings If the Book is lost or damaged a copy may be obtained from Electrical Connection For Your Safety Installation Getting to know your Dishwasher The Con...

Page 3: ...glyadvisedthatthisworkiscarriedout byaqualifiedelectrician Ifthedomesticwiringincludesaresidualcurrent operatedcircuit breaker ensurethatitconformstothelatestregulations Safety Information Atthetimeof...

Page 4: ...dfloor ensurethatthe openingsontheundersideare notobstructed 9 Do not touch the heating elementduringorstraightafter awashcycle 10 Iftheappliancemalfunctions turnoffthewaterinlettapand disconnectthepl...

Page 5: ...andmustdischargeintothe same drain system as your householdsink It MUST NOT be connected to a surfacewaterdrain Anti floodingprotection Your dishwasher has a special system which stops the water suppl...

Page 6: ...et to be washed E Upperbasket F Topsprayarm G Basketheightadjuster H Lowerbasket I Bottomsprayarm J Saltcontainercap K Washingfilter L Detergentandrinseaid dispenser Thisdishwasherconformstothe follow...

Page 7: ...delay willcomeon Selectthedesiredwashcycle Closethedoorand afteryouhear the beep the countdown to the delayedstartwillbegin If forexample youhavesetthe delayedstartto6hours the6hour indicatorlightwill...

Page 8: ...K FROG ZDWHU 5LQVH ZLWK KRW ZDWHU DW U LQJ J XWR 1RUPDO FOH IRU QRUPDOO GLUW SDQV DQG GLVKHV 6WDQGDUG GDLO F FOH DVK DW ROG 5LQVH 5LQVH ZLWK KRW ZDWHU DW U LQJ J 6RDNLQJ 3UHOLPLQDU ZDVK F FOH IRU GLVK...

Page 9: ...utono my cycles 2 kg 0 14 0 17 0 1 7 0 14 36 18 44 1 8 4 4 20 60 36 71 45 89 4 5 8 9 MED 40 40 71 89 8 9 60 25 Filling the salt container Alwaysusesaltwhichisintended fordishwasheruse The salt contain...

Page 10: ...sedifthe dishesappeardulloryoucan seecircularstains The amount of rinse aid needstobereducedifthe dishesarestickyoryoucan seewhitestreaks Use the right amount of detergent see programme chart Storeyou...

Page 11: ...ittedwithtwodetachable side compartments as shown in figureA1 whichcanbehookedon eithertheupperorlowerbasketas required What goes into the upper basket Place delicate and lightweight dishes in the upp...

Page 12: ...thedishwasher Beforeusingthedishwasheraftera longbreak pluginandswitchonat theelectricalsocket Reconnectthe inlethoseandturnonthewater supply tap Check there are no depositsofrustinsidethewater pipe i...

Page 13: ...emovesuchmarks Tap off alarm Ifyouhaveforgottentoturnthewa tertapon yourappliancewillre mindyouofthisbysoundingafew shortbeepsforafewminutes Turn thetaponandyourappliancewill startupagainafterafewminu...

Page 14: ...te r Vo lu m a p p ro x im a te ly A s o u p e p la te 2 3 c m e c u p 0 2 0 l B d in n e r p la te 2 6 c m f s e rv in g b o w l 1 9 c m C d e s s e r t p la te 1 9 c m g g la s s 2 5 0 m l D o va l...

Page 15: ...ll repairs include a parts and labour guarantee for 12 months from the date of the repair If you require any information or have any questions about your appliance our operators are on hand with help...

Page 16: ...he following provisions that your appliance l Has been installed and used correctly in accordance with this instruction booklet l Has been used solely for domestic purposes and is located on domestic...

Page 17: ...17 D ISHWASHER Notes...

Page 18: ...18 D ISHWASHER Notes...

Page 19: ...19 D ISHWASHER Notes...

Page 20: ...uk Republic of Ireland 1850 302 200 Note Our operators will require the following information Model number Serial number Extended Warranties UK 08709 088 088 Open 8 to 8 Mon Sun www theservicecentre c...

Reviews: