Hotpoint AHP69PX Operating Instructions Manual Download Page 2

2

/*

Ventilation

To ensure adequate ventilation is provided, the back

panel of the cabinet must be removed. It is

advisable to install the oven so that it rests on two

strips of wood, or on a completely flat surface with

an opening of at least 45 x 560 mm (

see diagrams

).

Centring and fixing

Position the 4 tabs on the side of the oven, in line

with the 4 holes on the outer frame. Adjust the tabs

according to the thickness of the cabinet side panel,

as shown below:

20 mm thick: take off the

removable part of the tab

(

see  diagram

).

18 mm thick: use the first

groove, which has already

been set in the factory

(

see  diagram

).

16 mm thick: use the second

groove  (

see  diagram

).

Secure the appliance to the cabinet by opening the

oven door and inserting 4 screws into the 4 holes on

the outer frame.

!

 All parts which ensure the safe operation of the

appliance must not be removable without the aid of

a tool.

!

 Before operating your new appliance please read

this  instruction  booklet  carefully.  It  contains

important information concerning the safe operation,

installation and maintenance of the appliance.

!

 Please keep these operating instructions for future

reference. Pass them on to possible new owners of

the  appliance.

Positioning

!

 Keep packaging material out of the reach of

children.

It can become a choking or suffocation hazard. (

see

Precautions  and  tips

).

!

 The appliance must be installed by a qualified

professional in accordance with the instructions

provided. Incorrect installation may cause harm to

people and animals or may damage property.

Built-in  appliance

Use the appropriate cabinet to ensure that the

appliance  functions  properly.

• The panels adjacent to the oven must be made of

heat-resistant  material.

• Cabinets with a veneer exterior must be

assembled with glues which can withstand

temperatures of up to 100°C.

• to install the oven under the counter (

see diagram

)

or in a kitchen unit, the cabinet must have the

following  dimensions:

!

 The appliance must not come into contact with

electrical parts once it has been installed.

The indications for consumption given on the data

plate have been calculated for this type of

installation.

595 mm.

595 mm.

24 mm.

545 mm.

5 mm.

567 mm.

23 mm.

593 mm.

45 mm.

558 mm.

Installation

560 mm.

45 mm.

Summary of Contents for AHP69PX

Page 1: ...s 6 8 Cooking modes Programming cooking Practical cooking advice Cooking advice table Precautions and tips 9 General safety Disposal Respecting and conserving the environment Care and maintenance 10 1...

Page 2: ...oncerning the safe operation installation and maintenance of the appliance Please keep these operating instructions for future reference Pass them on to possible new owners of the appliance Positionin...

Page 3: ...he cable clamp screw and the contact screws L N Fasten the wires beneath the screwheads using the following colour scheme Blue N Brown L Yellow Green Fasten the power supply cable in the corresponding...

Page 4: ...ion 2 position 1 Description of the appliance Overall view Control panel Display SELECTOR Knob THERMOSTAT knob DISPLAY TIME SETTING button FAST CLEAN button TIMER knob TEMPERATURE and TIME digits END...

Page 5: ...temperature may be changed by turning the THERMOSTAT knob 3 When the preheating indicator switches off and a buzzer sounds the preheating process is complete you may now place the food in the oven 4...

Page 6: ...e heating elements through forced circulation of the air throughout the oven This helps prevent food from burning on the surface and allows the heat to penetrate right into the food Always cook in thi...

Page 7: ...appears on the DISPLAY the oven will stop cooking and a buzzer sounds Programming has been set when the and buttons are illuminated The DISPLAY shows the cooking end time and the cooking duration alte...

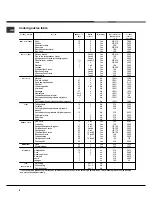
Page 8: ...00 100 100 100 15 20 10 15 8 10 10 15 15 20 15 20 15 20 10 12 3 5 70 80 70 80 Grilledchicken Cuttlefish Spit roastchickenusingrotisseriespit where present Spit roastduckusingrotisseriespit wherepresen...

Page 9: ...nance work without having disconnected the appliance from the electricity mains If the appliance breaks down under no circumstances should you attempt to perform the repairs yourself Repairs carried o...

Page 10: ...ch the surface and cause the glass to crack For more thorough cleaning purposes the oven door may be removed 1 Open the oven door fully see diagram 2 Lift up and turn the small levers located on the t...

Page 11: ...isplay when lit indicates that the oven door was automatically locked as soon as the temperature reached a high value The icon indicates that the cleaning cycle may be cancelled at any time by pressin...

Page 12: ...t its life UK 08709 077 077 Republic of Ireland 0818 313 413 www hotpointservice co uk Appliance Registration We want to give you additional benefits of Hotpoint ownership To activate your free 5 year...

Page 13: ...ion Replacement of any consumable item or accessory These include but are not limited to plugs cables batteries light bulbs fluorescent tubes and starters covers and filters Replacement of any removab...

Page 14: ...14 Notes...

Page 15: ...15 Notes...

Page 16: ...16 10 2006 195058925 00 XEROX BUSINESS SERVICES Notes...

Reviews: