background image

27

GB

Start-up and use

!

 The glue applied on the gaskets leaves traces of

grease on the glass. Before using the appliance, we
recommend you remove these with a special non-
abrasive cleaning product. During the first few hours
of use there may be a smell of rubber which will
disappear very quickly.

!

 A few seconds after the hob is connected to the

electricity supply, a buzzer will sound. The hob may
now be switched on.

Types of noise during normal hob operation:

• Buzz:

Buzz:

Buzz:

Buzz:

Buzz: due to the vibration of the metallic parts
that make up the induction element and the pot; it
is generated by the electromagnetic field required
for heating and increases as the power of the
induction element increases.

• Soft whistle:

Soft whistle:

Soft whistle:

Soft whistle:

Soft whistle: heard when the pot placed on the
heating zone is empty; the noise disappears once
food or water is placed into the pot.

• Crackle:

Crackle:

Crackle:

Crackle:

Crackle:  produced by the vibration of materials
on the bottom of the pot due to the flow of
parasitic currents caused by electromagnetic
fields (induction); can be more or less intense
depending on the material making up the bottom
of the pot, and decreases as the pot dimensions
increase.

• Loud whistle:

Loud whistle:

Loud whistle:

Loud whistle:

Loud whistle: heard when two induction
elements of the same group function
simultaneously at maximum power and/or when
the booster function is set on the larger element
while the other is auto-adjusted. Noise is reduced
by decreasing the power level of the auto-
adjusted induction element; pot bottom layers
made of different kinds of materials are among
the main causes of this noise.

• Fan noise:

Fan noise:

Fan noise:

Fan noise:

Fan noise: a fan is necessary to ensure the hob
functions correctly and to safeguard the electronic
unit from possible overheating. The fan functions
at maximum power when the large induction
element is at maximum power or when the booster
function is on; in all other cases, it works at
average power depending on the temperature
detected. Furthermore, the fan may continue to
work even after switching the hob off, if the
temperature detected is high.

The types of noise listed above are due to induction
technology and are not necessarily operational
faults.

!

 If the 

-----

 or 

+

+

+

+

+

 button is pressed for an extended

period of time, the display scrolls quickly though the
power levels and timer minutes.

Switching on the hob

To switch the hob on, press and hold the 

 button

for approximately one second.

Switching on the cooking zones

Each cooking zone is controlled using a selector

button 

 and a power adjustment device

consisting of power level selector buttons between
the values of 0 and 9.
• To begin operating a cooking zone, press the

corresponding control button and set the desired
power level using the power level selector buttons
between 0 and 9.

Switching off the cooking zones

To switch off a cooking zone, select it using the

corresponding selector button 

 and:

• Press power level selector button 0: this

immediately returns the power setting to 0 and the
cooking zone switches off.

Booster function

The booster function for some of the cooking zones
may be used to shorten heating-up times. It may be

activated by pressing the 

Booster

/

Booster

 button. The

indicator light directly above the button will illuminate.
This function boosts the power to 2000 W or 3000 W,
depending on the size of the relevant cooking zone.
The booster stops automatically after 4 minutes. While
the booster for one of the cooking zones is active, the
corresponding front or rear cooking zone will operate at
a reduced power level (e.g. if the booster for the rear
left-hand hotplate has been activated, the power level
of the front left-hand hotplate will be reduced). For
further information, please refer to the 

Technical

description of the models

.

Programming the cooking duration

!

 All the cooking zones may be programmed

simultaneously, for a duration between 1 and 99
minutes.

1. Select the cooking zone using the corresponding
selector button.
2. Adjust the power level of the cooking zone.

3. Press the 

 programming button. The indicator light

corresponding to the selected zone will start flashing.

Summary of Contents for KIO 642 DD B

Page 1: ...i una cottura Il contaminuti Blocco dei comandi Spegnimento del piano cottura Modalità demo Consigli pratici per l uso dell apparecchio Dispositivi di sicurezza Consigli pratici per la cottura Precauzioni e consigli 9 Sicurezza generale Smaltimento Manutenzione e cura 10 Escludere la corrente elettrica Pulire l apparecchio Smontare il piano Descrizione tecnica dei modelli 11 Italiano 1 IT Français...

Page 2: ...emperatura di circa 100 C se si desidera installare il piano cottura sopra un forno questo deve essere provvisto di un sistema di raffreddamento a ventilazione forzata evitare di installare il piano cottura sopra una lavastoviglie all occorrenza frapporre un elemento di separazione a tenuta stagna fra i due apparecchi a seconda del piano cottura che si desidera installare vedi figure il vano del m...

Page 3: ...0 240V 1 N 50 Hz giallo verde N i 2 fili blu insieme L marrone insieme al nero Altri tipi di collegamento Se l impianto elettrico corrisponde a una delle seguenti caratteristiche Tensione tipo e frequenza di rete 400V 2 N 50 Hz 220 240V 3 50 Hz 400V 3 N 50 Hz 400V 2 2N 50 Hz Separare i cavi ed effettuare il collegamento dei fili in accordo con la tabella e i disegni che seguono Tensione tipo e fre...

Page 4: ...i vedi Avvio e utilizzo Tasti SELEZIONE POTENZA ZONE COTTURA per accendere la piastra e regolare la potenza vedi Avvio e utilizzo Spia CONTAMINUTI indica che è attivo il contaminuti Tasto BOOSTER per accendere la sovralimentazione 3000 W della zona di cottura vedi Avvio e utilizzo Spia BOOSTER indica che è attiva la funzione di sovralimentazione booster Questo prodotto soddisfa i requisiti imposti...

Page 5: ...a alla massima potenza quando l induttore grande è al massimo livello di potenza o quando è inserita la funzione booster in tutti gli altri casi funziona a potenza media a seconda della temperatura rilevata Inoltre è possibile che la ventola continui a funzionare anche dopo la disattivazione del piano se la temperatura rilevata è alta I rumori elencati sono dovuti alla tecnologia induzione e non s...

Page 6: ...rata tramite i tasti e 3 Confermare premendo il tasto Il conto alla rovescia del timer ha inizio immediatamente A tempo scaduto viene emesso un segnale acustico per la durata di 1 minuto Blocco dei comandi Quando il piano cottura è in funzione è possibile bloccare i comandi per evitare il rischio di modifiche fortuite alle regolazioni bambini operazioni di pulizia ecc Premendo il tasto i comandi s...

Page 7: ...resenza di una pentola di dimensioni adeguate alla zona di cottura stessa La spia lampeggiante può indicare una pentola incompatibile una pentola di diametro insufficiente il sollevamento della pentola Surriscaldamento In caso di surriscaldamento dei componenti elettronici il piano cottura si spegne automaticamente e sul display appare F seguito da un numero lampeggiante Questo messaggio scompare ...

Page 8: ...ttura a fuoco lentissimo Crêpe Cottura a fuoco vivo e doratura Arrosti Bistecche Scaloppine Filetti di pesce Uova al tegamino Addensamento rapido Sughi liquidi Acqua bollente Pasta Riso Verdure Latte S Addensamento lento Sughi consistenti S Cottura a bagnomaria Cottura Pentola a pressione dopo il sibilo Cottura a fuoco lento Stufati Riscaldamento delle pietanze Salsa al cioccolato Mantenimento al ...

Page 9: ...le siano sempre rivolti verso l interno del piano cottura per evitare che vengano urtati accidentalmente Non staccare la spina dalla presa della corrente tirando il cavo bensì afferrando la spina Non fare pulizia o manutenzione senza aver prima staccato la spina dalla rete elettrica Non è previsto che l apparecchio venga utilizzato da persone bambini compresi con ridotte capacità fisiche sensorial...

Page 10: ...hietto immediatamente finché la superficie è ancora calda Una volta pulito il piano può essere trattato con un prodotto specifico per la manutenzione e la protezione la pellicola invisibile lasciata da questo prodotto protegge la superficie in caso di scolamenti durante la cottura Si raccomanda di eseguire queste operazioni con l apparecchio tiepido o freddo Ricordarsi sempre di risciacquare con a...

Page 11: ...sx Posteriore dx Anteriore sx Anteriore dx Potenza totale KIO 642 DD Z KIO 642 DD B Potenza in W I 1400 600 se Ant Sx I 2200 B 3000 I 2200 B 3000 I 1400 600 se Post Dx 7200 KIO 644 DD Z KIO 744 DD Z KIO 744 DO B Potenza in W I 1400 B 2000 600 se Ant Sx I 2200 B 3000 1600 se Ant Dx I 2200 B 3000 1600 se Post Sx I 1400 B 2000 600 se Post Dx 7200 Legenda I zona di cottura a induzione semplice B boost...

Page 12: ...r Verrouillage des commandes Extinction de la table de cuisson Mode Démonstration demo Conseils d utilisation de l appareil Les sécurités Conseils utiles pour la cuisson Précautions et conseils 20 Sécurité générale Mise au rebut Nettoyage et entretien 21 Mise hors tension Nettoyage de l appareil Démontage de la table Description technique des modèles 22 KIO 644 DD Z KIO 642 DD B KIO 642 DD Z KIO 7...

Page 13: ...le matériau du plan d appui doit pouvoir résister à une température d environ 100 C en cas d installation de la table de cuisson au dessus d un four il faut que ce dernier soit équipé d un dispositif de refroidissement par ventilation forcée éviter d installer la table de cuisson au dessus d un lave vaisselle si c est le cas prévoir une séparation étanche entre les deux appareils selon la table de...

Page 14: ...leus ensemble L le marron avec le noir Autres types de branchement Si l installation électrique correspond à une des caractéristiques suivantes Tension type et fréquence réseau 400V 2 N 50 Hz 220 240V 3 50 Hz 400V 3 N 50 Hz 400V 2 2N 50 Hz Séparer les câbles et procéder au raccordement des fils en suivant les indications du tableau et des dessins suivants Tension type et fréquence réseau Cordon él...

Page 15: ...tion Touche VERROUILLAGE DES COMMANDES pour empêcher toute intervention extérieure sur les réglages de la table de cuisson voir Mise en marche et Utilisation Voyant COMMANDES VERROUILLÉES pour signaler le verrouillage des commandes voir Mise en marche et Utilisation Touche SÉLECTION PUISSANCE FOYERS pour allumer le foyer et régler sa puissance voir Mise en marche et utilisation Voyant MINUTEUR il ...

Page 16: ... puissancemaximumquandlegénérateurplusgrandestàson niveaudepuissancemaximumouquandlafonctionbooster est insérée dans tous les autres cas il fonctionne à sa puissanceintermédiaireselonlatempératuredétectée Ilse peut d ailleurs que le ventilateur continue à fonctionner même après la désactivation de la table si la température détectée est trop élevée Les bruits énumérés sont rattachés à la technolog...

Page 17: ...l est possible de verrouiller les commandes pour empêcher toute intervention extérieure sur le réglage enfants nettoyage Appuyer sur la touche pour verrouiller les commandes le voyant situé au dessus de la touche s allume Pour pouvoir modifier les réglages interrompre la cuisson par ex il faut déverrouiller les commandes appuyer sur la touche pendant quelques instants le voyant s éteint et les com...

Page 18: ...serole a été soulevée Surchauffe En cas de surchauffe de ses composants électroniques la table s éteint automatiquement et l afficheur indique Fsuivi d un chiffre clignotant Cet affichage disparaît et la table est à nouveau utilisable dès que la température est redescendue à un niveauacceptable Interrupteur sécurité L appareil est équipé d un interrupteur de sécurité qui interrompt instantanément ...

Page 19: ... douce Cuisson très douce Crêpes Saise et coloration Rotis Steack Escalope Filets de poisson Oeufs au plat Réduction rapide Sauce liquides Eau Frémissante Pates Riz Légumes Lait S Réduction lente Sauce épaisses S Cuisson au bain marie Cuisson Autocuiseur après chuchotement Mijotage Ragouts Réchauffage des préparations Sauce chocolat Maintien au chaud ...

Page 20: ...jours tournés vers l intérieur de la table de cuisson pour éviter tout risque d accident Ne pas tirer sur le câble pour débrancher la fiche de la prise de courant N effectuer aucune opération de nettoyage ou d entretien sans avoir auparavant débranché la fiche de la prise de courant Il n est pas prévu que cet appareil soit utilisé par des personnes enfants compris présentant des capacités physique...

Page 21: ...nlevé à l aide du grattoir tant que la surface est encore chaude Une fois que la table est propre elle peut être traitée avec un produit d entretien et de protection spécial celui ci forme un film invisible qui protège la surface en cas de débordement accidentel Opérer de préférence quand l appareil est tiède ou froid Prendre soin de toujours bien rincer à l eau claire et d essuyer la table les ré...

Page 22: ...t droit Puissance totale KIO 642 DD Z KIO 642 DD B Puissance en W I 1400 600 si avant gche I 2200 B 3000 I 2200 B 3000 I 1400 600 si arrière drt 7200 KIO 644 DD Z KIO 744 DD Z KIO 744 DO B Puissance en W I 1400 B 2000 600 si avant gche I 2200 B 3000 1600 si avant drt I 2200 B 3000 1600 si arrière gche I 1400 B 2000 600 si arrière drt 7200 Légende I foyer à induction simple B booster le foyer peut ...

Page 23: ...ing duration Timer Control panel lock Switching off the hob Demo mode Practical advice on using the appliance Safety devices Practical cooking advice Precautions and tips 31 General safety Disposal Care and maintenance 32 Switching the appliance off Cleaning the appliance Disassembling the hob Technical description of the models 33 KIO 644 DD Z KIO 642 DD B KIO 642 DD Z KIO 744 DD Z KIO 744 DO B H...

Page 24: ...a temperature of approximately 100 C If the appliance is to be installed above an oven the oven must be equipped with a forced ventilation cooling system Avoid installing the hob above a dishwasher if this cannot be avoided place a waterproof separation device between the two appliances Depending on the hob you want to install the cabinet must have the following dimensions see figure 560 1 490 1 4...

Page 25: ...onds with one of the following Voltage and mains frequency 400V 2 N 50 Hz 220 240V 3 50 Hz 400V 3 N 50 Hz 400V 2 2N 50 Hz Separate the wires and connect them in accordance with the instructions given in the following table and diagrams Voltage and mains frequency Electrical cable Wire connection 400V 2 N 50 Hz 220 240V 3 50 Hz 400V 3 N 50 Hz yellow green N the two blue wires together L1 black L2 b...

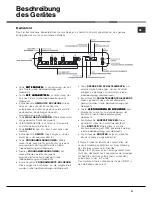
Page 26: ...ng used during a cooking programme see Start up and use CONTROL PANEL LOCK button prevents accidental changes to the hob settings see Start up and use CONTROL PANEL LOCK indicator light shows the control panel has been locked see Start up and use COOKING ZONE POWER SELECTOR buttons switch on the hotplate and control the power see Start up and use TIMER indicator light shows that the timer has been...

Page 27: ...average power depending on the temperature detected Furthermore the fan may continue to work even after switching the hob off if the temperature detected is high The types of noise listed above are due to induction technology and are not necessarily operational faults If the or button is pressed for an extended period of time the display scrolls quickly though the power levels and timer minutes Sw...

Page 28: ...tons 3 Confirm by pressing the button The timer begins counting down immediately When the time has elapsed a buzzer will sound for one minute Control panel lock When the hob is switched on it is possible to lock the oven controls in order to avoid accidental changes being made to the settings by children during cleaning etc Press the button to lock the control panel the indicator light above the b...

Page 29: ...ing zone is placed on it If the indicator light is flashing it may indicate An incompatible pan A pan whose diameter is too small The pan has been removed from the hotplate Overheating protection If the electronic elements overheat the hob switches off automatically and F appears on the display followed by a flashing number When the temperature has reached a suitable level this message disappears ...

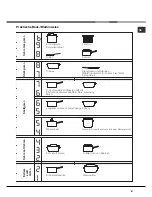
Page 30: ...w flame cooking Very low flame cooking Crêpes Cooking on a high flame and browning roasts steaks escalopes fish fillets fried eggs Fast thickening liquid juices Boiling water pasta rice vegetables Milk S Slow thickening dense juices S Bain marie cooking Pressure cooking after whistle Low flame cooking stews Reheating dishes Chocolate sauce Keeping food hot ...

Page 31: ...ce always pull the plug from the mains socket do not pull on the cable Never perform any cleaning or maintenance work without having disconnected the appliance from the electricity mains The appliance should not be operated by people including children with reduced physical sensory or mental capacities by inexperienced individuals or by anyone who is not familiar with the product These individuals...

Page 32: ...mmediately with the scraper while the surface is still hot Once it is clean the hob may be treated with a special protective maintenance product the invisible film left by this product protects the surface from drips during cooking This maintenance task should be carried out while the appliance is warm not hot or cold Always remember to rinse the appliance well with clean water and dry it thorough...

Page 33: ...wer KIO 642 DD Z KIO 642 DD B Power W I 1400 600 if Front Left I 2200 B 3000 I 2200 B 3000 I 1400 600 if Back Right 7200 KIO 644 DD Z KIO 744 DD Z KIO 744 DO B Power W I 1400 B 2000 600 if Front Left I 2200 B 3000 1600 if Front Right I 2200 B 3000 1600 if Back Left I 1400 B 2000 600 if Back Right 7200 Key I single induction cooking zone B booster the power level of the cooking zone may be boosted ...

Page 34: ...n der Kochzonen Programmierung der Garzeit Die Minutenuhr Sperre der Schaltelemente Ausschalten des Kochfeldes Demo Mode Vorführmodus Praktische Ratschläge zum Einsatz des Gerätes Sicherheitsvorrichtungen Praktische Back Brathinweise Vorsichtsmaßregeln und Hinweise 42 Allgemeine Sicherheit Entsorgung Reinigung und Pflege 43 Abschalten Ihres Gerätes vom Stromnetz Reinigung des Gerätes Demontage des...

Page 35: ...aus hitzebeständigem Material beschaffen sein um einer Temperatur von ca 100 C standzuhalten Soll das Kochfeld über einem Backofen installiert werden muss letzterer mit einem Kühlsystem mit Zwangsbelüftung ausgestattet sein Von der Installation eines Kochfeldes über einem Geschirrspüler wird abgeraten Gegebenenfalls ist zur Abdichtung ein Zwischenteil zwischen beiden Geräten zu installieren Je nac...

Page 36: ...0 Hz gelb grün N die 2 blauen Drähte zusammen L braun zusammen mit schwarz Andere Anschlussarten Sollte die Elektroanlage einer der nachfolgenden Eigenschaften entsprechen Netzspannungund frequenz 400V 2 N 50 Hz 220 240V 3 50 Hz 400V 3 N 50 Hz 400V 2 2N 50 Hz Trennen Sie die Drähte und schließen Sie sie gemäß nachfolgender Tabelle und Zeichnungen an Netzspannung und frequenz Elektrokabel Anschluss...

Page 37: ... die programmiert wurden siehe Inbetriebsetzung und Gebrauch Taste SPERRE DER SCHALTELEMENTE Um versehentliche Änderungen der am Kochfeld erfolgten Einstellungen zu verhindern siehe Inbetriebsetzung und Gebrauch Kontrollleuchte SCHALTELEMENTE GESPERRT Diese signalisiert dass die Schaltelemente gesperrt wurden siehe Inbetriebsetzung und Gebrauch Taste LEISTUNGSREGLER KOCHZONE LEISTUNGSREGLER KOCHZO...

Page 38: ...ktion eingeschaltet ist in allen anderen Situationen funktioniert es bei mittlerer Leistungsstufe je nach erfasster Temperatur Es ist darüber hinaus möglich dass das Gebläse auch bei ausgeschaltetem Kochfeld weiter läuft wenn die erfasste Temperatur noch hoch ist Die hier aufgeführten Geräusche hängen mit der Induktionstechnologie zusammen und sind nicht unbedingt ein Hinweis auf eine fehlerhafte ...

Page 39: ...t des Kochfeldes können die Schaltelemente gesperrt werden um irrtümliche Einstellungsänderungen zu verhindern durch Kinder bei der Reinigung usw Drücken Sie die Taste dann werden die Schaltelemente gesperrt Die über der Taste befindliche Kontrollleuchte leuchtet auf Zu weiteren Einstellungen z B um den Garvorgang zu unterbrechen müssen die Schaltelemente erst wieder freigegeben werden Drücken Sie...

Page 40: ...pfgröße Das Blinken der Anzeigeleuchte kann Folgendes signalisieren ungeeignetes Kochgeschirr ein zu geringer Topfdurchmesser der Topf wurde abgenommen Überhitzung Im Falle einer Überhitzung der elektronischen Gerätekomponenten schaltet sich das Kochfeld automatisch aus auf dem Display erscheint die Anzeige Fgefolgt von einer blinkenden Zahl Diese Meldung erlischt und das Kochfeld kann wieder eing...

Page 41: ...aren Extrem sanft Garen Crêpes Stark garen und bräunen Braten Koteletts Schnitzel Fischfilets Spiegeleier Schnell eindicken flüssige Soßen Kochendes Wasser Nudeln Reis Gemüse Milch S Langsam eindicken dickflüssige Soßen S Wasserbad Garen im Schnellkochtopf nach dem Dampfaustritt Sehr sanft Garen Aufwärmen von Speisen Schokoladensoße Warmhalten ...

Page 42: ...hteten Griffen auf die Kochstelle um jegliches Risiko durch unbeabsichtigtes Anstoßen auszuschließen Ziehen Sie den Netzstecker nicht am Netzkabel aus der Steckdose sondern nur am Netzstecker selbst Ziehen Sie vor der Reinigung oder vor Wartungsmaßnahmen stets den Netzstecker aus der Steckdose Das Gerät ist nicht zur Verwendung durch Personen einschließlich Kinder mit eingeschränkten körperlichen ...

Page 43: ...nt werden Nach der Reinigung kann das Kochfeld mit einem Pflegeprodukt nachbehandelt werden Der unsichtbare Schutzfilm den ein solches Produkt hinterlässt schützt die Oberfläche vor eventuell überkochenden Speisen Es empfiehlt sich diese Nachbehandlung bei lauwarmem oder abgekühltem Gerät vorzunehmen Achten Sie darauf das Kochfeld nach der Reinigung stets mit klarem Wasser abzuspülen und anschließ...

Page 44: ...ts Gesamtleistung KIO 642 DD Z KIO 642 DD B Leistung W I 1400 600 wenn Vor Links I 2200 B 3000 I 2200 B 3000 I 1400 600 wenn Hint Rechts 7200 KIO 644 DD Z KIO 744 DD Z KIO 744 DO B Leistung W I 1400 B 2000 600 wenn Vor Links I 2200 B 3000 1600 wenn Vor Rechts I 2200 B 3000 1600 wenn Hint Links I 1400 B 2000 600 wenn Hint Rechts 7200 Legende I Einfache Induktions Kochzone B Booster Die Leistung die...

Page 45: ... las zonas de cocción Programación de la duración de una cocción El contador de minutos Bloqueo de los mandos Apagado de la encimera Modalidad demo Consejos prácticos para el uso del aparato Dispositivos de seguridad Consejos prácticos para la cocción Precauciones y consejos 53 Seguridad general Eliminación Mantenimiento y cuidados 54 Interrumpir el suministro de corriente eléctrica Limpiar el apa...

Page 46: ...100ºC si se desea instalar la encimera sobre un horno el mismo debeposeerunsistemadeenfriamientoconventilación forzada evite instalar la encimera sobre un lavavajillas pero si fuera necesario interponga un elemento de separación estanco entre los dos aparatos según el tipo de encimera que se desea instalar ver las figuras elespaciodisponibleenelmuebledebetenerlas siguientesdimensiones 560 1 490 1 ...

Page 47: ... marrón junto al negro Otros tipos de conexión Si las características de la instalación eléctrica coinciden con algunadelassiguientes Tensióntipoyfrecuenciadelared 400V 2 N 50 Hz 220 240V 3 50 Hz 400V 3 N 50 Hz 400V 2 2N 50Hz Separe los cables y realice la conexión de acuerdo con la tabla y los dibujos que se muestran a continuación Tensión tipo y frecuencia de la red Cable eléctrico Conexión de l...

Page 48: ...to y uso Botón BLOQUEO DE MANDOS para impedir modificaciones fortuitas a las regulaciones de la encimera ver Puesta en funcionamiento y uso Piloto MANDOS BLOQUEADOS indica que se ha producido el bloqueo de los mandos ver Puesta en funcionamiento y uso Botón SELECCIÓN POTENCIA ZONAS COCCIÓN para encender la placa y regular la potencia ver Puesta en funcionamiento y modo de empleo Piloto CONTADOR DE...

Page 49: ...clusodespués que se ha desconectado la placa esto se debe a que la temperaturaregistradaesaúnelevada Los ruidos descriptos se deben a la tecnología de inducción y no implicannecesariamentedefectosdefuncionamiento La presión prolongada de los botones y permite el avance veloz de los niveles de potencia y de los minutos del temporizador Encendido de la encimera Elencendidodelaencimeraseproducemanten...

Page 50: ...el botón los mandos se bloquean y el piloto que se encuentra encima del botón se enciende Parapodervolverarealizarregulaciones porej interrumpirla cocción esnecesariodesbloquearlosmandos presioneel botón durante algunos instantes la luz testigo se apagará y el panel de control se desbloqueará Apagado de la encimera Presionando el botón el aparato se apagará Silosmandosdelaparatofueronbloqueados co...

Page 51: ...os la encimera se apagará automáticamente y en la pantalla aparecerá Fseguida de un número centelleante Este mensaje desaparecerá y la encimera se podrá volver a utilizar apenas la temperatura haya descendido a un nivel aceptable Interruptor de seguridad Elaparatoposeeuninterruptordeseguridadqueapagalas zonas de cocción automáticamente cuando se alcanza un tiempolímitedeusoaundeterminadoniveldepot...

Page 52: ...ajo Cocción a fuego muy bajo Crêpe Cocción a fuego fuerte y dorado Asados Bistec Escalopes Filetes de pescado Huevo frito Espesamiento rápido Salsas líquidas Agua hirviendo Pasta arroz Verduras Leche S Espesamiento lento Salsas consistentes S Cocción a Baño María Cocción olla a presión después del silbido Cocción a fuego bajo guisados Calentar comidas Salsa al chocolate Mantener caliente ...

Page 53: ...el aparato de la toma de corriente tirando del cable sino sujetando el enchufe No realice la limpieza o el mantenimiento sin haber desconectado primero el aparato de la red eléctrica No está previsto que el aparato sea utilizado por personas incluidos los niños con capacidades físicas sensoriales o mentales disminuidas por personas inexpertas o que no tengan familiaridad con el producto salvo que ...

Page 54: ...ente con la raedera mientras la superficie está todavía caliente Una vez limpia la encimera se puede tratar con un producto específico para el mantenimiento y la protección la película invisible que deja este producto protege la superficie en caso de escurrimientos durante la cocción Se recomienda realizar estas operaciones con el aparato tibio o frío Recuerde siempre enjuagar la encimera con agua...

Page 55: ...erda Delantera derecha Potencia total KIO 642 DD Z KIO 642 DD B Potencia en W I 1400 600 si Del Izq I 2200 B 3000 I 2200 B 3000 I 1400 600 si Post Der 7200 KIO 644 DD Z KIO 744 DD Z KIO 744 DO B Potencia en W I 1400 B 2000 600 si Del Izq I 2200 B 3000 1600 si Del Der I 2200 B 3000 1600 si Post Izq I 1400 B 2000 600 si Post Der 7200 Leyenda I zona de cocción por inducción simple B booster la zona d...

Page 56: ...56 ES 09 2010 195065951 06 XEROX FABRIANO ...

Reviews: