Smart Wifi Thermostat
Reference No.:HTW-HT03 Series
- 6 -
Version 2018-1.0
the thermostat screen and flashes once a sec.
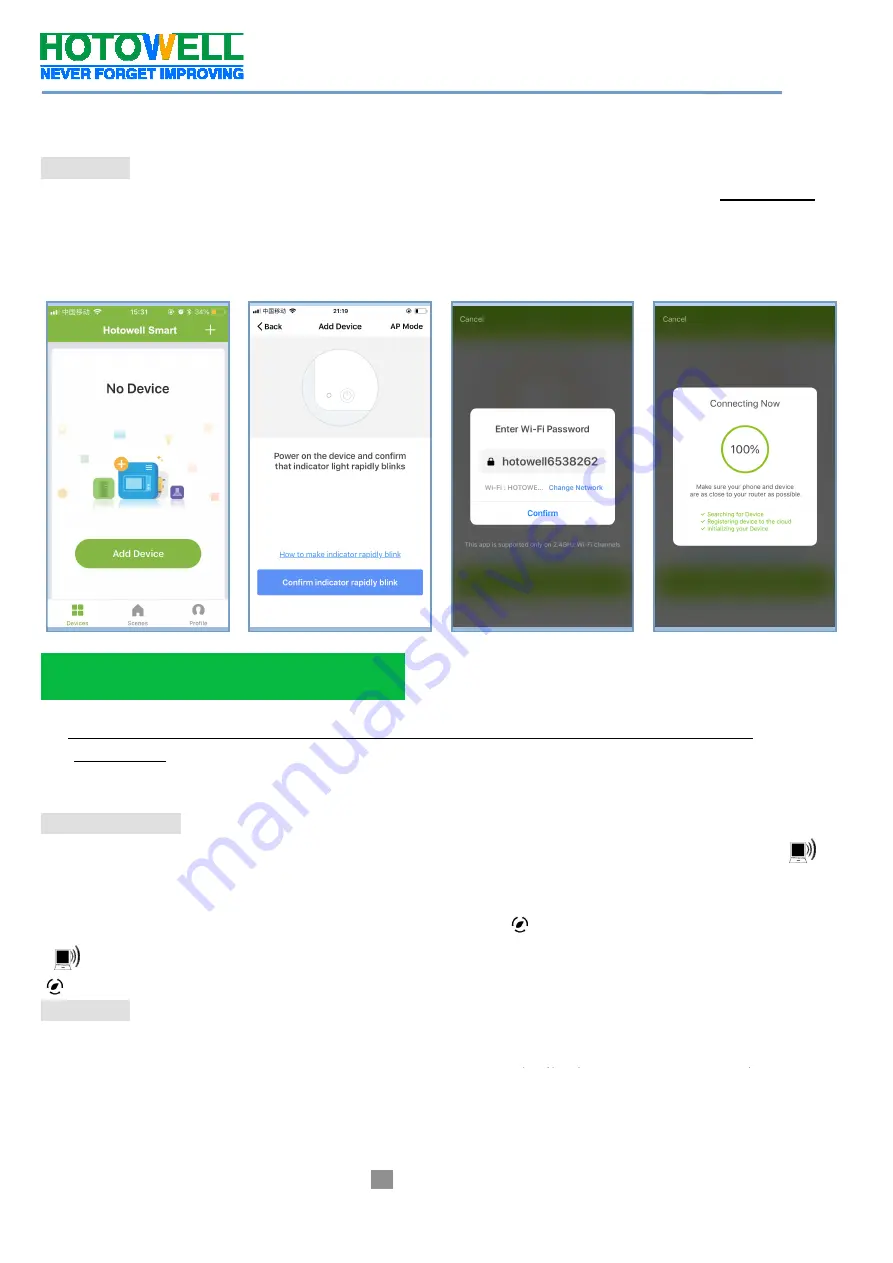
On the App
Press the “
+”
on the upper right corner of the page (see Fig 3.1) or
“Add Device”
to add “
Thermostat”
.
Click “Confirm indicator rapidly blink” (Fig 3.2) then select your network and back to your App to enter the
password of your wireless router(Fig.3.3) and confirm.
The App will connect with the thermostat successfully. The connecting process takes 5~90 sec, the
thermostat name can be editable once connected.(Fig.4.4)
***
If the thermostat has already been connected under above steps, please ignore this process.
***
This
SMART LIFE
App is only supported on 2.4GHz Wi-Fi channels.
If the router does not be supported, or the wi-fi signal is weak or thermostat can not be connected as above
steps, please try this AP mode connection process.
On the thermostat
During power off status, press and hold the arrow icon
︾
for 8 sec until the connecting icon
appears on the thermostat screen and flashes once a sec.
press and hold the arrow icon
︾
for 8 sec again, the icon will flash once per 3 sec.(fig 4.1)
indicates connecting from normal router mode.
Indicates connecting from AP mode.
On the App
Click “Confirm indicator slowly blink” (fig 4.1) then select your network and back to your app to enter the
password of your wireless router (fig 4.2) and confirm. The app will go into the page(fig 4.3)
Press “Connect now” to select the wifi signal Smart life-XXXX from the thermostat(fig 4.3).
This AP mode connection process may typically take approx. 5~90 seconds to complete.
fig 3.1
fig 3.2
fig 3.3
fig 3.4
Alternative AP mode Connection


