-4-
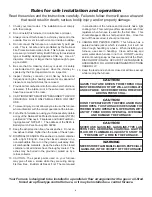
Rules for safe installation and operation
Read these rules and the instructions carefully. Failure to follow them will cause a hazard
that could result in death, serious bodily injury, and/or property damage.
Your Furnace is designed to be installed in a parallel air flow arrangement with a gas or oil-fired
forced air upflow-type central furnace, or it may be installed as a central furnace.
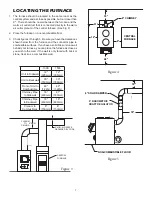
1. Check your local codes. The installation must comply
with their rulings.
2. Do not install this furnace in a mobile home or trailer.
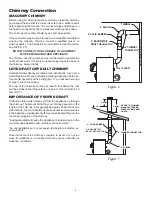
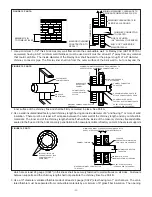
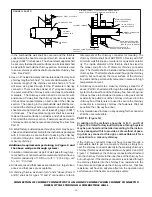
3. Always connect this furnace to a chimney and vent to the
outside. Never vent to another room or inside a building.
4. Do not connect this furnace to an aluminum Type B gas
vent. This is not safe and is prohibited by the National
Fire Protection Association Code. This furnace requires
a masonry or Listed Factory Built Chimney for residential
type or Building Heating Appliance Chimney. Use a 6"
diameter chimney or larger, that is high enough to give
a good draft.
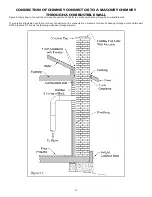
5. Be sure that if a masonry chimney is used, it is safely
constructed and in good repair. Have the chimney in
-
spected by the Fire Department or an inspector.
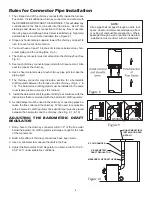
6. Inspect chimney connector and chimney before and
frequently during the heating season for any deposit of
creosote or soot which must be removed.
7. Provide air for combustion into the room where the furnace
is located. If the intake is not in the same room, air must
have free access to the room.
8. CAST IRON PARTS MUST BE "SEASONED" TO AVOID
CRACKING, BUILD ONLY SMALL FIRES ON FIRST
USE.
9. To prevent injury, do not allow anyone to use this furnace
who is unfamiliar with the correct operation of the furnace.
10. For further information on using your furnace safely, obtain
a copy of the National Fire Protection Association (NFPA)
publication "Chimney's, Fireplaces and Solid Fuel Burn
-
ing Appliances" NFPA 211. The address of the NFPA is
Batterymarch Park, Quincy, MA 02269.
11. Keep the ashpit section free of excess ashes. Do not al
-
low ashes to stack higher than the sides of the ash pan.
12. DISPOSAL OF ASHES- Place ashes in a metal container
with a tight fitting lid. Keep the closed container on a
noncombustible floor or on the ground, well away from
all combustible materials. Keep the ashes in the closed
container until all cinders have thoroughly cooled. The
ashes may be buried in the ground or picked up by a
refuse collector.
13. CAUTION- The special paints used on your furnace
may give off some smoke while they are curing during
first few fires., Build small fires at first. The metal used
in construction of the furnace and duct work has a light
coating of oil. This could give off smoke and/or odor from
registers when furnace is used for the first time. This
should disappear after a short period of time. Once this
burn-off has occurred, it should not reoccur.
14. CARING FOR PAINTED PARTS- This furnace has a
painted outside jacket, which is durable, but it will not
stand rough handling or abuse. When installing your
furnace, use care in handling. Clean with soap and
warm water when furnace in not hot. DO NOT use any
acids or scouring soap, as these wear and dull the finish.
DISCOLORATION WILL OCCUR IF THE FURNACE IS
OVERHEATED. FOLLOW OPERATING INSTRUCTIONS
CAREFULLY.
15. Keep the feed and ash doors closed at all times except
while tending the furnace.
CAUTION
DO NOT OPERATE WITH THE FEED AND/OR ASH
DOOR OPEN. THIS FURNACE IS DESIGNED FOR
THERMOSTATIC OPERATION. OPERATION WITH
ANY OF THESE DOORS OPEN WILL OVERHEAT
AND DAMAGE THE FURNACE.
WARNING
NEVER STORE FLAMMABLE LIQUIDS, ESPECIALLY
GASOLINE, IN THE VICINITY OF THE FURNACE.
CAUTION
GASES THAT ARE DRIVEN FROM FRESH COAL
MUST BE BURNED OR THEY WILL ACCUMULATE
AND EXPLODE. NEVER SMOTHER A FIRE WHEN
ADDING FRESH COAL.
CAUTION
NEVER USE GASOLINE, GASOLINE-TYPE LAN-
TERN FUEL, KEROSENE, CHARCOAL LIGHTER
FLUID, OR FLAMMABLE LIQUIDS TO START OR
"FRESHEN UP" A FIRE IN THE FURNACE.
Summary of Contents for 1300
Page 6: ... 6 DIMENSIONS OF FURNACE Figure 2 Model 1500 Figure 1 Model 1300 ...
Page 24: ... 24 CENTRAL INSTALLATION ADD ON INSTALLATION ...
Page 26: ... 26 INSTALLATION D INSTALLATION E ...
Page 27: ... 27 INSTALLATION F INSTALLATION G ...
Page 28: ... 28 INSTALLATION H TOP VIEW FRONT VIEW ...
Page 31: ... 31 NOTES ...
Page 55: ... 6 DIMENSIONS DE LA FOURNAISE Figure 2 Models 1500 Figure 1 Model 1300 ...


