4
E.
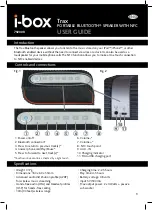
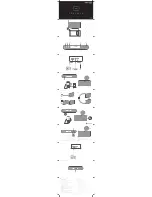
How to operate the product
1.
Connect to audio output on a multi-media player
Connect the two-channel audio input jack to the audio output on a multi-media
player such as earphone output and line out sockets on a PC, earphone output socket
on a MP3 player, audio output socket on a game console…
2.
Connect left-channel and right-channel speaker
Connect the left-channel and right-channel speaker using the 3.5mm cable provided.
3.
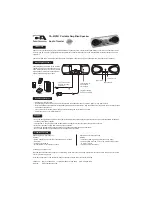
Power supply
a.
Use the mini-USB/USB converter provided to connect to an USB port on a PC/NB
or the AC adapter provided for power.
b.
1.2V AA Ni-MH Rechargeable Battery × 2: When power source is switched to PC
USB power cable or AC power supply, it will automatically go into the charging
mode to charge up the internal chargeable batteries. This will not affect the
normal operation of the speakers.
c.
1.5V AA Battery × 2: When on non-chargeable battery power, please remove the
USB power cable.
4. Power switch and volume control
a.
The LED light on top of the left-channel speaker is the LED –Battery Charging
Status.
b.
Power is off when power symbol on the switch at the back of the speaker is in the
center. To turn on the power, turn the switch in a clockwise direction until a click
sound is heard; continue the clockwise turn to adjust the volume; to turn off the
power, turn the switch in an anti-clockwise direction all the way after the click
sound.
5. When using batteries, please insert them correctly according to positive and negative
labels on the cover underneath the speakers.
a.
Use two non-chargeable or chargeable AA batteries (No. 3)
b.
Turn the left-channel speaker upside down and lift the speak stand. Slide the
battery cover open, insert batteries according to the positive and negative labels
on the battery cover, and close it (close as tightly as possible so not to affect
sound quality of the left-channel speaker).
Summary of Contents for Mini horn speaker
Page 1: ...1 User Manual...