background image

26

E-flite Divo 3D Profile Assembly Manual

Electronics Installation

Required Parts

Airframe assembly 

Hook and loop tape

Receiver 

Speed control

Motor battery 

Propeller

Required Tools and Adhesives


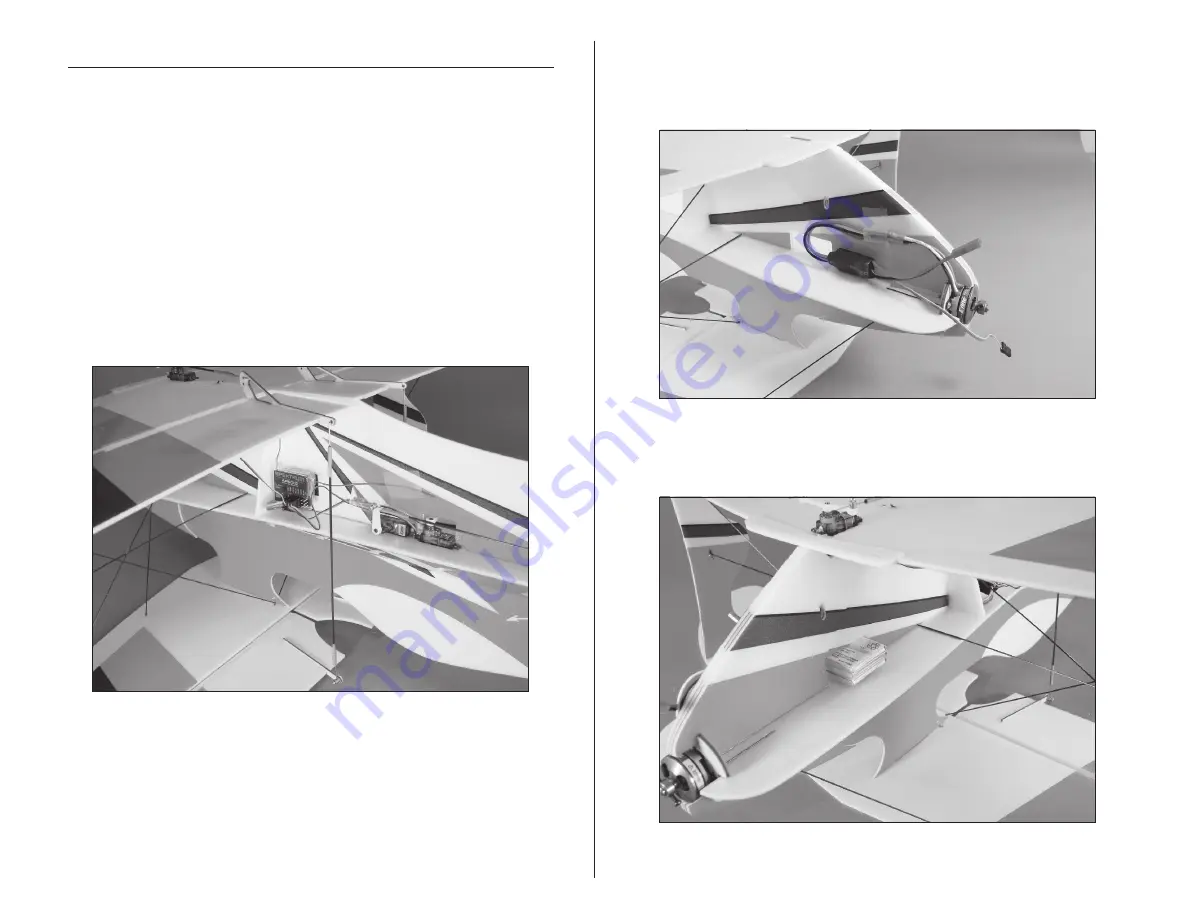
1. Use hook and loop tape to mount the receiver to the 

side of the horizontal fuselage. Route the antenna wire 

from your receiver according to the instructions provided 

with your radio system. Plug the servos into the receiver 

at this time.


2. Attach the speed control to the fuselage using hook 

and loop tape. Secure the wires so they will not interfere 

with the operation of the motor during flight.


3. Apply hook and loop tape to the motor battery and 

fuselage. Slide the motor battery into position.

Summary of Contents for E-flite Divo 3D Profile

Page 1: ...Specifications Wingspan 28 in 715mm Length 31 in 807mm Wing Area 347 sq in 22 4 sq dm Weight w Battery 7 5 8 5 oz 215 241 g Weight w o Battery 6 1 7 5 oz 173 215 g Divo 3D Profile Assembly Manual...

Page 2: ...1 Introduction 2 Using the Manual 3 Contents of Kit Parts Layout 3 Required Radio Equipment 3 Important Information About Motor Selection 4 Outrunner Setup E flite 4 Outrunner Setup Cyclon 4 Optional...

Page 3: ...itter for proper mixing and dual rate capabilities crystals micro receiver and three sub micro servos You can choose to purchase a complete radio system that includes all of these items or if you are...

Page 4: ...w Flyer Prop THP7303SJPL 730mAh 3 Cell 11 1V Li Po JST EFLC3005 Celectra 1 3 Cell Li Po Charger Or THP4803SJPL 480mAh 3 Cell 11 1V Li Po JST Note The use of the Thunder Power 480mAh pack and Cyclon mo...

Page 5: ...rranty is limited to the original Purchaser Purchaser and is not transferable REPAIR OR REPLACEMENT AS PROVIDED UNDER THIS WARRANTY IS THE EXCLUSIVE REMEDY OF THE PURCHASER This warranty covers only t...

Page 6: ...Your local hobby store and or place of purchase cannot provide warranty support or repair Once assembly setup or use of the Product has been started you must contact Horizon directly This will enable...

Page 7: ...following address Horizon Product Support 4105 Fieldstone Road Champaign Illinois 61822 Please call 877 504 0233 with any questions or concerns regarding this product or warranty Safety Precautions an...

Page 8: ...ves Foam safe CA Foam safe CA activator Low tack masking tape Square 1 Slide the stabilizer elevator into the slot at the rear of the fuselage 2 Slide the horizontal fuselage into the vertical fuselag...

Page 9: ...lign the slot in the horizontal fuselage with the stabilizer Use foam safe CA to glue the horizontal fuselage to the stabilizer ONLY 6 Apply a couple drops of foam safe CA near the firewall to tack gl...

Page 10: ...rizontal fuselage brace 8 Align the stabilizer square to the vertical fuselage Apply a few drops of foam safe CA to glue the stabilizer to the vertical fuselage Hint Use low tack masking tape to hold...

Page 11: ...ner to the horizontal fuselage Use a square to make sure the two remain properly aligned to each other while gluing 10 Position the fuselage stiffeners as shown They will rest on the triangular fuse b...

Page 12: ...op of the bottom wing resting on the waxed paper use foam safe CA to glue the bottom wing control horns to the ailerons The horns will be flush with the top of the bottom ailerons 2 Install the micro...

Page 13: ...to the fuselage while the glue cures 5 Use foam safe CA to glue the cabane struts to the bottom wing The struts will be square to the bottom wing when they are glued as well 6 Glue the top wing to the...

Page 14: ...steps to maintain the alignment of your airframe and to not build in any unwanted twists in the airframe Make sure to keep everything aligned and the wings straight with the fuselage Also make sure n...

Page 15: ...yond the top of the top wing and from the bottom of the bottom wing Use foam safe CA to glue the carbon rods in position Glue the three rods together where they cross each other as well 3 Use the 5 1...

Page 16: ...inch 1 5mm 0 Phillips screwdriver 1 Position the mount for your motor centered on the firewall The edges of the mount will be almost touching the narrow notches in the firewall Use a felt tipped pen t...

Page 17: ...ng two screws provided with the motor Apply a couple of drops of thin CA to the screws where they protrude beyond the back of the firewall 5 Use foam safe CA to attach the firewall to the fuselage Not...

Page 18: ...ile 6 minute epoxy 1 Sand the carbon tube on the outside This will give a good bond to the epoxy Note If you plan on flying very aggressive 3D flight use a small screw to hold the motor to the tube al...

Page 19: ...ewall Important The amount of right thrust is specifically designed into the airframe for indoor flight If you will be flying your Divo indoors and out we recommend that you reduce the amount of thrus...

Page 20: ...u want the total 5 degrees of thrust you will want to make sure that the tube is up against the cutout in the horizontal fuselage If you want to decrease the thrust then you may have to relieve more o...

Page 21: ...horn locking plate 2 Micro control connector backplate 4 Required Tools and Adhesives Foam safe CA Foam safe CA activator Low temperature hot glue Hot glue gun 1 Attach a long servo arm to the aileron...

Page 22: ...ews 5 Attach the bend of each of the 7 9 inch 200mm pushrods to the control horns on the bottom wing 6 With both the top and bottom ailerons centered secure the pushrods to the connectors at the top a...

Page 23: ...cal fuselage for the tabs on the rudder servo or cut the mounting tabs off of the rudder servo 9 Slide the control horn through the rudder then slide the control horn locking plate onto the horn press...

Page 24: ...entered secure the pushrod to the connector at the rudder servo using a 2mm x 4mm machine screw 12 Use foam safe CA to glue the pushrod brace to the fuselage in the hole closest to the rudder Make sur...

Page 25: ...he junction between the horn and locking plate to secure its position Attach the bend of the 12 2 inch 311mm pushrod to the elevator control horn 14 With elevator centered secure the pushrod to the co...

Page 26: ...the side of the horizontal fuselage Route the antenna wire from your receiver according to the instructions provided with your radio system Plug the servos into the receiver at this time 2 Attach the...

Page 27: ...d control to change the direction of the motor rotation Note Never check the motor rotation on the bench with the propeller installed The plane could move and cause serious injury Always check the mot...

Page 28: ...the tail skid Leave about 1 8 inch 3mm of the tubing extending beyond the skid The tube helps in quieting the skid on hard surfaces 2 Slide the landing gear struts through the holes in the bottom win...

Page 29: ...m safe CA to glue the landing gear to the fuselage and the nylon doublers Also glue the landing gear to the bottom wing 5 Slide a wheel retainer onto each landing gear axle 6 Glue one of the wheel ret...

Page 30: ...p 3 Check the movement of the ailerons with the radio system Moving the aileron stick right will make the right aileron move up and the left aileron move down 4 Use a ruler to adjust the throw of the...

Page 31: ...flying session be sure to range check your radio This is accomplished by turning on your transmitter with the antenna collapsed Turn on the receiver in your airplane With your airplane on the ground...

Page 32: ...nsitions smoothly from off to full throttle and back Also ensure the engine is installed according to the manufacturer s instructions and it will operate consistently Check all the control horns servo...

Page 33: ...established in front of which all flying takes place with the other side for spectators Only personnel involved with flying the aircraft are allowed at or in front of the flight line Intentional flyi...

Page 34: ...34 E flite Divo 3D Profile Assembly Manual Building and Flying Notes...

Page 35: ...35 E flite Divo 3D Profile Assembly Manual Building and Flying Notes...

Page 36: ...10869 2007 Horizon Hobby Inc 4105 Fieldstone Road Champaign Illinois 61822 877 504 0233 horizonhobby com E fliteRC com...

Reviews: