background image

17

EN

Adjusting Trim in Flight

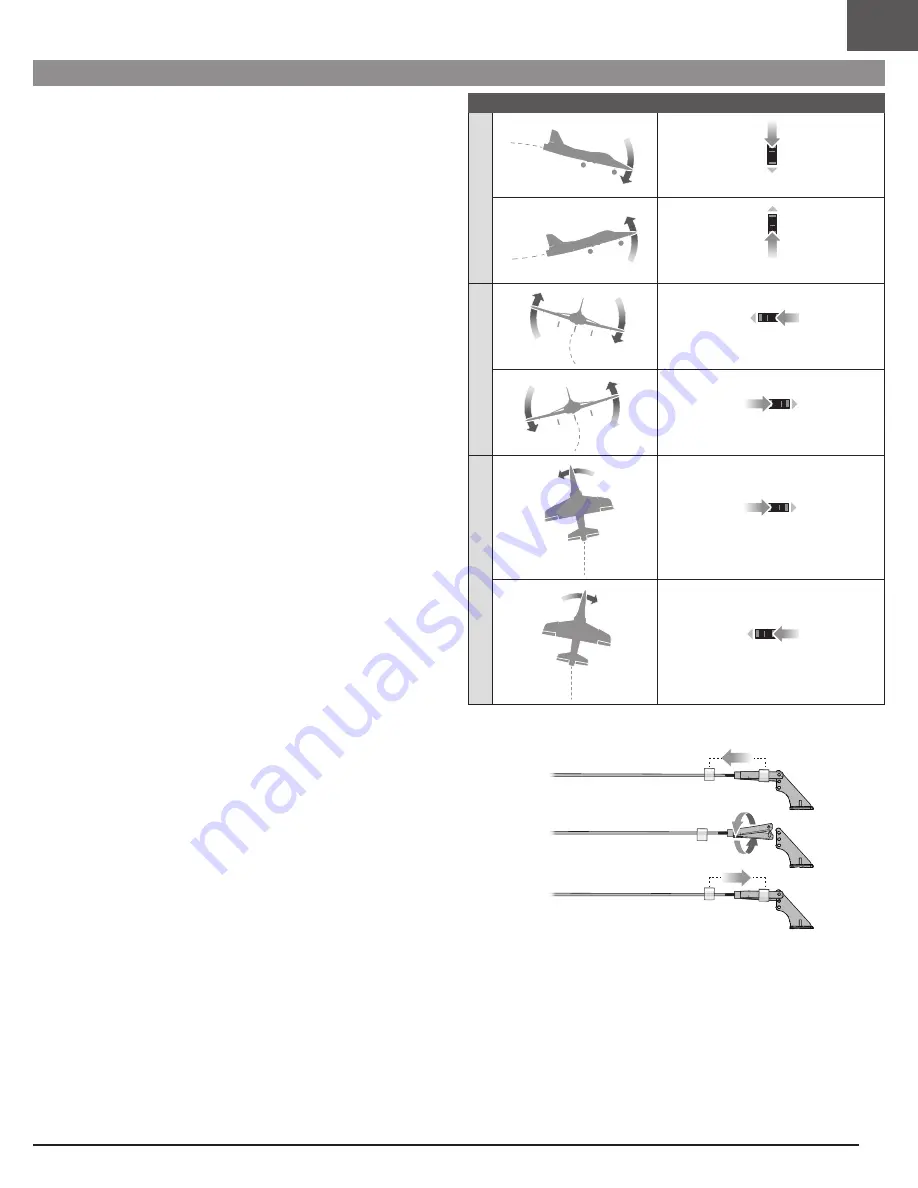
If your aircraft does not fly straight and level at half throttle with the sticks at 

neutral, fly into the wind and adjust the trim sliders as indicated in the table until 

the aircraft maintains a reasonably straight and level flight path.

•  Trimming is best done in calm wind conditions.
•  The SAFE flight mode switch should be set to Experienced mode (switch B, position 2) 

before adjusting the trims. 

After the aircraft is trimmed in flight, land the aircraft and proceed to the Manually 

Adjusting Trim section to re-center the servos and set the trim mechanically.
The included DXS transmitter features electronic trim buttons. The transmitter 

emits a faint beep with each click of the trim buttons in either direction. Holding 

the button in either direction quickly adjusts the trim several steps until the button 

is released or until the trim reaches the end of its travel. If the trim button does not 

beep when clicked, the trim is at the far end of its travel. Center trim is indicated by 

a slightly louder beep.

TIP: 

Trim the aircraft at sufficient altitude of about 100' (30 meters). Having 

an experienced flight instructor trim your aircraft during the first flight is 

recommended.

Aircraft Drift

Trim Required

Elev

ator

Elevator Trim

Elevator Trim

Aileron

Aileron Trim

Aileron Trim

Rudder

Rudder Trim

Rudder Trim

Trimming the Aircraft

Manually Adjusting Trim 

After adjusting the aircraft trims in the air, the servos should be re-centered and the 

pushrods adjusted to reflect the trim changes made in the air. Doing so ensures the 

servos will retain full throw and not overdrive in either direction.

1. After landing from the trim flight, set the throttle cut to ON (switch H, position 1).
2. Set the flight mode switch to experienced mode (switch B, position 2). Ensure 

the aircraft is kept immobile.

3. One at a time, take note of any offset in position of each control surface.
4. Remove the clevis from the control horn of the control surface by sliding the 

soft rubber tube back along the pushrod. Gently pry the clevis open and slide 

the pin out of the control horn.

5. Center the transmitter trim for that control surface.
6. Adjust the clevis in or out by rotating the clevis on the pushrod until the control 

surface position matches the corrected offset when the clevis pin is inserted in 

the control horn. 

7. Re-insert the clevis pin in the correct hole in the control horn.
8. Snap the clevis closed, capturing the control horn between the clevis sides.
9. Slide the soft rubber tube over the clevis to keep it from opening.

10. Move to the next control surface and repeat steps 3 through 9, until all of the 

transmitter control surface trims are centered.

Summary of Contents for Apprentice STS E-flite

Page 1: ...nd w hlen Sie auf der Produktseite die Quicklinks Handb cher und Unterst tzung um die aktuellsten Informationen zu Handb cher Scannez le code QR et s lectionnez les liens rapides Manuals and Support s...

Page 2: ...WARNING Procedures which if not properly followed create the probability of property damage collateral damage and serious injury OR create a high probability of superficial injury CAUTION Procedures w...

Page 3: ...ery and charger bundle You can also view the Optional Parts list on the product page on www HorizonHobby com for more information on other compatible batteries chargers and other items Phillips Screwd...

Page 4: ...ceiver Rx Main Landing Gear Motor Flight Controller Electronic Speed Control ESC Aileron Servo SPMSA381 Aileron Servo SPMSA381 Rudder Servo SPMSA382 Elevator Servo SPMSA382 Nose Gear Servo SPMSA382 Ru...

Page 5: ...nstallation We recommend watching the Nose Gear Installation chapter section of the assembly video by scanning this QR code or using this URL www horizonhobby cc HabuSTSassembly We recommend reading e...

Page 6: ...he hole in either the right or left landing gear plate on the bottom of the wing The wheel should be facing toward the front of the aircraft TIP The main landing gear are interchangeable There is no r...

Page 7: ...rudder pushrod through the top of the outermost hole of the rudder servo arm Feed the pushrod through the hole until the pushrod is seated as shown in the illustration 6 Attach the pushrod clevis to...

Page 8: ...is connected With throttle cut off switch H position 0 any position of the throttle stick above the lowest setting will activate the aircraft motor NOTICE Always ensure the throttle stick is at the l...

Page 9: ...throttle cut switch H position 1 With the throttle cut on throttle input from the throttle stick is deactivated This safety feature ensures any accidental movement of the throttle stick will not activ...

Page 10: ...location is 80mm behind the leading edge of the wing measured at the wing root as shown The flight battery and canopy must be installed to balance the aircraft correctly Hold the aircraft inverted wit...

Page 11: ...odel on level ground away from obstacles 5 Power on the aircraft and wait for it to fully initialize 6 Move the sticks on the transmitter as shown in the table and observe the control surfaces on the...

Page 12: ...educe the effectiveness of the range check If you experience issues during the range check restrain the model on a non conductive stand or table up to 2ft 60cm above the ground then range check the sy...

Page 13: ...he aircraft roll or bank right Move the aileron stick left to make the aircraft roll or bank left TIP Always picture yourself in the aircraft when determining which way to bank the aircraft wings When...

Page 14: ...perienced Mode switch B position 2 NO flight envelope limits There are no pitch or roll limits and no self leveling so you have complete control You can even fly inverted upside down and perform aerob...

Page 15: ...the ESC and motor Slowly advance the throttle stick Wind When properly trimmed the aircraft s wing design causes the aircraft to climb at full throttle and descend at reduced throttle without the use...

Page 16: ...s altitude as it passes over the threshold of the runway 5 As the aircraft passes over the threshold of the runway decrease the throttle 6 Just as the aircraft is about to touch down gently pull back...

Page 17: ...ed Elevator Elevator Trim Elevator Trim Aileron Aileron Trim Aileron Trim Rudder Rudder Trim Rudder Trim Trimming the Aircraft Manually Adjusting Trim After adjusting the aircraft trims in the air the...

Page 18: ...tain their bind for future flights If you encounter problems refer to the troubleshooting guide If necessary contact the appropriate Horizon Hobby product support office Failsafe The receiver stores t...

Page 19: ...ics at www modelaircraft org for more information on clubs and flight instruction To the flight instructor Feel free to experiment with the SAFE technology before instructing your student on this airc...

Page 20: ...ct the LAS connector to Port 7 on the flight controller For correct polarity of the plug ensure that the orange not brown signal wire B is facing towards the front of the aircraft when plugged into th...

Page 21: ...Select List to go back to the Function List 10 Select Throttle Cut Switch Switch H Position 100 iX Series Transmitter Setup 1 Power ON your transmitter and begin once the Spektrtum Airware app is ope...

Page 22: ...I and plastic ESC clip J 8 Disconnect the throttle lead from the flight controller and pull the ESC K from the fuselage taking note of the routing of the power and throttle leads through the fuselage...

Page 23: ...23 EN Factory Settings for the Control Horns and Servo Arms The illustration shows recommended hole settings in the servo arms and control horns Elevator Ailerons Rudder Nose Gear Arms Horns...

Page 24: ...ximately 1 2 Aircraft will not climb Battery is not fully charged Fully charge battery before flying Elevator may be trimmed down Adjust elevator trim up Rotor damaged Land immediately replace Rotor A...

Page 25: ...r Center of Gravity CG Point at which the aircraft balances most notably from front to back Clevis The U shaped connector at the end of the aircraft pushrod which allows adjustment of the pushrod leng...

Page 26: ...an corrective lenses prescribed to me When using an advanced flight system such as an autopilot or flying First Person View FPV I will comply with AMA s Advanced Flight System programming I will only...

Page 27: ...speak with a Product Support representative Inspection or Services If this Product needs to be inspected or serviced and is compliant in the country you live and use the Product in please use the Hori...

Page 28: ...between the equipment and receiver Connect the equipment into an outlet on a circuit different from that to which the receiver is connected Consult the dealer or an experienced radio TV technician fo...

Page 29: ...and the Horizon Hobby logo are trademarks or registered trademarks of Horizon Hobby LLC The Spektrum trademark is used with permission of Bachmann Industries Inc All other trademarks service marks an...

Reviews: