background image

BEFORE

YOU 
BEGIN

1

INTRODUCTION

IMPORT

ANT

PRECAUTIONS

ASSEMBL

Y

BEFORE

YOU 
BEGIN

ELLIPTICAL

OPERA

TION

LIMITED

W

ARRANTY

TROUBLESHOOTING

MAINTENANCE

CONDITIONING

GUIDELINES

ASSEMBL

Y

ELLIPTICAL

OPERA

TION

ASSEMBL

Y

15

INTRODUCTION

ELLIPTICAL OPERA

TION

CONDITIONING GUIDELINES

TROUBLESHOOTING & 

MAINTENANCE

LIMITED WARRANTY

ELLIPTICAL OPERA

TION

BEFORE YOU 

BEGIN

IMPORT

ANT

PRECAUTIONS

ASSEMBL

Y

POWER

Your programmable elliptical is powered by a power supply. The power must be plugged into the power jack, 

which is located in the front of the machine near the STABILIZER TUBE. Make sure the console power switch is 

in the ON position. Note: Not all units have an ON/OFF switch on the console.

Do not operate the elliptical if the power cord or plug is damaged.

If the elliptical appears to not be working properly, do not use the elliptical.

MOVING

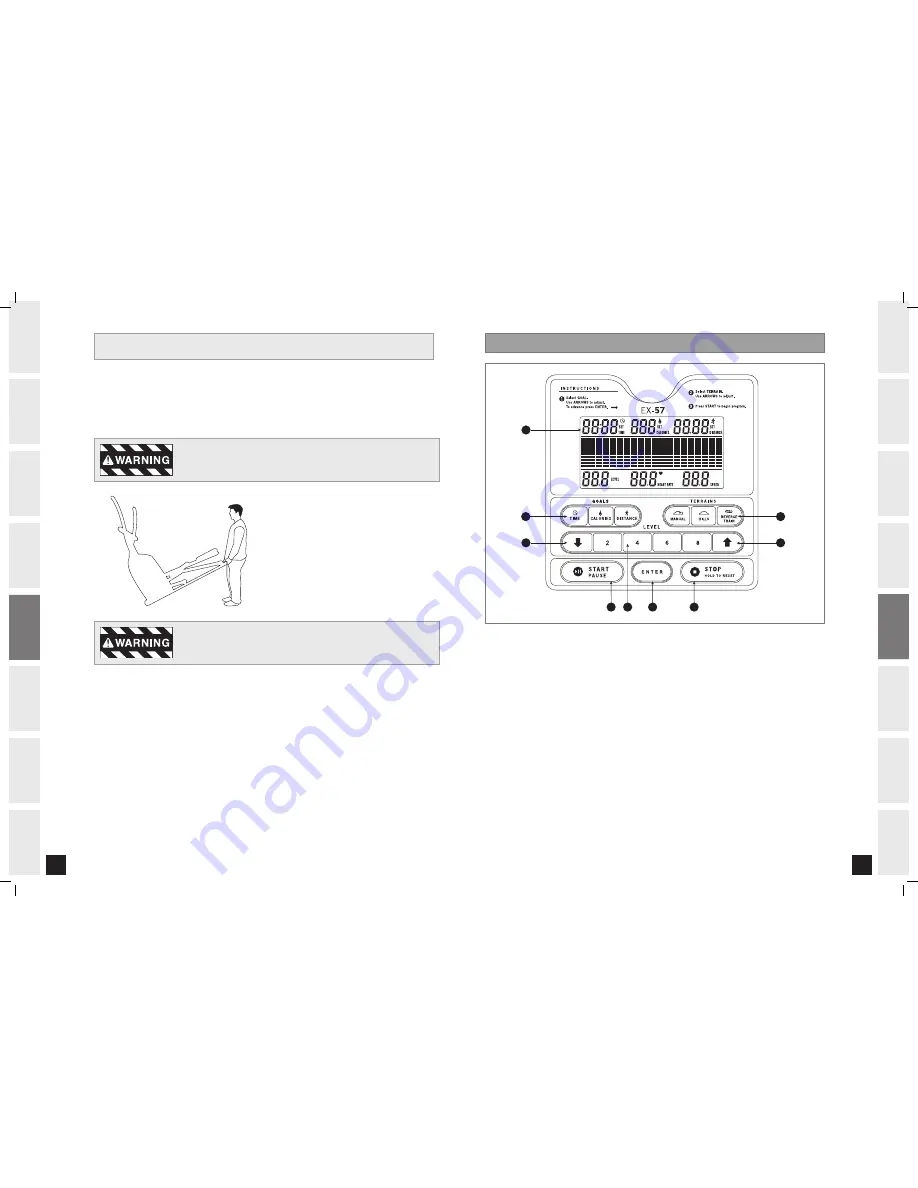
Your elliptical has a pair of transport wheels built 

into the FRONT STABILIZER TUBE. To move, first 

remove the power supply and firmly grasp the 

REAR STABILIZER BAR, carefully tilt and roll. Note: 

Be sure to grab the bar and not the plastic cover.

Our ellipticals are well built and heavy, weighing up to 200 lbs! Use care and 

additional help if necessary when moving.

FOOT POSITIONING

Your elliptical offers a variety  of foot positions. Moving your foot to the forward most position of the foot pad 

increases your step height, which will create a feel similar to a step machine. Placing your foot toward the back 

of the foot pad decreases your step height and creates more of a gliding feel, similar to a smooth walk or run.


Your elliptical also allows you to pedal both forward and backwards to offer a variation to your workout and to 

focus on other major leg muscle groups such as your hamstrings and calves.

ELLIPTICAL OPERATION

Note: There is a thin protective sheet of clear plastic on the overlay of the console and should be removed.

A) LARGE WINDOW:

 Displays program profiles, Time, Level, Calories, Heart Rate, Distance and Speed.

B) PROGRAM KEYS:

 Used to select the goal of the workout.

C) TERRAIN KEYS:

 Used to customize the workout.


D) ENTER: 

Used to confirm your program and program settings.

E) QUICK LEVEL KEYS: 

Used to quickly adjust your resistance level during the workout.

F) ARROW KEYS:

 Used to select program settings and adjust resistance level during the workout.

G) START/PAUSE: 

Press to start your workout or pause an existing workout. 

H) STOP: 

Press to stop your workout. Hold for 3 seconds to reset the elliptical.

NOTE

: If the unit is inactive for 10 minutes, the console display will shut off. 


   Press any key or ride the elliptical to restart the display. Program will be reset.

CONSOLE DISPLAY

F

F

D

E

G

H

A

B

C

EX-57_Rev.1.3.indd   14-15

6/25/08   10:40:35 AM

Summary of Contents for HORIZON EX-57

Page 1: ...HORIZON SERIES ELLIPTICAL USER S GUIDE FOR MODEL EX 57 EX 57_Rev 1 3 indd 1 6 25 08 10 40 27 AM...

Page 2: ...eatures you need to get stronger and healthier faster Because we re committed to designing fitness equipment from the inside out we use only the highest quality components It s a commitment we back wi...

Page 3: ...only never use solvents See MAINTENANCE This elliptical should not be used by persons weighing more than 275 pounds Failure to comply will void the warranty This elliptical is intended for in home use...

Page 4: ...6mm Allen Wrench c Phillips Screw Driver c 13 15mm Flat Wrench c 1 Console c 1 Console Mast c 1 Front Stabilizer Tube c 2 Upper Handlebars c 2 Lower Handlebars c 2 Lower Link Arms c 2 Top Covers c 2...

Page 5: ...ast hole ASSEMBLY STEP 3 CONSOLE MAST CONSOLE MAST BOOT MAIN FRAME BOLT A SPRING WASHER B FLAT WASHER C TOP FRONT COVER TOP BACK COVER CONSOLE MAST BOOT CONSOLE WIRE 0 5 NN 2UZ 413 8 4 3 NN 2UZ 5 8 4...

Page 6: ...side INSIDE ELBOW COVER OUTSIDE ELBOW COVER SCREW L LOWER HANDLEBAR GUIDE RAIL TEFLON WASHERS I LOWER HANDLEBAR NUT K BOLT J LOWER LINK ARM SPACER H LOWER LINK ARM SPACER TEFLON WASHERS LOWER HANDLEB...

Page 7: ...T located at front of the main frame Connect ADAPTOR to a power outlet After a beep the CONSOLE will light up ASSEMBLY STEP 6 BEFORE YOU BEGIN CONGRATULATIONS on choosing your elliptical You ve taken...

Page 8: ...variety of foot positions Moving your foot to the forward most position of the foot pad increases your step height which will create a feel similar to a step machine Placing your foot toward the back...

Page 9: ...ot be relied on when accurate readings are necessary Some people including those in a cardiac rehab program may benefit from using an alternate heart rate monitoring system like a chest or wrist strap...

Page 10: ...ur long term goals always begin an exercise program at low intensity Aerobic exercise does not have to be painful to be beneficial There are two ways to measure your exercise intensity The first is by...

Page 11: ...eginning an exercise program TARGET HEART RATE ZONE CHART 100 75 60 BEATS PER MINUTE 20 25 30 35 40 45 50 55 60 65 AGE T A R G E T Z O N E 120 117 114 111 108 105 102 99 97 93 150 146 143 139 135 131...

Page 12: ...interval workouts alternate between high and low intensities Increased Energy Level more frequent daily workouts Improved Sports Performance high intensity workouts Improved Cardiovascular Endurance m...

Page 13: ...N ELLIPTICAL OPERATION LIMITED WARRANTY CONDITIONING GUIDELINES ASSEMBLY CONDITIONING GUIDELINES TROUBLESHOOTING MAINTENANCE MONTH MONTHLY GOAL MONTHLY TOTALS WEEK DISTANCE CALORIES TIME WEEKLY LOG SH...

Page 14: ...check that all connections to the console are secure and not damaged or pinched If doing the above does not fix the problem the speed sensor and or magnet may have become dislodged or damaged PROBLEM...

Page 15: ...I PEDAL BACKWARDS ON MY ELLIPTICAL Your elliptical allows you to pedal both forward and backwards to exercise and strengthen a wider range of muscles COMMON PRODUCT QUESTIONS PROBLEM There is no hear...

Page 16: ...rizon Fitness is not responsible or liable for any damage loss or liability arising from any personal injury incurred during the course of or as a result of any repair or attempted repair of your fitn...

Page 17: ...er Tech Support To receive additional product information visit us at www horizonfitness com CUSTOMER TECH SUPPORT DO NOT RETURN TO THE RETAILER if you have any problems during assembly or if parts ar...

Reviews: