background image

14. Heads   


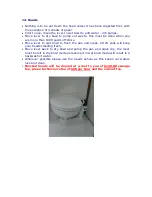
Nothing is to be put down the head unless it has been digested first, with 
the exception of 3 sheets of paper. 


Prior to use, move the lever to wet bowl to add water - 4/6 pumps. 


Move lever to dry bowl to pump out waste; this must be done when you 

are more than 1000 yards off shore. 


Move lever to wet bowl to flush the pan and pipes, 20-25 pulls will keep 
your heads smelling fresh. 


Move lever back to dry bowl and pump the pan and pipes dry, the lever 
must be left in dry bowl mode as leaving it in wet bowl mode will result in a 
backwash of water. 


Wherever possible please use the heads ashore as this keeps our waters 
nice and clean. 


Blocked heads will be cleared at a cost to you of $120.00  sewage 
fee, plus a technician’s fee of $60 per hour and the call out fee. 


Summary of Contents for 2008 Beneteau 43

Page 1: ...Information operations manual for Beneteau 43 2008 Namaste...

Page 2: ...and don t hesitate to ask any of our professional friendly staff if you have any questions All of the yachts in the Horizon fleet are maintained to the highest standards so that you may enjoy a troubl...

Page 3: ...Daily engine checks 6 The generator 7 Electrical systems and charging 8 Air conditioning units 9 Instruments 10 VHF radio 11 Anchoring and using the windlass 12 Picking up a mooring buoy 13 Fresh wate...

Page 4: ...refills starboard transom and port amidships Diesel refill port transom Manual bilge pump at port helm Propane tank at port helm Windlass breaker aft cabin below the berth Diesel cut off valve aft cab...

Page 5: ...t Deck Light Navigation Instruments Fridge Unit operates both the fridge and the freezer LPG Solenoid Water Pressure Bilge Pump dual toggle switch for automatic or manual forced march action 110v brea...

Page 6: ...and water heater breakers are located behind the instrument panel l Main battery breaker shown in on position Water heater breaker should always be in the off position as shown here Open the panel by...

Page 7: ...e panel The green light on the switch will then illuminate 3 All of the 110v outlets are now live 4 Reverse steps 2 3 to switch off the inverter but run the engine for ten minutes after the inverter i...

Page 8: ...ignition for 10 to 15 seconds before cranking the engine failure to follow this procedure will result in the engine stalling When the throttle handle is returned to neutral the button in the centre o...

Page 9: ...point 2 Check the fresh water coolant level There is a fairly rich mixture of coolant already in the tank If it is below the minimum line remove the cap on the top of the header tank and top off with...

Page 10: ...enerator To start the generator Make sure the 110v systems are off prior to starting the generator Turn switches below nav table to 2 Push down upper toggle 10 seconds glow plug and hold While holding...

Page 11: ...able to 0 Push down quickly on the bottom toggle and release The generator will close down You must not run the generator when underway Resetting the generator If the generator trips out check the res...

Page 12: ...evs N B It is more efficient to charge your batteries off the generator when you are stationary rather than running the engine In the event of generator failure run the engine as above Shorepower Ther...

Page 13: ...e beneath the forward seating in the saloon Turn on the forward unit first and wait for 30 seconds before turning on the aft unit Ensure the companionway and all hatches are closed otherwise the compr...

Page 14: ...from Turn on the air condition while the unit is running open the bleed valve and let it run until it coughs out all the air and a steady stream of water flows Close the bleed valve and the unit shoul...

Page 15: ...s Located at the helm are the following Raymarine instruments Starboard helm Port helm At the cockpit table is a Raymarine E120 chart plotter ST6002 Autopilot ST60 Graphic display ST60 Tridata ST60 Wi...

Page 16: ...it is very important to switch to a working channel after the contact is established Do no use Channel 16 for your conversations this channel is for hailing and distress only Channels to use 16 Haili...

Page 17: ...emergency PAN PAN MEDICO PAN PAN MEDICO PAN PAN MEDICO Pronounced med ick oh This is an International Urgency Signal that should be used when medical advice is needed Safety SECURITE SECURITE SECURIT...

Page 18: ...rse slowly building up to 1500 rpm to really drive your hook into the sand Once set put the engine in neutral and allow the yacht to settle take transits around the bay to ensure you are not dragging...

Page 19: ...loaded The fuse is located in the starboard aft cabin below the bed as you face into the cabin If the breaker is in the down position the fuse has tripped flick the breaker up to reset the windlass If...

Page 20: ...ightening or loosening the lock When you have paid out sufficient chain 5 to 8 times the water depth tighten up the central lock to stop any more chain from being released Increase revs to 1500 rpm to...

Page 21: ...ught back to the same cleat Once set your mooring buoy will be attached either on the port or starboard cleat and the yacht will be head to wind Remember to centralize the wheel and lock in place to a...

Page 22: ...pump immediately to prevent the pump from drawing more air into the system or the pump overheating and proceed as follows Switch off pump Select the next full tank the valves are located beneath the...

Page 23: ...ore Move lever to wet bowl to flush the pan and pipes 20 25 pulls will keep your heads smelling fresh Move lever back to dry bowl and pump the pan and pipes dry the lever must be left in dry bowl mode...

Page 24: ...ly The transom shower is located beneath the central helm seat To operate the transom shower the fresh water pump must be activated on the 12v panel There is also a toggle switch located next to the s...

Page 25: ...to melt the ice There is a thermostat in the fridge It is a white dial with numbers on it going from 1 6 Putting 6 at the apex of the dial is the coldest setting Keep it on this setting until it is co...

Page 26: ...lose off the tank in the cockpit The 12v solenoid system is USCG approved device You do not need to shut any manual valves unless you wish or unless the solenoid stops working as indicated above All o...

Page 27: ...yacht not off the stern Make sure the bimini is not close to the BBQ Never use the BBQ while sailing Never use the BBQ on a dock Never change propane tanks when using the BBQ When in use make sure som...

Page 28: ...pen the engine compartment even if you think the fire has been extinguished dying embers can easily be re ignited by a fresh supply of oxygen Open fire Pull out the yellow safety tab Point the extingu...

Page 29: ...the safety cord is in place For starting an engine that has been at rest for 3 or more hrs use the choke Pull the choke out and set a few revs with the throttle Do not twist the throttle trying to pri...

Page 30: ...Gear Shift Choke Throttle Stop button Lever to lower and raise the outboard Kill Cord Fuel tank Fuel vent make sure this is slightly open at all times Fuel line connection make sure this is securely...

Reviews: