background image

Adjustable analog stick sensitivity

Snipe Mode

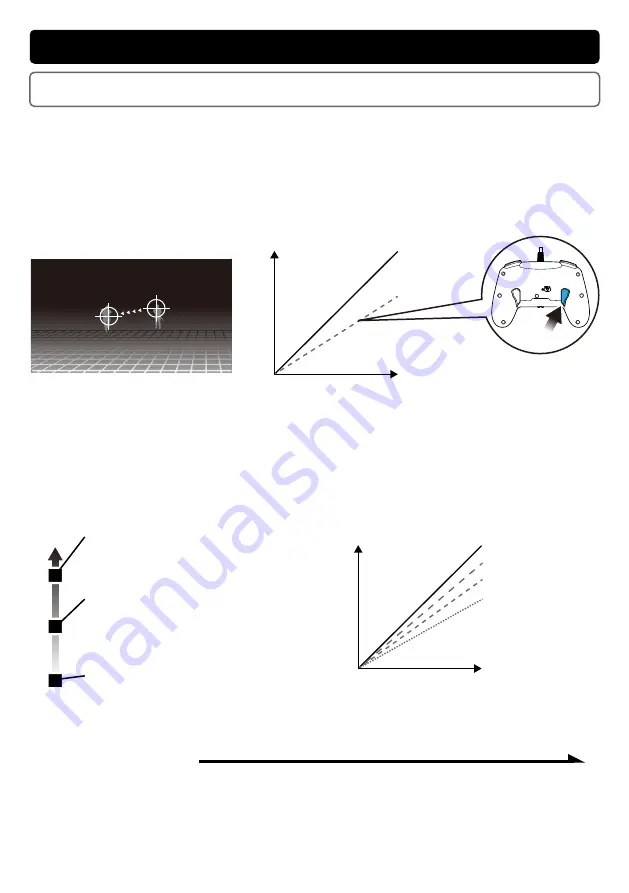
While pressing the FL Button (Snipe Button), the sensitivity of the Right Analog 

Stick will decrease.

This is useful for precise long-range aiming or making precise movements.

◆ Snipe Mode Sensitivity

Adjust the sensitivity of the Right Analog Stick by pressing the FL Button

 (Snipe Button) and selecting one of the three levels listed below.

* By default, the sensitivity is set to Level 2.

Slow

Fast

Stick Sensitivity Level 1

(Max. Output 50%)

Greatly lowered sensitivity.

Stick Sensitivity Level 2

(Max. Output 70%)

Moderately lowered sensitivity.

This sensitivity level is set by default.

Stick Sensitivity Level 3

(Max. Output 85%)

Slightly lowered sensitivity.

Right Stick Tilt

Input

Default

(Max. Output 100%)

Sensitivity Level 3

(Max. Output 85%)

Sensitivity Level 2

(Max. Output 70%)

Sensitivity Level 1

(Max. Output 50%)

12

* While pressing the Snipe Button, even if the Right Analog Stick is titled to the max, the controller will not 

  input more than the set sensitivity.

* It is possible to assign functions to the Left Analog Stick by using the companion App.

Image: Long-Range Aiming

Default

When using 
Snipe Mode

Right Stick Tilt

Input

Only while 

the FL Button 

(Snipe Button) 

is pushed

See following page for set up instructions.

Summary of Contents for NSW-326

Page 1: ...ded 3 Platform 3 Layout 4 How to Connect 5 Motion Aim Function 6 What is Motion Aim 6 How to set up Motion Aim 7 Motion Aim Sensitivity 8 Quick Motion Aim 9 Adjustable analog stick sensitivity 12 Snip...

Page 2: ...r humid areas Do not use this product if it has been damaged or modi ed Do not get this product wet This may cause an electric shock or malfunction Do not place this product near heat sources or leave...

Page 3: ...s product does not support DirectInput PC XInput Compatible Headsets Platform Controller 1 Included An internet connection is required to update the Nintendo Switch system rmware A PC and internet con...

Page 4: ...utton Capture Button D Pad Left Analog Stick Functions as the Left Analog Stick Button when pressed down Turbo Button Button A Button B Button Y Button Function Button X Button Home Button Right Analo...

Page 5: ...the USB plug In game settings The Motion Aim function is different from the gyro sensor acceleration sensor on the Joy Con and Nintendo Switch Pro controller This product may not operate properly if t...

Page 6: ...Pro controller It is possible to assign functions to the Left Analog Stick by using the companion App What is Motion Aim Motion Aim allows the Right Analog Stick input to be controlled by tilting the...

Page 7: ...the same in both modes by tilting the controller forward and backward Up Down Right Stick Motion Aim Function Motion Aim Function Motion Aim Function Settings There are two modes for Motion Aim contro...

Page 8: ...d to the neutral position before changing the setting again 2 The Motion Aim LED Blue will be lit when in use If settings are adjusted while the Motion Aim selector Switch is set to OFF the motion aim...

Page 9: ...be used in combination with the original function If you want to use only the Quick Motion Aim Function with the set button and not the original function use the Assign function p 16 to assign the or...

Page 10: ...ff LED Off Slow Blinking LED Off Motion Aim Switch OFF 1 Start Settings When setting Motion Aim sensitivity all buttons on the controller will not respond Settings complete LED On 2 LED On 2 Push the...

Page 11: ...seconds have passed without pressing any buttons in or the Function LED Red and the Motion Aim LED Blue will automatically light up and the setting functions will close Settings will be saved even if...

Page 12: ...ity Level 2 Max Output 70 Moderately lowered sensitivity This sensitivity level is set by default Stick Sensitivity Level 3 Max Output 85 Slightly lowered sensitivity Right Stick Tilt Input Default Ma...

Page 13: ...urn off it means at least one button has Turbo or Turbo Hold enabled If 4 seconds have passed without moving the Right Analog Stick up or down in all LEDs will automatically turn off and the setting f...

Page 14: ...ow to set up Turbo Function Operation LED Status Settings Turbo Mode Button is set to continuously activate the button function as long as you press the button Turbo Hold Continuously activates the bu...

Page 15: ...Turbo Button If the above button functions are assigned to the FL or FR Button the Turbo function can be assigned to the FL or FR buttons Turbo speed is set to 10 times second by default You can adjus...

Page 16: ...ion to To assign the function press the button of the function you want to assign to in The function is assigned to the button pressed in or it is set to NC button stops responding and the setting fun...

Page 17: ...efault twice The button function is set to default and the setting function close Return One Button Function to Default If 4 seconds have passed without pressing any buttons in the Function LED Red wi...

Page 18: ...y connected device When using a headset with this product there will be no sound coming from the TV or Nintendo Switch When using the product on a PC the Headphone Mic audio jack cannot be used Some s...

Page 19: ...Off Mic Mute LED Orange Operation LED Status Settings Push HORI Device Manager for Nintendo Switch Please download and install the HORI Device Manager for Nintendo Switch from this product s website u...

Page 20: ...mful interference in a residential installation This equipment generates uses and can radiate radio frequency energy and if not installed and used in accordance with the instructions may cause harmful...

Page 21: ...oriusa com Please visit http stores horiusa com policies for warranty details Warranty For all warranty claims made within the rst 30 days after purchase please check with the retailer where the origi...

Reviews: