Hope Industrial Systems HIS-ML21-SGAB User Manual Download Page 24

24 


Installation into Panel 


1. 

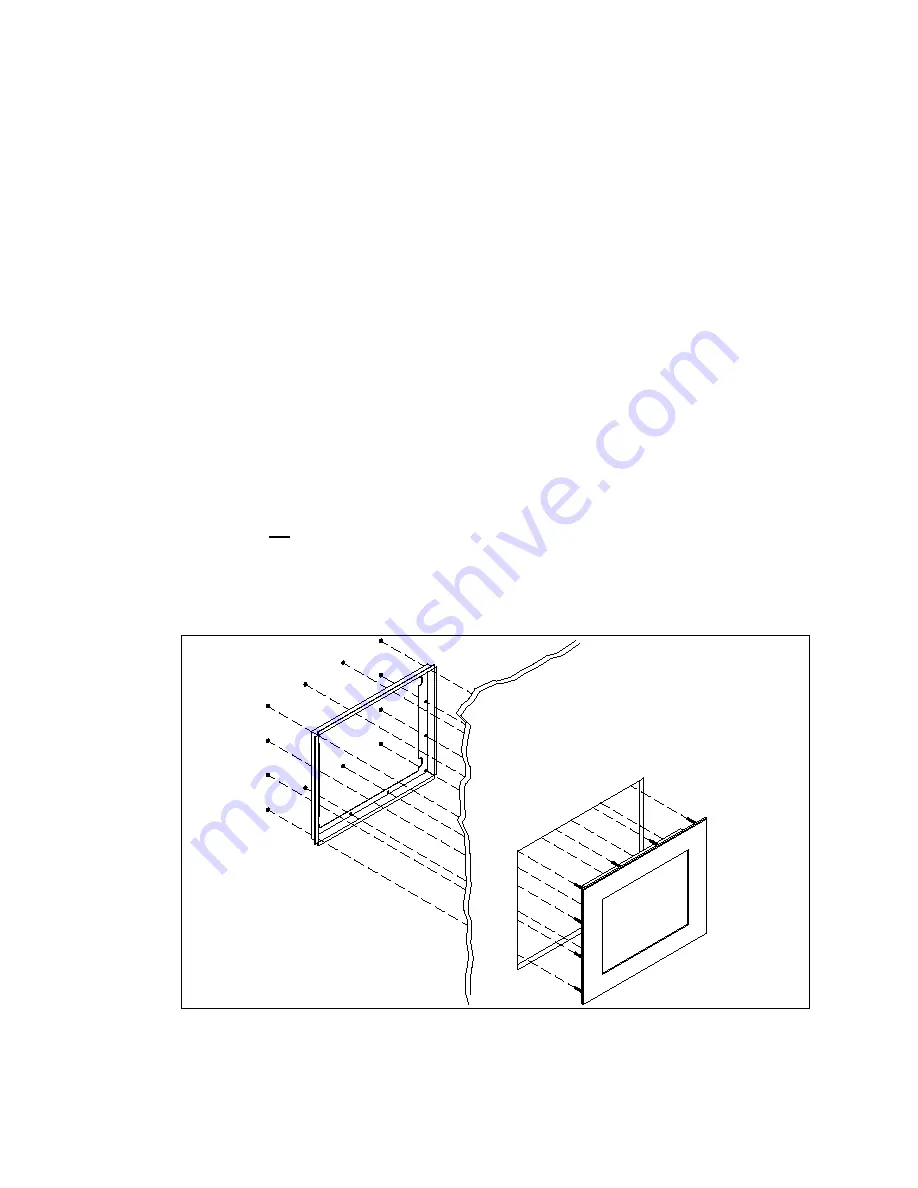
Refer to the drawing below. 
 

2. 

Locate position in panel for mounting of the monitor.  Assure that 
there is adequate space begin the panel.  Allow extra space (0.5 
in. behind and on each side) for air ventilation. 
 

3. 

Cut a rectangular hole in the panel.  Clean and deburr. 
Dimensions:  21.13” (536mm) W x 16.70” (424mm) H ; +/- .020”


4. 

Separate the rear collar from the unit by removing the 14 nuts. 
 

5. 

Insert the unit into the front of the panel and re-attach the collar. 
 

6. 

Tighten all 14 nuts to a torque of 24 inch-pounds to assure a wa-
ter-tight seal between the poron bezel gasket on the monitor and 
equipment panel.  

HIS will not assume liability for damage to in-

ternal electronics due to improper installation. 


Summary of Contents for HIS-ML21-SGAB

Page 1: ...1 Hope Industrial Systems Inc User Manual 21 3 Panel Mount Industrial Monitor Model No HIS ML21 SGAB HIS ML21 SRAB...

Page 2: ...ay Setting the Timing Mode 4 Self Test Feature Check 5 User Controls 6 Automatic Save 7 Direct Access Features 7 OSD Lock Unlock 7 OSD Functions 8 Troubleshooting 21 Display Modes 22 Installation Inst...

Page 3: ...a like rated enclosure This product is a UL Recognized Component and must be used with a listed computer FCC Notice This equipment has been tested and found to comply with the limits for a Class A dig...

Page 4: ...the timing mode use the controls to adjust the screen image For the best picture quality set your LCD display timing mode to VESA 1600 x 1200 60Hz To set the Timing Mode 1 Set the resolution Right cl...

Page 5: ...off both your computer and the monitor 2 Unplug the video cable from the back of the computer 3 Turn on the monitor If the monitor is functioning properly you will see a white box with a large blue o...

Page 6: ...n once as the monitor saves your ad justments POWER Use this button to turn the monitor on and off When the power is turned on a message appears in the center of the screen displaying the current mode...

Page 7: ...Access Features Brightness Adjustment 1 With the menu off push the or button to display the bright ness adjustment menu 2 Push the button to increase the brightness push the button to decrease the bri...

Page 8: ...n and then follow the Tool Tips to select the function and adjust the value 4 Use and buttons to select the sub menu and press the Menu but ton once to activate the selected sub menu 5 After selecting...

Page 9: ...en 3 Use the button to increase the brightness or button to decrease the brightness Adjust Contrast 1 Push the Menu button 2 Push the Menu button to open the Con trast adjustment screen 3 Use the butt...

Page 10: ...button to select the Coarse 5 Push the Menu button to open the Coarse adjust ment screen 6 Use the or buttons to adjust the coarse Removes noise such as horizontal stripes If the noise persists even...

Page 11: ...on to open the H Position adjustment screen 6 Use the or buttons to the horizontal position of the monitor s viewing area Follow these instructions to change the vertical position of the monitor s ent...

Page 12: ...2 Push the button or button until the Image screen is displayed 3 Push the Menu button to open the sub menu selection screen 4 Push the button or button to select the Image Effect 5 Push the Menu but...

Page 13: ...he sub menu selection screen 4 Push the button or button to select Bluish 5 Push the Menu button to adjust Bluish white Bluish White 1 Push the Menu button 2 Push the button or button until the Color...

Page 14: ...e Menu button to open the User Mode adjustment screen 6 Use the or button to select R ed G reen or B lue and push the Menu button Adjust the gamma value 1 Push the Menu button 2 Push the button or but...

Page 15: ...nt to reset the monitor use the or button to select No Menu How to adjust Follow these steps to change the language used in the menu You can choose one of seven languages English German Spanish French...

Page 16: ...button to open the H Position ad justment screen 6 Use the or button to change the horizontal posi tion of the OSD menu Change the horizontal position of the OSD menu 1 Push the Menu button 2 Push th...

Page 17: ...Halftone adjustment screen 6 Use the or button to opaqueness of the background of the OSD menu The menu will automatically turn off if no adjust ments are made for a certain time period 1 Push the Me...

Page 18: ...the button or button until the OSD screen is displayed 3 Push the Menu button to open the sub menu se lection screen 4 Push the button or button to select Color 5 Push the Menu button to open the Col...

Page 19: ...source Select Manual Source Select to manually select the signal source using the Source button 1 Push the Menu button 2 Push the button or button until the Source Select screen is displayed 3 Push th...

Page 20: ...e and position are adjusted auto matically 1 Push the Auto button 1 Push and hold in the Menu button for 5 seconds or more to Lock the OSD 2 Push and hold in the Menu button for 5 seconds or more to U...

Page 21: ...Chart The image is too light or dark Adjust the Brightness and Contrast Horizontal bars appear to flicker jitter or shimmer on the image Adjust the Fine function Vertical bars appear to flicker jitter...

Page 22: ...w the screen image has been optimized during manufacture Table Preset Timing Modes Mode Resolution Horizontal Frequency kHz Vertical Frequency Hz Pixel Clock Frequency MHz Sync Polarity H V VGA 720 x...

Page 23: ...ed and with use of an equally rated power supply Remember that heat rises the temperature at the top of the cabinet will be much hotter than at the bottom when the air is not circulating Also remember...

Page 24: ...e in the panel Clean and deburr Dimensions 21 13 536mm W x 16 70 424mm H 020 4 Separate the rear collar from the unit by removing the 14 nuts 5 Insert the unit into the front of the panel and re attac...

Page 25: ...window Always spray the glass cleaner on the cloth or towel and then clean the touch screen Glass cleaner sprayed directly on the monitor could possibly leak inside a non sealed unit and cause damage...

Page 26: ...26 Drawings Front View Bottom and Rear View Showing cutout dimensions...

Page 27: ...27...

Page 28: ...CFTs Cold Cathode Fluorescent Tube Screen protector when not shipped with touch screen Tempered glass to ANSI Z97 1 SPEC AR coated on both sides 98 Transmission of light 99 Reduction of glare 53 UV bl...

Page 29: ...Hz 1 0g 57 640Hz sine Altitude Operating up to 10 000 feet Non operating up to 40 000 feet Functional Panel controls rear access Power Menu Exit Auto OSD On Screen Display controls Auto image adjust c...

Page 30: ...n kit adds another 1 1 Bezel Stainless Steel Front bezel outside di mensions 22 28 566mm W x 17 87 454mm H x 0 28 7mm thick not including gasket Cutout dimensions 21 13 537mm W x 16 70 424mm H 020 Net...

Page 31: ...pixels can happen to TFT displays Five or less permanently dead pixels out of 1 3 million do not make a good case for exchanging the unit Please contact our Customer Service Department if the number...

Page 32: ...32 Hope Industrial Systems Inc 1325 Northmeadow Parkway Suite 100 Roswell GA 30076 www HISmonitors com Publication ML21 1 0 March 2003 2003 Hope Industrial Systems Inc...

Reviews: