background image

2. How to use

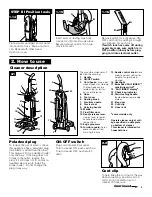
Cleaner description

15. Nozzle control knob: 

slide 

knob to correct setting for 
height of carpet being 
cleaned.

16. Headlight
17. Embedded Dirt FINDER™

sensitivity switch

*

18. ‘Dirt FINDER’ display

*

19. Check bag indicator
20. Stair cleaning handle: 

located below lower edge 
of door.

21. Bag door
22. Cord clip
23. Hose rack

*

some models only

Operate cleaner only at volt-
age specified on data plate
on bottom of cleaner.  
This cleaner is intended for
household use.

The assembled cleaner will
look like the drawing.

1.

Handle

2.  ON/OFF switch
3.

Cord hooks: 

wrap cord 

around hooks for storage.
The top hook can be 
rotated right or left for 
easy cord release.

4.

Hose 

5.

Tool cover

6.

Dusting brush

7.

Furniture nozzle

8.

Crevice tool

9.

Carrying handle

10. Wands
11. Final filter door
12. Handle release lever: 

step on lever to lower 
handle to operating or 
low positions.

13. Edge groomers
14. Furniture guard: 

helps 

prevent cleaner from 
marking furniture.

5

2-2

ON-OFF switch

Plug cord into electrical outlet.  
To turn cleaner ON, push switch up.
To turn cleaner OFF, push switch
down.

1

2

3

4

3

3

5

6

7

8

9

10

11

12

12

13

13

14

15

16

17

18

19

20

21

22

23

STEP III Position tools

Polarized plug

To reduce the risk of electric shock,
this appliance has a polarized plug
(one blade is wider than the other).
This plug will fit in a polarized outlet
only one way.  If the plug does not
fit fully in the outlet, reverse the
plug. If it still does not fit, contact a
qualified electrician to install the
proper outlet.  Do not change the
plug in any way.

Cord clip

To help keep the cord out of the way
while vacuuming, position cord in
cord clip (A) located at rear of
cleaner on hose rack.

1-15

1-16

1-14

Place smaller unridged end of wand
into bottom of rack. Snap wand into
clip. Repeat with other wand.
Open tool cover.

Insert ends of dusting brush (A),
crevice tool (B) into storage areas.
Secure furniture nozzle (C) in clip.
Close tool cover.

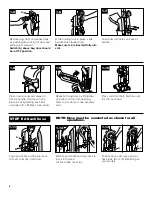
Remove switch lock (A) above ON/
OFF switch (B) by pulling it straight
out. Dispose of switch lock.

If switch lock has come off during
assembly, make sure switch is in
OFF position (down) before plug-
ging cord into electrical outlet.

A

2-1

A

A

C

B

B

Continued

Summary of Contents for WindTunnel U5458910

Page 1: ...WindTunnel by HOOVER Congratulations on your purchase This WindTunnel vacuum cleaner uses HOOVER HEPA Filtration Type Y filter bags This product was designed for easy assembly See page 3 www hoover com ...

Page 2: ...mage the cleaner and the bag Always turn off this appliance before connecting or disconnecting hose Do not use without dust bag or filters in place Change bag frequently when picking up very fine materials such as powder Use extra care when cleaning on stairs Do not put any object into openings Do not use with any opening blocked keep free of dust lint hair or anything that may reduce air flow Do ...

Page 3: ...ver com to find the service outlet nearest you click on the Service button OR Call 1 800 944 9200 for an automated referral of authorized service outlet locations U S only OR Call 1 330 499 9499 to speak with a representative in our Consumer Response Center Continued 1 Assembling cleanerNot Note The white switch lock above the ON OFF switch aids in the assembly of your cleaner Assembly can be cont...

Page 4: ... into the 3 notches and the clip as shown Slide hose into B and twist hose to lock it into place Lift hose tube cover C NOTE Hose must be connected as shown for all operations D B C B E A 4 Remove bag door on cleaner body by pushing down at top of door and pulling door outward Switch A above bag door should be in OFF position While holding rack in place slide handle onto cleaner body Make sure tab...

Page 5: ...ectrical outlet To turn cleaner ON push switch up To turn cleaner OFF push switch down 1 2 3 4 3 3 5 6 7 8 9 10 11 12 12 13 13 14 15 16 17 18 19 20 21 22 23 STEP III Position tools Polarized plug To reduce the risk of electric shock this appliance has a polarized plug one blade is wider than the other This plug will fit in a polarized outlet only one way If the plug does not fit fully in the outle...

Page 6: ...et that may need more cleaning attention It is able to sense when larger amounts of dirt particles especially embedded dirt are removed To let you know that the DirtFINDER feature is ready the red light will Handle position For ease in sliding knob the handle should be in the upright position C The nozzle will not move into the adjusted position until the cleaner handle is lowered to the operating...

Page 7: ... a break away feature which allows it to snap free if it is pushed open too far To reattach align hinges of cover with slots on sides of tool storage area Push cover down to secure in place Cleaning tools Tools allow for cleaning surfaces above the floor and for reaching hard to clean areas The cleaner is ready for tool use when handle is in upright posi tion CAUTION Agitator continues to rotate w...

Page 8: ...n though it is only partially full of dirt When cleaner is used to remove material of this nature change fil ter bag often It is imperative that you use only genuine HOOVER filter bags distrib uted by The Hoover Company to assure that your cleaner operates at peak performance HOOVER bags can be identified by these trade marks H G How to clean tools To clean the hose wipe off dirt with a cloth damp...

Page 9: ...t 9 3 5 3 1 3 2 A B C A C B Removing and installing filter bag Grasp filter bag collar A and pull collar from tube B Note Do not clean out old filter bag and reuse Discard used filter bag Hold new filter bag as shown Align opening in filter bag with B Push A firmly onto B Tuck in filter bag Removing bag door To change filter bag press down at top of bag door and pull door for ward Remove door Seco...

Page 10: ...own in How to replace Replace belt if it is stretched cut or broken What to buy To assure effective operation use only genuine HOOVER belts with your cleaner When purchasing a new belt ask for HOOVER part No 38528033 belt package no 40201160 Removing belt Remove agitator brush roll and used belt Discard used belt Replacing lens Reposition lens and secure with the two screws How to replace Disconne...

Page 11: ...rings The agitator is equipped with two ball bearings that should be lubricated periodically by a Hoover Factory Service Center or an Authorized Hoover Warranty Service Dealer Depot Thermal protector An internal thermal protector has been designed into your cleaner to protect it from overheating When the thermal protector acti vates the cleaner will stop running If this happens proceed as follows ...

Page 12: ...as described in Figs 3 10 through 3 15 in the Maintenance section Problem Cleaner won t run Problem Cleaner tools won t pick up Possible Cause Possible Solution Broken or worn belt Replace belt Agitator brush roll worn Replace brush roll Filter bag full Change filter bag Incorrect carpet height setting Move nozzle control knob to lower setting Blockage in air flow passage Clear blockage Problem Cl...

Reviews: