background image

7.

WARNING! Ensure that the charging base is disconnected from the Mains power 

before assembly.

WARNING! Always switch off the cleaner before fitting or removing accessories.

Assembly

1.  Insert the battery into the handvac, as shown, ensuring that it clicks 

into place.

2.  To remove the battery, press the Battery Release button and gently 

remove the battery. 

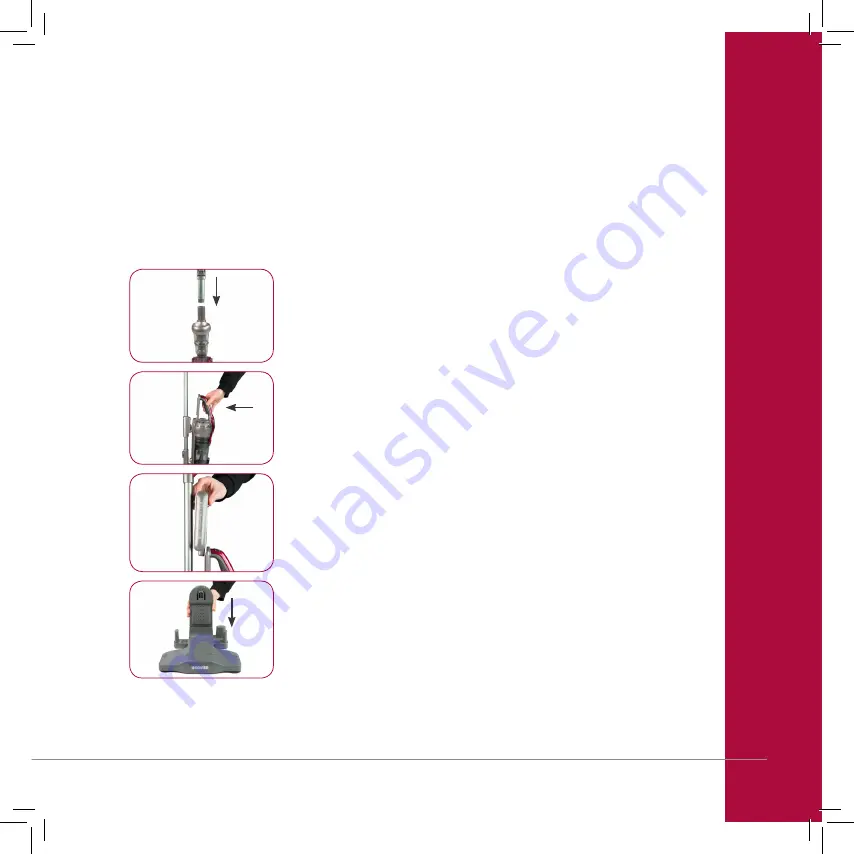
1.  Place the powerhead onto a flat floor, and insert the Extension Tube 

as shown, ensuring it clicks into place.

2.  Place the handvac into the main body and push until it clicks into 

place. 

W

arnings

Installing and Removing the Battery

Assembling the Charger

WARNING! Ensure that the charging base is disconnected 

from the Mains power before assembly.

1.  To assemble the charger insert the top section of the charger into 

the charger base ensuring it clicks into place. Plug the power plug 
into the mains power supply. 

Summary of Contents for Vortex Pro 5231

Page 1: ...Digital Brushless Motor Air Velocity Technology Cordless Freedom...

Page 2: ...1 5 8 6 7 2 4 3 9 12 15 14 16 17 21 18 22 19 23 20 25 24 13 10 11...

Page 3: ...19 Dusting Brush 20 Long Crevice Tool 21 Soft Brush 22 Flexible Extendable Hose 23 Elbow Connector 24 Large Upholstery Tool 25 Charging Base Specifications Voltage 25 2V Power 330W with power brush H...

Page 4: ...e the plug from the electricity supply before cleaning your appliance when not in use or attempting any maintenance task The charging base must only be connected to an AC supply at the voltage shown o...

Page 5: ...arry the appliance by the power cable use the power cable as a handle or pull the power cable around sharp edges or corners Avoid running the appliance over the power cable 9 Do not handle or operate...

Page 6: ...nd care 1 The appliance is only to be used with the charging base uniquely provided with the appliance 2 Only charge the battery inside the product and only use the specifically designated charger to...

Page 7: ...y remove the battery 1 Place the powerhead onto a flat floor and insert the Extension Tube as shown ensuring it clicks into place 2 Place the handvac into the main body and push until it clicks into p...

Page 8: ...aner in a stationary position while the powerhead is in operation IMPORTANT In between uses or when performing any maintenance always ensure that the cleaner is switched off and parked on a flat level...

Page 9: ...ice Tool Perfect for cleaning in between hard to reach places Large Upholstery Tool Ideal for cleaning furniture upholstery Soft Brush Ideal for dusting flat surfaces and furniture Flexible Extendable...

Page 10: ...hours to be fully charged NOTE When the charging indicator light is flashing during use it means the battery requires charging CAUTION Do not try to open the battery pack and repair it yourself NOTE...

Page 11: ...press the Power Control Button To turn off the cleaner press the On Off Button 3 Choose the appropriate accessory for your cleaning application and connect the accessory to the handvac 1 Press the On...

Page 12: ...ck 1 Remove the Extension Tube by pressing the Rod Release Button 2 Push the Handvac Extension Button as shown to release the Handvac Connector 3 Insert the Handvac Connector into the handvac 4 The ac...

Page 13: ...er 1 Turn the Diverter Dust Canister clockwise to unlock the canister The canister can now be emptied 2 To clean the diverter inner cyclone filter rotate and remove the filter as shown Hair and debris...

Page 14: ...an now be cleaned or replaced NOTE The dust canister filter is not a washable filter It is recommended to replace the filter every 6 months or when the filter is soiled with dirt 1 Press the Handvac R...

Page 15: ...dust canister mesh filter rotate and remove the base of the cyclone filter as shown Hair and debris can now be cleaned from the mesh filter The filter can be washed using lukewarm water Allow the filt...

Page 16: ...ush 2 Gently remove the roller brush as shown and clean as required WARNING Always switch off the cleaner before performing any maintenance on the powerhead Cleaning the Roller Brush 1 Align the two p...

Page 17: ...screws as shown 3 After cleaning replace the trap door and ensure that the two screws are turned to the Locked Position 2 The hose can now be pulled out for easy cleaning To clean simply use the hand...

Page 18: ...ery 33201621 Filter Set 32201630 Roller Brush 33788104 Diverter dust bin 33155917 Handvac dust bin 33155918 Please contact Hoover Customer Care 1300 360 845 NZ 0800 387 442 to find your local spare pa...

Page 19: ...is filled with dust The powerhead air path is blocked Empty the dust canister Clean or replace the filter Clear the air path in the powerhead Roller brush does not spin The roller brush is blocked Rem...

Page 20: ...Monday Friday 9am 5pm EST The decision to repair or replace the cleaner is at the sole discretion of Electrical Home Aids Pty Ltd If Electrical Home Aids Pty Ltd decide to repair or replace the cleane...

Reviews: