background image

Display contacts for different accounts: Want to only view contacts on your Phone or SIM card?

Go to 

 > Settings > Display preferences, and select the accounts that you want to display. You

can also:

l

Enable Simple layout: Want to hide the profile pictures, companies, and titles in the contacts list?

From the contacts list screen, go to 

 > Settings > Display preferences, and enable Simple

view.

l

View contact storage space: Want to check your contact storage space? From the contacts list,

go to 

 > Settings > Display preferences. In the Accounts field, you can see the available and

total storage space on your device or SIM card.

Add contacts to Favourites: Tired of constantly searching through your contacts for a particular
entry? You can Favourite your frequent contacts for quick and easy access. From your Contacts list,
touch the entry you want to Favourite, then touch Favourite to add it to the Favourites screen.

Manage Contact Groups

Want to send a message to a group of colleagues or host a get-together? Smart groups automatically
groups your contacts by company, city, and most recent contact time, so you can quickly send a group
email or message.

Create a contact group: From the groups list, touch 

, enter the group name (such as Family or

Friends), and then touch OK. Follow the onscreen instructions to add contacts, and then touch 

.

Send a message to smart group contacts: From the groups list, from the Groups section, open a

group and touch 

 to send a message or 

 to send an email.

Edit a group: From the groups list, select the group you want to edit and touch 

 to add a

contact, or touch 

 to Remove membersGroup ringtoneDelete group or Rename.

Delete a group: From the groups list, touch and hold a group, and then touch Delete.

Add Contacts to the Blacklist

You can add contacts to the blacklist to avoid receiving harassing or spam calls from them.

Open 

Contacts, touch the contact you want to add to the blacklist, and then go to 

 > Add

to blacklist. Your device will block all calls and messages from contacts in the blacklist.

View blacklisted contacts: Open 

Phone Manager, go to Blocked > 

, and then touch

Blacklist to view the blacklist.

Remove a contact from the blacklist: Open 

Contacts, touch the contact you want to remove

from the blacklist, and then go to 

 > Remove from blacklist.

Contacts

24

Summary of Contents for 8A

Page 1: ...User Guide ...

Page 2: ...nd Status Bar 14 Screen Lock and Unlock 17 Home Screen Management 18 Contacts Search Contacts 22 Managing Contacts 22 Dialling Basic Calling Functions 26 VoLTE 27 Use VoWi Fi for a New Calling Experience 28 Message Basic Messaging Functions 29 Camera Basic Camera Functions 31 Use Panorama Mode to Take Panoramic Photos 33 Pro Mode 34 Gallery Photo Management 37 Phone Manager Use One touch Optimisat...

Page 3: ...ection Bluetooth 50 Connecting USB Device 52 Security and Privacy Face Unlock 54 Fingerprint 55 Enable or Disable Location Services 58 Enable App Lock 58 Backup and Restoration Data Backup Using HiSuite 60 Data Backup to a Memory card 60 Data Backup to a USB Storage Device 60 Reset Your Phone 61 Wi Fi and Network Wi Fi 62 Connecting to the Internet 65 Share Your Mobile Network with Other Devices 6...

Page 4: ...System Change the Input Method 71 Accessibility 71 General Settings 72 Legal Notice Legal Notice 75 Personal Information and Data Security 76 Obtaining help 77 Contents iii ...

Page 5: ...d 2 If you have selected Enable pick up to wake your Phone will turn the screen on and recognise your face to unlock the screen automatically after you pick up your Phone and hold it to your face If you do not wish to use this feature deselect this option Touch Enrol face and follow the onscreen instructions to enrol your facial information 3 Methods to set Face unlock l Direct unlock Turn on the ...

Page 6: ... the corresponding shortcut switch to enable or disable a feature Touch and hold a shortcut switch icon to enter the feature s settings page Touch to enable this feature Touch and hold to enter Settings Organize shortcuts Camera Tips Use Panorama Mode to Take Panoramic Photos Panoramas provide a wider viewing angle than ordinary photos letting you take sweeping landscape shots To capture a panoram...

Page 7: ...background Spot The subject to be highlighted in the picture is relatively small such as a flower or a tree Adjust brightness based on the shooting environment l Adjust ISO On the Pro mode screen touch and swipe left or right on the ISO slider to adjust its value To avoid excessive noises the recommended ISO is below 400 The recommended ISO for the daytime is between 100 and 200 and above 400 for ...

Page 8: ...em based on your actual needs l The recommended settings above are for reference only You may adjust them based on the actual condition to achieve your desired effect Use Pro Mode to Capture Portraits Want to take more professional portraits The Pro mode allows you to adjust your camera settings to shoot professional portraits Open Camera More Pro Select a Metering mode or mode is recommended for ...

Page 9: ...prevents unauthorised access to important apps on your device Enable App lock Open Settings Go to Security privacy App lock When you access the app for the first time follow the onscreen instructions to set the password and enter the app lock In subsequent access you can directly enter the app lock password On the App lock screen enable App lock for the apps you want to protect When accessing a lo...

Page 10: ...ts Touch and hold an empty area on the home screen to enter home screen editing mode Touch Widgets touch and hold a widget and drag it to an empty area on the home screen or touch the widget you want Check that there are enough empty spaces on the home screen for the widget If there is not enough space add an empty screen page or free up some space on the current home screen page Delete widgets To...

Page 11: ...d TalkBack reads aloud content on the screen that you touch select or activate It is a useful tool that helps visually impaired users interact with their Phone 1 Open Settings and go to Smart assistance Accessibility TalkBack to open the TalkBack settings screen 2 Enable TalkBack and touch OK Your device will launch a tutorial when you enable TalkBack for the first time If you need to listen to th...

Page 12: ...Enrol Your Facial Information to Enable Face Unlock Face unlock allows you to quickly unlock your Phone by holding it up to your face l Only the owner can enable Face unlock This feature is not available for users or guests and not supported in PrivateSpace either l Face unlock is not available if the screen unlock password has not been entered for three or more days in a row or if your Phone has ...

Page 13: ...can simply raise your Phone to unlock the screen without a password or fingerprint If you haven t selected Enable pick up to wake when enroling the face data you can set up this feature later Open Settings go to Security privacy Face recognition set the Face unlock method to Direct unlock Then open Settings go to Smart assistance Motion control Pick up and select Wake device Enrol a Fingerprint Yo...

Page 14: ...nancial information please exercise caution when connecting to a public Wi Fi network Connect to a Wi Fi Network Open Settings go to Wireless networks Wi Fi and enable Wi Fi Touch a Wi Fi network to access it and enter the network password or complete the authentication if required Alternatively you can scroll to the bottom of the menu touch Add network and follow the onscreen instructions to add ...

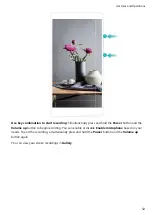
Page 15: ... function of your Phone before screen recording Enable microphone is disabled by default l If you have enabled Enable microphone your device will record all ambient sounds in the recording It is recommended that you record your screen in a quiet environment Use shortcut to start recording Swipe down from the status bar to open the notification panel and then touch to start recording the screen You...

Page 16: ...ton and the Volume up button to begin recording You can enable or disable Enable microphone based on your needs To end the recording simultaneously press and hold the Power button and the Volume up button again You can view your screen recordings in Gallery Gestures and Operations 12 ...

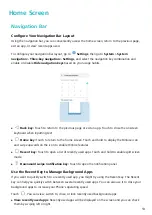
Page 17: ... home screen Touch and hold to display the HiVoice icon and swipe upwards on the icon to enable HiVoice features l Recent key Touch to open a list of recently used apps Touch and hold to enable split screen mode l Downward swipe notification key Touch to open the notification panel Use the Recent Key to Manage Background Apps If you want to quickly switch to a recently used app you might try using...

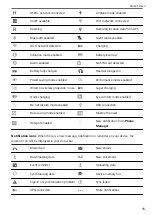
Page 18: ...ture Touch and hold to enter Settings Organize shortcuts Notification Panel and Status Bar Notification and Status Icons and Descriptions The icons in the status bar give you a quick view of the overall status of your device including its network connection battery level and any new messages received when your device is in Silent mode Status icons By glancing at the status icons you can quickly le...

Page 19: ...ireless projection in use Super charging Quick charging Eye comfort mode enabled Do not disturb mode enabled USB connection Data saving mode enabled Bluetooth power Hotspot enabled New notification from Phone Manager Notification icons When there is a new message notification or reminder on your device the relevant icon will be displayed in your status bar Missed call New emails Downloading data N...

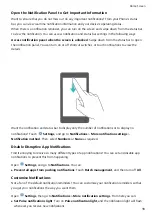
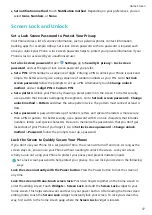
Page 20: ... notifications or to display no notifications Touch Settings and go to Notifications More notification settings Notification method Then select Numbers or None as required Disable Disruptive App Notifications Find it annoying to receive so many different types of app notifications You can set and disable app notifications to prevent this from happening Open Settings and go to Notifications You can...

Page 21: ...nect at least 4 dots l Set a password A password made up of numbers letters and special characters is more secure than a PIN or pattern For better security use a password with 8 or more characters that includes numbers letters and special characters Be sure to memorize the password so that you don t get locked out of your Phone if you forget it Go to Set lock screen password Change unlock method P...

Page 22: ... until your Phone vibrates and then touch Uninstall Follow the onscreen prompts to delete the app To ensure that the system runs normally some preinstalled system apps cannot be uninstalled Create a folder From the home screen touch and hold an app icon until your Phone vibrates then drag it on top of another icon The two icons will now be placed in a new folder Delete a folder Open the folder tou...

Page 23: ...r Touch and hold the screen page you want to move then drag it to the desired position l Set a default home screen page Touch in the upper part of the home screen to set the selected screen page as your default home screen page Set Your Home Screen Wallpaper Tired of default wallpapers Set a photo you like as your home screen wallpaper to personalise your home screen Open Settings and then go to H...

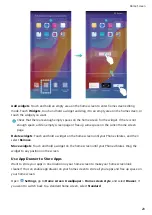
Page 24: ...ch and hold a widget on the home screen until your Phone vibrates and then select Remove Move widgets Touch and hold a widget on the home screen until your Phone vibrates Drag the widget to any position on the screen Use App Drawer to Store Apps Want to store your apps in one location on your home screen to make your home screen look cleaner You can enable app drawer on your home screen to store a...

Page 25: ...reen After you enable app drawer touch on the home screen to enter the app list From the app list touch and hold the app icon that you want to add until your Phone vibrates and then drag it to the desired position on the home screen Home Screen 21 ...

Page 26: ...all matching contacts If an error occurs while you re searching for a contact on the contacts list screen go to Settings Organise contacts and then touch Rebuild index data OK Managing Contacts Import and Export Contacts When you switch to a new Phone you ll need to transfer your existing contacts Open Contacts go to Settings Import Export and then select one of the following l Import contacts Sel...

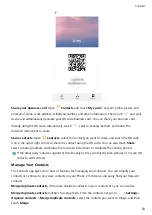
Page 27: ...an also touch Share select a sharing method and follow the onscreen instructions to complete the sharing process If the other party s device supports QR code analysis they can directly take pictures of or scan QR codes to add contacts Manage Your Contacts The Contacts app gives you a host of features for managing your contacts You can simplify your contacts list choose to only view contacts on you...

Page 28: ... contacts by company city and most recent contact time so you can quickly send a group email or message Create a contact group From the groups list touch enter the group name such as Family or Friends and then touch OK Follow the onscreen instructions to add contacts and then touch Send a message to smart group contacts From the groups list from the Groups section open a group and touch to send a ...

Page 29: ...s Use Erase traces to erase call and message records for a contact to protect your privacy Open Contacts select a contact and go to Erase traces Erase All of your call and message records for that contact will be erased Contacts 25 ...

Page 30: ...o hang up quickly You can set Power button ends call On the Dialler screen go to Settings More and enable Power button ends call to quickly hang up calls Make Emergency Calls In an emergency situation if your Phone is powered on and within the service area you can make emergency calls even if the screen is locked or there is no mobile reception The emergency call feature is subject to your local r...

Page 31: ...cord Touch and hold an entry then touch Delete entry l Delete multiple records Go to Delete multiple entries select the entries you want to delete or Select all then touch Activate International Roaming for Borderless Communication When you travel abroad for work or a holiday you can make calls when your device is roaming without having to dial the country code 1 Contact your network provider to a...

Page 32: ...ovider you can l Enable 4G Turn on 4G Due to carrier customisation there may not be a 4G switch on your device This indicates 4G is already enabled and does not need to be turned on manually l Enable VoLTE calling Turn on VoLTE HD calls Use VoWi Fi for a New Calling Experience You can use VoWi Fi to make voice and video calls in any location that has a Wi Fi network even when there is no mobile Ph...

Page 33: ...ly deleting an important message Touch and hold a message and then touch to archive the message Delete a message Tired of the clutter created by too many messages Delete unneeded conversations or messages to clean up your Messaging list To delete conversations or messages touch and hold the conversations or messages to enter the editing screen select the conversation or message and touch Deleted m...

Page 34: ...ge Open Messages and touch Go to Settings Advanced From here you can configure the following Whether to retrieve MMS messages automatically Disable Auto download MMS to prevent your device from automatically downloading MMS messages Whether to retrieve MMS messages automatically when roaming Disable Auto download MMS when roaming to prevent your device from automatically downloading MMS messages i...

Page 35: ...e pictures appear darker You can adjust the exposure manually from the viewfinder by touching the screen and dragging the icon up or down Enable or disable flash Flash is used to provide extra lighting for taking photos in low light conditions From the viewfinder touch to select one of the following flash modes l Auto The camera automatically enables or disables flash depending on the ambient ligh...

Page 36: ...shot To select an assistive grid open Camera and touch to enter Settings Then touch Assistive grid and select the type of grid or lines you want to use Rule of thirds composition method Use either Grid or Phi grid The four intersection points in the grid are the focus areas of the picture Place the subject of your photo on one of the intersection points to achieve a good composition Spiral composi...

Page 37: ...cape shots To capture a panorama shot the camera takes multiple photos of objects within our visual field and stitches them together into a single photo When taking a panorama find a wide open space that is some distance away from the subject and try to avoid backgrounds that are all in one colour 1 Go to Camera More Panorama Camera 33 ...

Page 38: ...round Spot The subject to be highlighted in the picture is relatively small such as a flower or a tree Adjust brightness based on the shooting environment l Adjust ISO On the Pro mode screen touch and swipe left or right on the ISO slider to adjust its value To avoid excessive noises the recommended ISO is below 400 The recommended ISO for the daytime is between 100 and 200 and above 400 for night...

Page 39: ...st them based on your actual needs l The recommended settings above are for reference only You may adjust them based on the actual condition to achieve your desired effect Use Pro Mode to Capture Portraits Want to take more professional portraits The Pro mode allows you to adjust your camera settings to shoot professional portraits Open Camera More Pro Select a Metering mode or mode is recommended...

Page 40: ...ment you can select Adjust Focus To better highlight a subject it is recommended that you use manual focus MF when shooting portraits In the viewfinder touch to focus on the part the subject s face for example you want to highlight l In Pro mode some settings may change after you change a setting You may adjust them based on your actual needs l The recommended settings above are for reference only...

Page 41: ...ts Touch to adjust the photo s brightness contrast saturation and other parameters l Beautify a portrait photo When the system detects a portrait photo it will automatically provide you with the Beauty feature You can touch in the photo editing screen to apply features such as Smooth Blemishes Thin face and Enhance eyes to make your portrait shot more attractive l Create photo mosaics Touch and se...

Page 42: ... for albums that you want to hide Albums such as Camera Videos My favourites and Screenshots cannot be hidden Delete photos and videos Press and hold a photo or album until the icon appears select the items you want to delete and then go to Delete Deleted photos and videos will remain in the Recently deleted album along with a tag indicating the number of days until the item is permanently removed...

Page 43: ...er l Data usage this month Check the data usage of individual apps l Network access Manage Internet access permissions for each app l Smart data saver Enable data saving mode prevents background apps from using mobile data and select the apps that have unrestricted data access Enable Smart Power Saving Management to Optimise Power Consumption Running out of battery at an inopportune time can cause...

Page 44: ...when you charge your device Gaps between the coloured bars indicate the various points when you were not charging your device This feature does not consume power Touch Battery usage to view power intensive apps and hardware l Display remaining battery percentage on the status bar Enable Battery percentage to display the remaining battery percentage of your device on the status bar Phone Manager 40...

Page 45: ...nage Email Accounts You can manage multiple email accounts concurrently on your Huawei Phone Open Email You can l Check emails On the Inbox screen touch and then select an email account to view the list of your emails Swipe down to refresh the list of emails Open an email to read reply forward or delete it Swipe left or right on the screen to view the previous or next email To delete multiple emai...

Page 46: ... or to manage VIP contacts Import Important Events to Calendar Worried about missing an important event among a sea of emails You can import important events to Calendar and view them at anytime and anyplace Open Email select the event from the email and select Add to calendar Set Auto Response for Exchange Email Unable to reply to emails on vacation Enable auto responses to automatically reply to...

Page 47: ... enter your event information including title location and start and end times Go to Add reminder to add a reminder for your event then touch Search events On the Calendar page touch and enter the event keywords such as title or location Configure Calendar On the Calendar page go to Settings to customize calendar display and reminders Check the exact location of the destination Open Calendar In a ...

Page 48: ...not miss any important events Import meeting reminders Open Calendar go to Manage accounts Add account and follow the onscreen prompts to add your work emails Exchange account to the calendar to check meeting reminders Share an event Touch an event on the calendar or under schedule then touch and follow the onscreen prompts to share the event using any of the multiple methods Calendar 44 ...

Page 49: ...a timer View the time all over the world Go to Clock touch on the World clock tab and enter the name of a city or select a city from the list of cities Touch to set the date and time Display the time in two different regions Go to Clock then go to Date time in the World clock tab Enable Dual clocks touch Home city and select your city of residence from the city list 45 ...

Page 50: ...Network provided date and time Time and datein your selected city If the time in your current region is the same as that of your home city the lock screen will only display one time Clock 46 ...

Page 51: ...aring method and follow the onscreen prompts Add a note to favourites Want to add a note to favourites so you can refer to it later On the list page of All notes swipe left on a note and touch Alternatively open the note you want to add to favourites and touch Generate a to do list Want to create a shopping list On the page of Notepad touch enter an item and then touch SAVE Add multiple items to g...

Page 52: ...uch write your notes and touch to save it You can write and draw in Notepad Add tags to notes Want to easily view the categories of your notes On the editing page of All notes touch and use different coloured tags to categorise different content for a clearer view of your notes Notepad 48 ...

Page 53: ...towards healthier Phone usage habits To check your Phone usage open Settings and go to Digital balance More Check today s screen time Touch Today and you can check your Screen time App usage Unlocks and EXTENSIONS Check last seven days screen time Touch Last seven days and then check your Screen time App usage Unlocks and EXTENSIONS 49 ...

Page 54: ...you drive You can also connect your Phone to Bluetooth wearables to record and manage fitness data Connecting Bluetooth devices to your Phone does not increase power consumption significantly 0 0 Bluetooth protocols used by Huawei devices and their functions HFP HSP Make calls A2DP Play music AVRCP Control music playback OPP Transfer files PBAP Sync contacts MAP Sync text messages 50 ...

Page 55: ...e to another device over Bluetooth to share data import and export contacts and set up Internet tethering Use Bluetooth to send files Ensure that your Phone is within Bluetooth range of the other device 10 m or 32 ft You can then establish a Bluetooth connection and share multimedia files web pages contacts documents and apps between the two devices Open Files touch and hold the file that you want...

Page 56: ... Computer using a USB cable to transfer data and perform other tasks l Transfer files Media Transfer Protocol MTP is a type of transmission protocol for media files You can transfer files between your Phone and computer using this connection method First install Windows Media Player 11 or later on your computer Swipe down from the status bar to open the notification panel and then set your USB con...

Page 57: ... between your Phone and a USB storage device You can use an OTG cable to access USB storage devices including USB drives and card readers directly from your Phone l This feature is only available on Phones with USB OTG support l If your Phone has a USB Type C port you will need to purchase a Huawei certified Micro USB to USB Type C adapter or a USB OTG cable with a USB Type C connector 1 Connect t...

Page 58: ...y available if the unlock method is set to Pattern 4 digit PIN Custom PIN or Password 2 If you have selected Enable pick up to wake your Phone will turn the screen on and recognise your face to unlock the screen automatically after you pick up your Phone and hold it to your face If you do not wish to use this feature deselect this option Touch Enrol face and follow the onscreen instructions to enr...

Page 59: ...nition set the Face unlock method to Direct unlock Then open Settings go to Smart assistance Motion control Pick up and select Wake device Fingerprint Fingerprint Recognition Enjoy Faster Navigation and Enhanced Security Fingerprint recognition not only allows you to unlock your Phone faster it also provides added security to your personal information You can use your fingerprint to l Unlock your ...

Page 60: ...sensor to take a photo or video l Answer a call Touch and hold the fingerprint sensor to answer a call l Turn off an alarm Touch and hold the fingerprint sensor to turn off an alarm l Show the notification panel When your screen is in portrait mode swipe down on the fingerprint sensor to display the notification panel touch twice to clear notifications and swipe up to close the notification panel ...

Page 61: ...ur device You can also delete or rename your fingerprints 1 Open Settings 2 Go to Security privacy Fingerprint ID Fingerprint management 3 Enter the screen unlock password and then follow the onscreen instructions to enter the fingerprint configuration screen 4 In the Fingerprint list section you can l Enrol a new fingerprint Touch New fingerprint to enrol a new fingerprint l Rename or delete a fi...

Page 62: ...vices not for the purpose of identifying and collecting your private information Set indoor positioning assistance Open Settings go to Security privacy Location access Advanced settings and enable or disable Wi Fi and Bluetooth scanning Scanning Wi Fi networks and Bluetooth devices will improve the accuracy of indoor positioning Enable App Lock App lock allows you to set a password for your WeChat...

Page 63: ... App lock password and password protection Touch on the App lock screen and then touch Change password or Change password protection to modify your App lock password or password protection Security and Privacy 59 ...

Page 64: ...ttings and go to System Backup restore Data backup External storage Memory card Then touch BACK UP from Select data select the data you want to back up and touch Back up l You can enable Auto backup on the backup page and then connect your phone to the power supply The system automatically backs up the data when the screen is off l You can touch Backup encryption Encrypt backups to enable Backup e...

Page 65: ...luetooth pairing information It won t change other settings on your Phone or delete any data or files Open Settings go to System Reset Reset network settings touch Reset network settings and follow the onscreen instructions to reset the settings Restore all settings This will restore your device s initial network settings fingerprint data face data and lock screen passwords It won t reset settings...

Page 66: ... you have enabled Wi Fi your device will l Automatically select and connect to the optimal network Automatically select and connect to Wi Fi networks you ve previously connected to free networks or your mobile data network depending on the signal strength at your current location You can view the connection status by checking the icons in the status bar l The icon indicates that your device is con...

Page 67: ...d access to your personal data and financial information please exercise caution when connecting to a public Wi Fi network Connect to a Wi Fi Network Open Settings go to Wireless networks Wi Fi and enable Wi Fi Touch a Wi Fi network to access it and enter the network password or complete the authentication if required Alternatively you can scroll to the bottom of the menu touch Add network and fol...

Page 68: ... On or Off Open Settings go to Wireless networks Wi Fi Wi Fi and choose to enable or disable Wi Fi l Your Phone will automatically connect to the optimal network available after Wi Fi is enabled l Wi Fi may automatically switch to your mobile data network depending on strength of Wi Fi signals in your area Note that using mobile data to download or view videos and other large files may incur addit...

Page 69: ...network you want to connect to If you select an encrypted network you will also need to enter the Wi Fi password Connecting using mobile data Before using mobile data ensure that you have a data plan with your network provider to avoid incurring excessive data charges 1 Swipe down from the status bar to open the notification panel 2 Touch to enable mobile data When you don t need to access the Int...

Page 70: ...mit to set the data limit for a single session When the data sharing limit is reached your device will automatically disable the hotspot Use Bluetooth to share mobile data Establish a Bluetooth connection between devices before using Bluetooth to share your mobile data Open Settings go to Wireless networks Tethering portable hotspot and enable Bluetooth tethering On the Bluetooth screen of the pai...

Page 71: ...ating system you may need to install drivers or establish the relevant network connection on your computer before using this function Refer to your computer s operating system guide for more information Wi Fi and Network 67 ...

Page 72: ...et times such as weekends or evenings Touch Time to configure the time period and repeat interval then toggle on the Time switch Event rule Prevent interruptions during meetings or events Touch Event to enable Do not disturb mode during calendar events Configure Your Sound Settings When you are watching movies or playing games your device will automatically switch to stereo sound to enhance your a...

Page 73: ...ble Eye comfort mode at set times You can configure your Phone to enable Eye comfort mode for a set period of time each day When Eye comfort mode is disabled open Settings go to Display Eye comfort and enable Scheduled then set your desired Start time and End time Adjust Eye comfort mode colour temperature Once Eye comfort mode is enabled blue light will be filtered out and the screen will take on...

Page 74: ...onfigure the notch display settings Touch More display settings Notch to configure the notch display settings l Change the image and text size Touch Text and display size and select a display mode to suit your needs l Enable automatic screen rotation Go to More display settings Auto rotate screen to enable automatic rotation Alternatively swipe down from the status bar to open the notification pan...

Page 75: ...creen and then launch the tutorial 3 Touch and enable Explore by touch When Explore by touch is enabled your device will read out content that you touch Why does my Phone suddenly start reading out content on the screen How do I disable this feature You may have enabled TalkBack by accident To disable TalkBack press and hold the Power button until your device vibrates and then touch the screen wit...

Page 76: ...rvice to help visually impaired users interact with their devices Open Settings go to Smart assistance Accessibility and enable Text to speech Configure your preferred engine and speech rate to enable this feature Enable Colour Correction The colour correction setting enables your device to compensate for the effects of colour blindness When colour correction is enabled users with normal colour vi...

Page 77: ...me and date with your mobile network Disable Set automatically to set your time and date manually l Modify your time zone Enable Set automatically to sync your Phone s time zone with your mobile network Disable Set automatically to set your time zone manually l Change the time format Enable 24 hour time to set your time format to 24 hours Disable 24 hour time to set your time format to 12 hours l ...

Page 78: ...se and decide whether to perform a cleanup Not all devices support microSD cards Open Settings and touch Storage to view the memory usage and free up more space in a timely manner based on the available storage space Clean up space recommended If you select CLEAN UP you can view the usage details of apps Based on the scan result you can also manually clean up the system as recommended or specify i...

Page 79: ...gistered trademarks of Qualcomm Inc NASDAQ QCOM Other trademarks products services and company names mentioned herein may be the property of their respective owners Notice Some features of the product and its accessories described herein rely on the software installed or the capacities and settings of the local network and therefore may not be activated or may be limited by local network operators...

Page 80: ...d expressly excludes all liability in connection with such matters DISCLAIMER ALL CONTENTS OF THIS DOCUMENT ARE PROVIDED AS IS EXCEPT AS REQUIRED BY APPLICABLE LAWS NO WARRANTIES OF ANY KIND EITHER EXPRESS OR IMPLIED INCLUDING BUT NOT LIMITED TO THE IMPLIED WARRANTIES OF MERCHANTABILITY AND FITNESS FOR A PARTICULAR PURPOSE ARE MADE IN RELATION TO THE ACCURACY RELIABILITY OR CONTENTS OF THIS DOCUME...

Page 81: ...ularly scan for viruses l Be sure to obtain third party applications from a legitimate source Downloaded third party applications should be scanned for viruses l Install security software or patches released by Huawei or authorised third party application providers l Using unauthorised third party software to update your device may damage your device or put your personal information at risk It is ...

Page 82: ...reen layout may vary All statements information and recommendations in this guide do not constitute a warranty of any kind express or implied Please visit http consumer huawei com en support hotline for recent updated hotline and email address in your country or region Model JAT L29 JAT L41 EMUI 9 0_01 ...

Reviews: