

10.
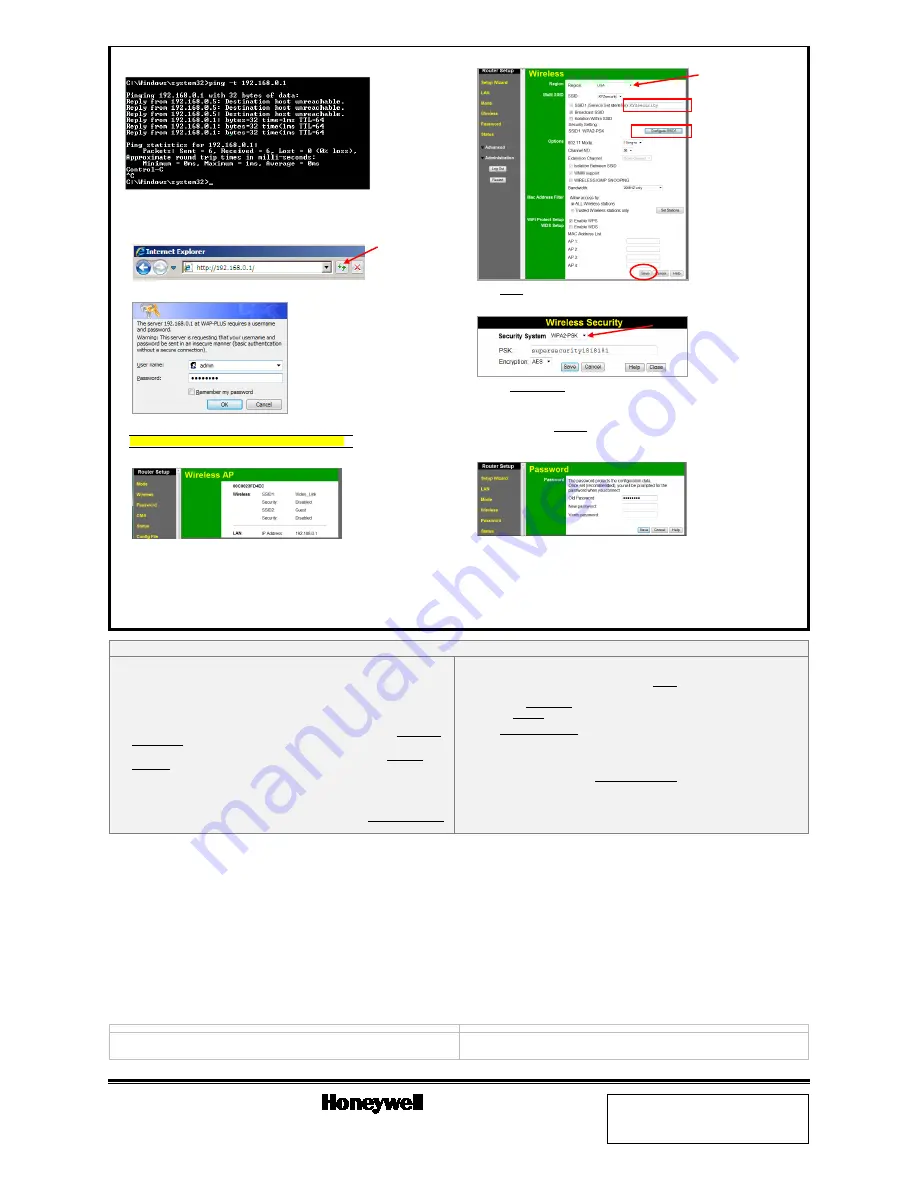
A command window opens. Enter
ping
–
t 192.168.0.1
and hit [Enter]. The command
box displays the ping results.
11.
When you get at least 3 replies from the WAP-PLUS (192.168.0.
1
) halt the pinging with a
[Ctrl] + [C] keyboard command, then close the command box.
12.
At the PC, open the browser and enter
http://192.168.0.1
into the address field. Then
click refresh.
13.
The WAP-PLUS log in screen appears.
14.
Enter the default User name (admin) and password (password), then click
OK
.
NOTE: Do not change any settings other than the ones below.
15.
The Wireless AP screen appears.
16.
In the left pane, select
Wireless
. (Completed screen shown below.)
17.
In the Region drop-down field, select a region. Then give the SSID1 a meaningful name.
18.
Click
Configure SSID1
. The Wireless Security screen appears.
19.
From the Security System drop-down field, select
WPA2-PSK
. Create a PSK key (pre-shared
key) that is greater than 8 characters. Click
Save
, then
Close
.
20.
The Wireless screen returns.
21.
In the left pane select Password. If a security log in screen appears. Enter the default User
name (admin) and password (password), then click
OK
.
22.
The Password screen appears.
23.
Change the default password and click
Save
.
24.
In the left pane click
Log Out
, then
OK
for the confirmation message.
25.
You can repeat this procedure for the next WAP-PLUS, or return your PC to a network DHCP
state and reconnect it to the internet or LAN.
NOTE: With the LYNX-Touch (L5100), the LAN (router) can be connected to any of the four
wired ports.
Substitute steps for other Windows operating systems
Depending on what version of Windows you are using, screen appearance will vary. Further you
may have to accept permission messages to continue.
As with any operating system there are many ways to do the same task. For alternate ways,
please refer to your operating system’s help file.
Widows VISTA (Substitute these steps.)
2.
From the tool bar, navigate
Start > Settings > Control Panel
. Select the Network and
Sharing Center icon, right click, and select
Open
.
3.
In the left pane, click
Manage network connections
. Select the active Local Area
Connection icon, right click, and select
Properties
.
Widows 7 (Substitute these steps.)
2.
From the tool bar, navigate
Start > Control Panel > Network and Sharing Center
.
3.
In the left pane, click
Change adapter settings
. Select the active Local Area Connection
icon, right click, and select
Properties
.
Windows 8 (Substitute these steps.)
2.
Position the cursor to the top right screen until the Charm bar appears at the right. Then click
the
Settings
icon.
•
Select the Control Panel. The Control Panel window appears.
•
At the Category drop-down menu, click
Small icons
.
3.
At the All Control Panel Items window, click
Network and Sharing Center
.
•
In the left pane, click
Change adapter settings
.
•
Right click your network icon and select
Properties
.
8.
Verify the WAP-PLUS is ready to communicate by performing a “ping” test. Press the
[Windows key + X + A] to get an Administrator Command box.
FEDERAL COMMUNICATIONS COMMISSION STATEMENTS
The user shall not make any changes or modifications to the equipment unless authorized by the Installation Instructions or User's Manual. Unauthorized changes or modifications could void the user's authority to operate the
equipment.
CLASS B DIGITAL DEVICE STATEMENT
This equipment has been tested to FCC requirements and has been found acceptable for use. The FCC requires the following statement for your information:
This equipment generates and uses radio frequency energy and if not installed and used properly, that is, in strict accordance with the manufacturer's instructions, may cause interference to radio and television reception. It has been
type tested and found to comply with the limits for a Class B computing device in accordance with the specifications in Part 15 of FCC Rules, which are designed to provide reasonable protection against such interference in a
residential installation. However, there is no guarantee that interference will not occur in a particular installation. If this equipment does cause interference to radio or television reception, which can be determined by turning the
equipment off and on, the user is encouraged to try to correct the interference by one or more of the following measures:
• If using an indoor antenna, have a quality outdoor antenna installed.
• Move the antenna leads away from any wire runs to the receiver/control.
• Reorient the receiving antenna unti
l interference is reduced or eliminated.
• Plug the receiver/control into a different outlet so that it and the radio or television receiver are on different branch c
ircuits.
• Move the radio or television receiver away from the receiver/control.
• Consul
t the dealer or an experienced radio/TV technician for help.
INDUSTRY CANADA CLASS B STATEMENT
This Class B digital apparatus complies with Canadian ICES-003.
Cet appareil numérique de la classe B est conforme à la norme NMB-003 du Canada.
FCC / IC STATEMENT
This device complies with Part 15 of the FCC Rules, and RSS210 of Industry Canada. Operation is subject to the following two
conditions: (1) This device may not cause harmful interference, and (2) This device must accept any interference received,
including interference that may cause undesired operation.
Cet appareil est conforme à la partie 15 des règles de la FCC & de RSS 210 des Industries Canada. Son fonctionnement est soumis
aux conditions suivantes: (1) Cet appareil ne doit pas causer d' interferences nuisibles. (2) Cet appareil doit accepter toute
interference reçue y compris les interferences causant une reception indésirable.
DECLARACIÓN COFETEL
DECLARACIÓN ANATEL
La operación de este equipo está sujeta a las siguientes dos condiciones.
1. Es posible que este equipo o dispositivo no cause interferencia perjudicial y.
2. Este equipo debe aceptar cualquier interferencia, incluyendo la que pueda causar su operación no deseada.
Este equipamento opera em caráter secundário, isto é, não tem direito a proteção contra interferência
prejudicial, mesmo de estações do mesmo tipo, e não pode causar interferência a sistemas operando em caráter
primário.
Ê800-11462V1$Š
800-11462V1 4/13 Rev. B
2 Corporate Center Drive, Suite 100
P.O. Box 9040, Melville, NY 11747
Copyright
2012 Honeywell International Inc.
www.honeywell.com/security
WARRANTY
For the latest warranty information go to:
http://www.security.honeywell.com/hsc/resources/wa/


