Honeywell TRADELINE VR8204A Manual Download Page 9

9

68-0047—2

VR8204; VR4204

STARTUP AND CHECKOUT

CHECK AND ADJUST GAS INPUT AND BURNER
IGNITION

CAUTION

1. Do not exceed input rating stamped on appli-

ance nameplate, or manufacturer recommended
burner orifice pressure for size orifice(s) used.
Make certain primary air supply to main burner
is properly adjusted for complete combustion.
Follow appliance manufacturer instructions.

2. IF CHECKING GAS INPUT BY CLOCK-

ING GAS METER. Make certain there is no
gas flow through the meter other than to the
appliance being checked. Other appliances must
remain off with their pilots extinguished (or
their consumption must be deducted from the
meter reading). Convert flow rate to Btuh as
described in form 70-2602, Gas Controls Hand-
book, and compare to Btuh input rating on
appliance nameplate.

3. IF CHECKING GAS INPUT WITH MANO-

METER: Be sure gas control is in OFF posi-
tion before removing outlet pressure tap plug
to connect manometer (pressure gauge). Also
turn gas control knob back to OFF when re-
moving gauge and replacing plug. Before re-
moving inlet pressure tap plug, shut off gas
supply at the manual valve in the gas piping to
the appliance or, for LP, at the tank. Also shut
off gas supply before disconnecting manom-
eter and replacing plug. Repeat Gas Leak Test
at plug with main burner operating.

Standard Pressure Regulator

1. Check the manifold pressure listed on the appliance

nameplate. Gas control outlet pressure should match the
nameplate.

2. With main burner operating, check gas control flow

rate using the meter clocking method or pressure using a
manometer connected to the outlet pressure tap on the gas
control. See Fig. 5.

3. If necessary, adjust pressure regulator to match ap-

pliance rating. See Table 4A or 4B for factory set nominal
outlet pressure and adjustment range.

a. Remove pressure regulator adjustment cap screw.

b. Using screwdriver, turn inner adjustment screw

clockwise

to increase or counterclock-

wise

to decrease gas pressure to burner.

c. Always replace cap screw and tighten firmly to

prevent gas leakage.

4. If desired outlet pressure or flow rate cannot be

achieved to adjusting the gas control, check gas control
inlet pressure using a manometer at the gas control inlet
pressure tap. If inlet pressure is in the nominal range (see
Table 4A or 4B), replace gas control. Otherwise, take the
necessary steps to provide proper gas pressure on the
control.

Slow-opening and Step-opening Pressure Regulators

1. Check the full rate manifold pressure listed on the

appliance nameplate. Gas control full rate outlet pressure
should match this rating.

2. With main burner operating, check gas control flow

rate using the meter clocking method or pressure using a
manometer connected to the outlet pressure tap on the gas
control. See Fig. 5.

3. If necessary, adjust pressure regulator to match ap-

pliance rating. See Table 4A or 4B for factory set nominal
outlet pressure and adjustment range.

a. Remove pressure regulator adjustment screw.
b. Using screwdriver, turn inner adjustment screw

clockwise

to increase or counterclock-

wise

to decrease gas pressure to burner.

c. Always  replace cap screw and tighten firmly to

prevent gas leakage.

4. If desired outlet pressure or flow rate cannot be

achieved by adjusting the gas control, check gas control
inlet pressure using a manometer at the gas control inlet
pressure tap. If inlet pressure is in the nominal range (see
Table 4A or 4B), replace gas control. Otherwise, take the
necessary steps to provide proper gas pressure to the con-
trol.

5. STEP-OPENING PRESSURE REGULATORS

ONLY. Carefully check burner lightoff at step pressure.
Make sure burner lights smoothly and without flashback to
orifice. Make sure all ports remain lit. Cycle burner several
times, allowing at least 30 seconds between cycles for
regulator to resume step function. Repeat after allowing
burner to cool. Readjust full rate outlet pressure, if neces-
sary, to improve lightoff characteristics.

!

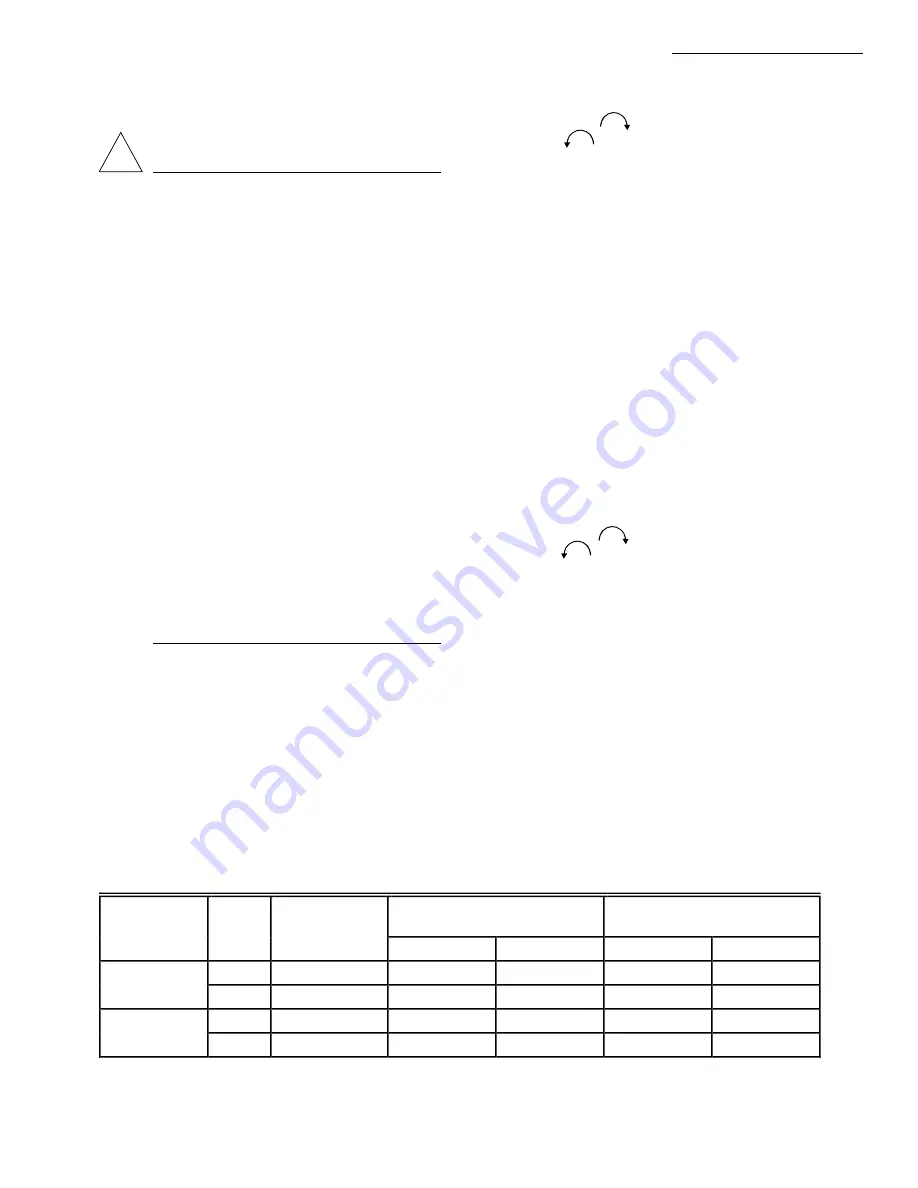
TABLE 4A—PRESSURE REGULATOR SPECIFICATION PRESSURES (in. wc)

Model

Type

Nominal Inlet

Factory Set

Nominal Outlet Pressure

Setting Range

Type

of Gas

Pressure Range

Step

Full Rate

Step

Full Rate

Standard,  

Natural

5.0 - 7.0

3.5

3.0 - 5.0

slow-opening

LP

12.0 - 14.0

10.0

8.0 - 12.0

Step-opening

Natural

5.0 - 7.0

0.9

3.5

3.0 - 12.0

LP

12.0 - 14.0

2.2

10.0

8.0 - 12.0

Summary of Contents for TRADELINE VR8204A

Page 1: ...supply is interrupted Two position gas control knob has ON and OFF posi tions All adjustments and wiring connections are accessible from top of the control Compact size Straight throughbodypattern rightangleadaptersavail able for inlet and outlet 1 2 in inlet and 1 2 in outlet adapters available for 3 8 or 3 4 in Adjustable servo regulator effectively maintains almost constant gas output pressure ...

Page 2: ...dling and maximum replacement value TRADELINE model specifications are the same as those of standard models except as noted below TRADELINE MODEL AVAILABLE VR8204A Dual Automatic Combination Gas Control for Intermittent Pilot Systems Models for natural or LP gas TABLE 1 MODEL SPECIFICATIONS Model No Opening Charac Type Standard Factory Regulator Settings Optional Factory Regulator Settings Range o...

Page 3: ...G Can be mounted 0 to 90 degrees in any direction including vertically from the upright position of the gas control knob TEMPERATURE RATING VR8204A C H and VR4204H 0 F to 175 F 18 C to 79 C VR8204M P K and VR4204M P 40 F to 175 F 40 C to 79 C DIMENSIONS See Fig 1 APPROVALS AmericanGasAssociationdesigncertificate L2025006 CanadianGasAssociationdesigncertificate L2025006 Australian Gas Association d...

Page 4: ...MAGE SEVERE INJURY OR DEATH 1 Do not use a gas control set for natural gas on an LP gas system or a gas control set for LP gas on a natural gas system 2 When making conversion main pilot burner orifices must be changed to meet appliance manufacturer specifications Refer to appliance manufacturer instructions for orifice specifications and changeover procedure Gas controls are factory set for natur...

Page 5: ...inances or with the National Fuel Gas Code ANSI Z223 1 NFPA No 54 whichever applies Tubing installation must com ply with approved standards and practices 1 Use new properly reamed pipe free from chips If tubing is used make sure the ends are square deburred and clean All tubing bends must be smooth and without defor mation 2 Run pipe or tubing to the control If tubing is used obtain a tube to pip...

Page 6: ...IS USED M3079 Connect Pilot Gas Tubing 1 Cut tubing to desired length and bend as necessary for routing to pilot burner Do not make sharp bends or deform the tubing Do not bend tubing at control after compression nut has been tightened because this may result in gas leakage at the connection 2 Square off and remove burrs from end of tubing 3 Unscrew brass compression fitting from the pilot outlet ...

Page 7: ...ig 2 5 Adjust thermostat heat anticipator as instructed in the appliance manual i e usually 0 1A for VR4204 0 5A for VR8204 Fig 8 Wiring connections for 24 volt control in intermittent ignition system with S8600 MV MV PV PV GND BURNER 24V GND 24V SPARK S8600 POWER SUPPLY PROVIDE DISCONNECT MEANS AND OVERLOAD PROTECTION AS REQUIRED ALTERNATE LIMIT CONTROLLER LOCATION MAXIMUM WIRE LENGTH 3 ft 9 m CO...

Page 8: ... main burner in operation paint pipe joints including adapters and control inlet with rich soap and water solution 5 If another leak is detected tighten adapter screws joints and pipe connections 6 Replace part if leak cannot be stopped ADJUST PILOT FLAME The pilot flame should envelop 3 8 to 1 2 in 10 to 13 mm of the tip of the igniter sensor See Fig 10 To adjust pilot flame 1 Remove pilot adjust...

Page 9: ...ired outlet pressure or flow rate cannot be achieved to adjusting the gas control check gas control inlet pressure using a manometer at the gas control inlet pressure tap If inlet pressure is in the nominal range see Table 4A or 4B replace gas control Otherwise take the necessary steps to provide proper gas pressure on the control Slow opening and Step opening Pressure Regulators 1 Check the full ...

Page 10: ...stem should be replaced if It does not perform properly on checkout or trouble shooting The gas control knob is hard to turn The gas control is likely to have operated for more than 200 000 cycles Operation The VR8204 VR4204 gas controls provide ON OFF manual control of gas flow In the OFF position gas flow to both pilot and main burners is mechanically blocked In the ON position gas flows to the ...

Page 11: ...servo pressure regulator pro vides close control of outlet pressure even if inlet pressure and flow rate vary widely Any outlet pressure change is immediately reflected back to the pressure regulator dia phragm which repositions to change the flow rate through the regulator valve and thus through the automatic valve If outlet pressure begins to rise the pressure regulator diaphragm moves slightly ...

Page 12: ...outlet pressure as described for the standard regulator The step model requires approximately 60 seconds to reset once the main burner goes off If it is re energized within 60 seconds it may bypass or shorten the length of the low pressure step The burner may relight at the full flow rate WHEN THE CALL FOR HEAT ENDS When the call for heat ends the first automatic valve and the second automatic val...

Page 13: ...at the gas control knob is in the ON position 2 Adjust thermostat several degrees above room tem perature 3 Using ac voltmeter check for voltage at gas control If pilot lights measure across MV PV and MV If pilot does not light measure across MV PV and PV before safety lockout occurs 4 If voltage is incorrect or not present check control circuit for proper operation 5 If voltage is present replace...

Page 14: ...l application but the specific controls used and the procedures outlined by the manufac turer of your appliance may differ requiring special instructions TO TURN ON FURNACE STOP Read the safety information above 1 The lighting sequence on this appliance is automatic do not attempt to manually light the pilot 2 If the furnace does not come on when the thermostat is set several degrees above room te...

Page 15: ...15 68 0047 2 ...

Page 16: ...d Building Control Home and Building Control Helping You Control Your World Honeywell Inc Honeywell Limited Honeywell Limitée 1985 Douglas Drive North 740 Ellesmere Road Golden Valley MN 55422 Scarborough Ontario M1P 2V9 Printed in U S A ...

Reviews: