Honeywell TP970 Series Installation Instructions Manual Download Page 2

TP970-TP973 PNEUMATIC THERMOSTATS 

THROTTLING RANGE 

Throttling Range 

Throttling ranges (TR) are factory set at 4F (2K) and 

ANTIHUM 

should not require any change under normal

SPRING (2) 

operating conditions. 

THROTTLING 
RANGE 

If a change in throttling range is necessary, reset the

ADJUSTMENT (2)

BOBBIN 

(NITE/WINTER)  

throttling range to the values specified on the job drawings. 
Use the following procedures: 

TEMPERATURE 

SETPOINT 

INDICATOR 

1.   Remove stat cover and install 0 to 30 psi (0 to 207 

kPa) gage in gage tap (Fig. 4) 

SETPOINT 

2.  Slide the TR indicator to the desired position on the

INDICATOR 

SCREW 

TR scale.

(NITE/WINTER) 

3.  Mechanically check the TR by moving setpoint lever

SETPOINT DIAL 

STOPS 

to determine the difference in setpoint indication 
when the branchline pressure reads 3 psi (21 kPa) 
and 13 psi (91 kPa). (It may be necessary to turn the 
calibration screw to adjust TR into the stat range.) 

(NITE/WINTER) 

4.  Reset TR to within 

±

2F (

±

1K) of required setting for 

C3946-3 

accurate control. 

5.  Follow RECALIBRATION procedures. 

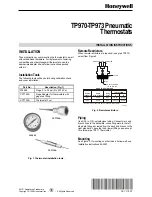
Fig. 3. Installing TP970-TP973 without wall box. 

ADJUSTMENTS 

After installation, set the thermostat to the desired setpoint 
and let the system operate long enough to stabilize. The 
length of time required for stabilization depends on system 
response time. This could be only a few minutes or as long 
as several hours. Make certain that the system has 
stabilized before checking calibration. If the temperature 
stabilizes within one-half of the throttling range of the 
setpoint, no calibration is required. 

NOTE:   All thermostats are accurately factory calibrated 

and should require only a calibration (bleed-off) 
check to ensure correct operation. 

70

60 

80 

90 

THERMOMETER 
CALIBRATION 

INDICATOR 

CALIBRATION 

(DAY/SUMMER) 

DAY/AUTO LEVER 
(TP971 ONLY) 

SETPOINT INDICATOR 

ADJUSTMENT 

SCALEPLATE 

M  X 

MAX 

SCALE (2) 
(DAY/SUMMER) 

THROTTLING 
PLATE (2) 

GAGE TAP 

NOTE: NOT ALL ADJUSTMENTS ARE ON ALL THERMOSTATS. 

TEMPERATURE 
SETTING 

60 

70 

80 

90 

1-1/8 

2-1/4 

HOLLOW 
WALL 

1 INCH 
HOLE 

5/32 INCH 
TUBING 

COVER 

STAT 

BACKPLATE 

C6398-1 

Fig. 4. TP971 and TP972A2218 controls and indicators. 

Front view—cover off. 

95-7478EF 

Summary of Contents for TP970 Series

Page 1: ...en remote restrictors are required one pipe TP973 select from Figure 2 SEE CHART FOR BARB SIZE A B FILTER INLET ALL INLET BARBS 1 4 IN 6 MM REMOTE RESTRICTORS Part No Orifice Body Barb Size in inches MM 14002913 Size in inches Color A B 001 0 005 Blue 1 4 6 5 32 4 004 0 005 Blue 5 32 4 5 32 4 One Barb Cap 14003567 001 Furnished with Restrictor C3931 1 Fig 2 Remote restrictors Piping Use 5 32 in O ...

Page 2: ...or C3946 3 accurate control 5 Follow RECALIBRATION procedures Fig 3 Installing TP970 TP973 without wall box ADJUSTMENTS After installation set the thermostat to the desired setpoint and let the system operate long enough to stabilize The length of time required for stabilization depends on system response time This could be only a few minutes or as long as several hours Make certain that the syste...

Page 3: ...ibrated 5 Remove the gage and replace cover TP971 1 Remove the thermostat cover and install a 30 psi gage into the gage tap 2 Set the temperature setpoint indicator at the indicated temperature 3 With 13 psi 91 kPa DAY main air pressure turn the DAY left calibration screw see Fig 4 until the gage reads 0 psi 4 Turn the calibration screw in the opposite direction until the gage reads 8 psi 56 kPa p...

Page 4: ...ES RACCORDS À CRANS B A ENTRÉE FILTRE TOUS LES RACCORDS D ENTRÉE 1 4 po 6 mm RESTRICTEURS À DISTANCE No DE PIÈCE TAILLE DE L ORIFICE COULEUR TAILLE DU RACCORD À CRANS EN PO MM 14002913 EN PO DU CORPS A B 001 0 005 Blue 1 4 6 5 32 4 004 0 005 Blue 5 32 4 5 32 4 UN BOUCHON À CRANS 14003567 001 FOURNI AVEC LE RESTRICTEUR CF3931 1 Fig 2 Restricteurs à distance Canalisations Utiliser du tuyau de polyét...

Page 5: ...on avec purge de leur étalonnage pour qu on s assure de leur bon fonctionnement Bande proportionnelle La bande proportionnelle BP est réglée en usine à 4 F 2 2 C et ne devrait pas nécessiter de modification en conditions normales de fonctionnement S il faut toutefois modifier la bande proportionnelle suivre les étapes ci dessous pour remettre la bande proportionnelle aux valeurs indiquées dans les...

Page 6: ...e tourner l indicateur du point de consigne jusqu à ce qu il marque la température indiquée 3 Avec une pression d air de jour à la canalisation principale de 13 psi 91 kPa faire tourner la vis d étalonnage de jour à gauche Fig 3 jusqu à ce que le manomètre indique 0 psi 0 kPa 4 Faire tourner la vis d étalonnage dans le sens opposé jusqu à ce que le manomètre indique 8 psi 1 psi 56 kPa 7 kPa 5 Avec...

Reviews: