background image


35 


Set the alarm hour using the 

UP

 or 

DOWN

. Press and hold either button for 

quick digit advance. 


Press 

ALARM/CHART

 to confirm selection 


Set the alarm minutes using 

UP

 or 

DOWN

. Press and hold either button for 

quick digit advance 


Press 

ALARM/CHART

 to confirm selection – the snooze interval digits will 

flash


Set a Snooze interval (all three alarms share same snooze time duration) using 

UP

 or 

DOWN

. Press and hold either button for quick digit advance 


Press 

ALARM/CHART

 to confirm your selection 

After programming is completed, the display will return to the alarm selection screen. 

NOTE

: Ice Warning Alarm (

PRE-AL

) cannot be set if weekday alarm (

W

) or single 

alarm(

S

) is not enabled. 


ACTIVATING OR DEACTIVATING SNOOZE 

To enable a snooze function press 

LIGHT/SNOOZE

 button. 

NOTE

: Alarm will automatically enter the snooze mode if no buttons are pressed after the 

alarm sounds for 2 minutes. This will occur for a maximum of three times. 

To disable alarm(s): 

Press 

ALARM/CHART

 entering into a specific alarm mode and press 

ALARM/CHART


again to disable this alarm. 

NOTE

: For weekday alarm (

W

), pressing 

ALARM/CHART

 will only disable the alarm for 

the current day. The alarm will activate again on the next day, Monday through Friday. 

 
WWVB RADIO CONTROLLED TIME 

The NIST (National Institute of Standards and Technology) radio station (WWVB) is 
located in Ft. Collins, Colorado. It transmits an exact time signal continuously throughout 
the most of the continental United States at 60 KHz frequency. The Atomic Time Clock in 
your Weather Station can receive this WWVB signal through the internal antenna from up 
to 2,000 miles away. Due to the nature of the Earth’s ionosphere, reception can be 
limited during the daylight hours. The radio controlled clock will search for an alternate 
station that receives the atomic time signal from the NIST Atomic clock in Boulder, 
Colorado. 
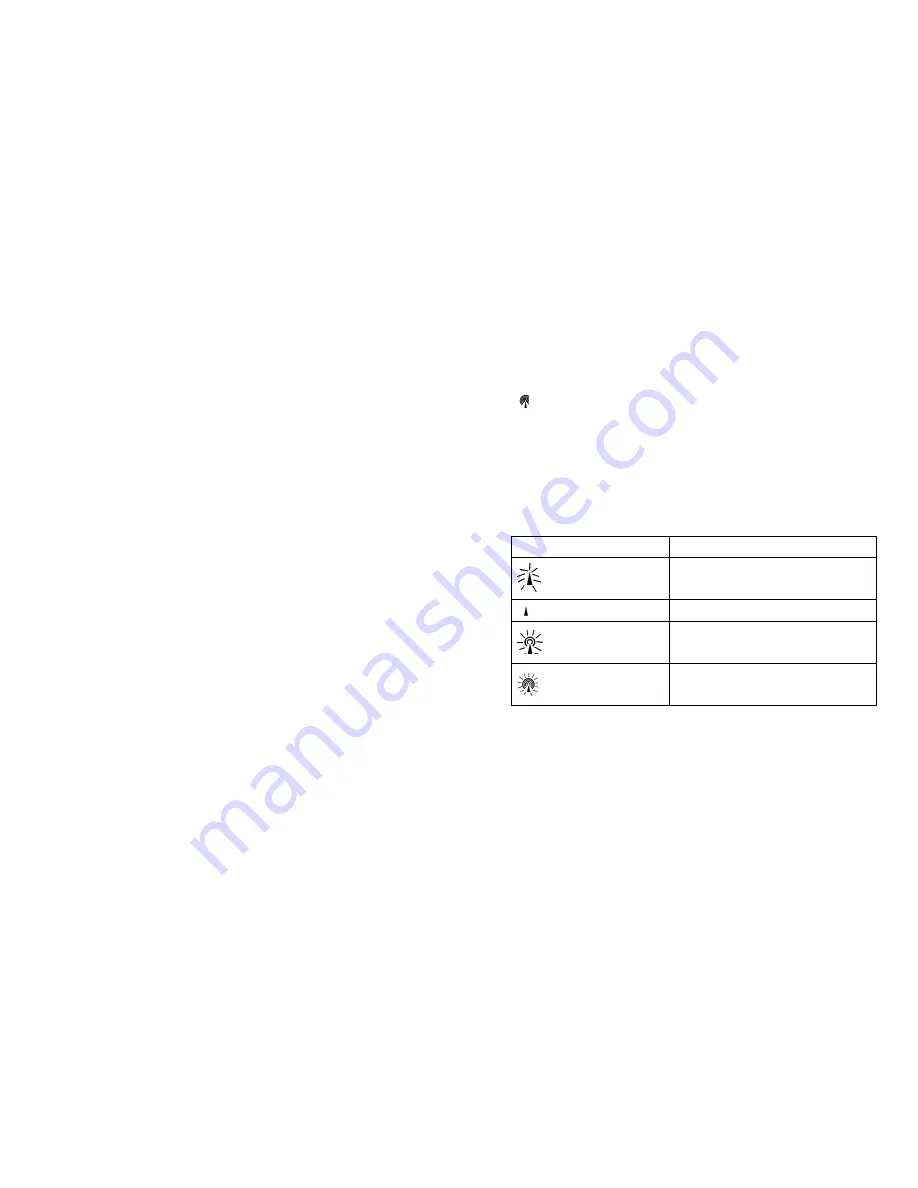
The WWVB tower icon on the unit’s display will flash indicating a radio signal reception 
from the WWVB station. If the tower icon is not fully lit, or if the time and date are not set 
automatically, please consider the following:   


During night-time hours, atmospheric disturbances are typically less severe 
and radio signal reception may improve. A single daily reception is sufficient 
enough to keep the clock accuracy within 1 second. 


36


Make sure the unit is positioned at 8 feet (2 meters) distance from any 
interference source such as a TV, computer monitor, microwave, etc. 


Within concrete wall rooms such as basements or office buildings, the received 
signal may be weakened. Always place the Projection Clock near the window 
for better reception.   

Once the atomic time signal is received, the date and time will be set automatically, and 
the [ ] icon will appear. 
After the clock is set manually, place the main unit by the window for the better reception. 
The atomic clock receiver is programmed that it will continue to search for the atomic 
time signal daily for every hour between 1:00 am and 4:30 am.   
Once the time signal has been successfully received, the time and date will be updated 
automatically. 
To enable or disable the atomic time receiver: 


Press and hold 

UP

 - if atomic time reception is activated, a triangular tower 

icon will start flashing next to the clock icon. If reception is disabled, the 
triangular tower icon will disappear. 

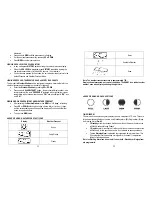
Icon 

Atomic Time Reception Strength 

            (Flashing) 

Undefined data 


Reception failed for the past 24 hours 


Weak signal, but can be decoded 


Strong signal 


SUNRISE/SUNSET WINDOW 

The main unit is able to calculate the sunrise and sunset times depending on the user 
defined location. The location data contains the longitude, latitude, time zone and DST 
(Daylight Saving Time). 
If the closest city code is selected, the main unit will automatically generate all of the 
correct data for specified location. 
If you cannot find the closest city code or would like to enter your specific location, select 

“USR

” as the city code during the setup.   

A search function is also available. It allows viewing the sunrise/sunset times for different 
dates. 

Summary of Contents for TN924W - Complete Pro Weather Station

Page 1: ...ZING YOUR WEATHER STATION 28 BACKLIGHT 28 CONNECTING WEATHER STATION TO A PERSONAL COMPUTER 28 USING DIFFERENT WEATHER STATION WINDOWS 28 WEATHER and PRESSURE WINDOWS 29 TIME WINDOW 32 SUNRISE SUNSET WINDOW 36 TEMPERATURE AND HUMIDITY WINDOW 38 RAIN WINDOW 41 WIND WINDOW 42 MAINTANANCE 44 TROUBLESHOOTING 45 PRECAUTIONS 46 APPENDIX 1 CITY CODES 47 APPENDIX 2 NWR ALERT MESSAGES 50 SPECIFICATIONS 52 ...

Page 2: ...ge remote rain sensor transmitter TS906 One Anemometer remote wind sensor transmitter TS805 One Five Channel Temperature Humidity Sensor transmitter TS34C One CD disk with generic PC connection software One USB cable One 9V AC DC Adapter Mounting Hardware with Allen Wrench One User Manual You would need to purchase 12 AA batteries 4 STANDARD PACKAGE CONTENTS Picture Components Main Unit receiver A...

Page 3: ...are above 32 F 0 C We recommend using lithium batteries for the remote weather sensors when temperatures are below 32 F 0 C Avoid using rechargeable batteries Rechargeable batteries cannot maintain correct power requirements Insert batteries before first use matching the polarity in the battery compartment Remove protective plastic screen from LCD display if any During an initial setup place the r...

Page 4: ...remote sensor in the desired location MOUNTING The remote thermo hygrometer sensor can be placed on the flat surface or 8 mounted on the wall in vertical position Use the wall mount hardware and screws provided when mounting the thermo hygrometer sensor on the wall PLACEMENT The remote thermo hygrometer sensor should be placed in the area with a free air circulation and sheltered from the direct s...

Page 5: ...et is level check if the ball bearing inside the bucket is at the midpoint of the leveler Place the protective screen over the top to protect the rain gauge from the debris Mount the rain gauge in place using mounting hardware provided Make sure that the rain gauge is in open area where precipitation falls directly into the gauge s bucket ideally 2 3 feet above the ground PLACEMENT The rain gauge ...

Page 6: ...l with an anemometer arm D Watch that the main display unit in the Wind Window displays the wind direction arrow pointing to the NORTH If the wind direction arrow in the Wind Window does not show NORTH press SET opening F located inside battery compartment with a paper clip or similar tool Replace the battery cover I and secure the screws NOTE Repeat this procedure every time when changing the bat...

Page 7: ...information entered by the user Moon Phase calendar and historical data for the past and future 39 days Dual crescendo alarms with programmable snooze Display Light sensor detects low light conditions and LCD lights up automatically when adapter is connected Power AC DC adapter 6 AA batteries BATTERY INSTALLATION Remove the battery compartment door on the back of the main unit Insert six 6 AA size...

Page 8: ... 6 six UM 3 or AA 1 5 batteries J REMOVABLE TABLE STAND Keeps the main unit in upright position on the flat surface K LIGHT SENSOR AUTO ON OFF SWITCH Toggles the main unit s light sensor to Automatic ON or OFF position L EXTENDABLE RADIO ANTENNA Improves reception of the Weather Radio M EXTERNAL ANTENNA SOCKET Improves reception of the Weather Radio when additional antenna is connected through an ...

Page 9: ...her sensors Ideally the remote weather sensors should be mounted within the line of sight from the main unit Transmission range may be affected by trees metal structures and electronic appliances Test reception before permanently mounting all remote weather sensors Avoid placing the main unit in the following areas Direct sunlight and surfaces emitting and radiating heat such as heating ducts or a...

Page 10: ...adio memory NOTE For customizing your Weather Radio use the Weather Radio Control Panel buttons located on the front of the main unit CUSTOMIZING YOUR WEATHER RADIO Weather Radio allows selecting and programming of several different features including the weather radio channel country language of the events alerts alerts location signal reminder and alert mode 20 CHANNEL SEARCH There are two optio...

Page 11: ...xit 22 PROGRAMMING YOUR LOCATION The NWR radio channels work the same as regular radio Your Weather Radio is pre programmed with seven NOAA broadcast frequencies channel1 7 1 2 3 4 5 6 7 162 400MHz 162 425MHz 162 450MHz 162 475MHz 162 500MHz 162 525MHz 162 550MHz After the strongest available channel has been detected by your Weather Radio all FIPS codes specific for your location state and county...

Page 12: ...nd bottom just to the left of letter A when deactivated Press to exit NOTE Press any button to mute the missed alert reminder 24 ALERT MODE SELECTION There are two options available for the alert type voice or tone If the VOICE option is selected the alert sounds for 1o seconds and then the weather broadcast will turn on automatically for five 5 minutes The Weather Radio display will reflect alert...

Page 13: ...ding icon will start flashing Press UP button on the back of the main unit to cycle through the modes clockwise or DOWN anti clockwise WEATHER WINDOW Displays Moon phase Weather forecast History bar chart for pressure temperature or humidity on Channel 1 PRESSURE WINDOW Displays SEA LEVEL or LOCAL pressure value SEA LEVEL pressure history for the past 24 hours TIME WINDOW Displays 26 Time and cale...

Page 14: ...ted on the back panel NOTE For an automatic control function the main unit must be plugged into the wall power outlet via the AC DC adaptor provided CONNECTING WEATHER STATION TO A PERSONAL COMPUTER To collect and manipulate data from your weather station you may connect the main unit to the computer via USB cable Proceed in the following order Make sure all sensors have batteries installed and th...

Page 15: ...ntered within first 2 minutes the unit will self adjust to the default settings inHg inches of Mercury for pressure units and 33 feet for altitude To set the pressure and or altitude units and program the altitude or adjust the sea level 30 pressure during these 2 minutes Press UP or DOWN arrow button selecting the pressure in inHg inches of mercury hPa hectoPaskal mBar millibars or mmHg millimete...

Page 16: ...MEM so 0 days is flashing Press UP or DOWN selecting from today s date a future or past days and the corresponding moon phase will be displayed Press and hold either button for a quick advance To exit press MEM button UNDERSTANDING WEATHER FORECAST ICONS Display Weather Forecast Sunny Partly Cloudy Cloudy 32 Rainy Unstable Weather Snow Note The weather forecast accuracy is approximately 70 Display...

Page 17: ...itude will flash Press UP or DOWN to adjust the latitude degrees minutes and direction 34 Press and hold either button for quick digits advance Press SET to confirm selection Continue setting the longitude degrees minutes and direction using the same technique Press SET to confirm the selection 0 00 tz will flash prompting to enter the Time Zone setting mode the Time Zone data is provided on P Set...

Page 18: ...sh indicating a radio signal reception from the WWVB station If the tower icon is not fully lit or if the time and date are not set automatically please consider the following During night time hours atmospheric disturbances are typically less severe and radio signal reception may improve A single daily reception is sufficient enough to keep the clock accuracy within 1 second 36 Make sure the unit...

Page 19: ...unrise time displayed in the morning will be different from the one displayed in the afternoon night For the period from 12 am to 12 pm the unit will display the sunrise time for a current day For the period from 12 pm to 12am the unit will display a sunrise time for the next day with the NEXT DAY icon At some locations especially with high latitudes sunrise and sunset events may not occur within ...

Page 20: ...call a current 40 temperature for the corresponding channel the upper temperature alert with icon if disabled displays OFF or lower temperature alert with icon if disabled displays OFF Once the above alerts are displayed press the UP or DOWN to enable or disable the corresponding alert PROGRAMMING ALARMS In the Temperature and Humidity Window press ALARM CHART selecting the desired alarm Press and...

Page 21: ...ress ALARM CHART to confirm selection and the unit will return to the rainfall alert display WIND WINDOW The front portion of the Wind Window shows wind direction in animated compass display The wind direction can be displayed as compass point i e NW or in bearing starting from the North i e 22 5º The upper left section of the Wind Window can be programmed to display either a temperature at the pl...

Page 22: ...g any data Remove the battery compartment door on the back and replace all batteries Do not mix old and new batteries Replace the battery compartment door CHANGING BATTERIES IN REMOTE SENSORS Replace the batteries following the setup instructions for the corresponding sensor When the batteries are properly installed the remote weather sensor will resume sending signals to the main unit To enforce ...

Page 23: ...k the placement tips included in this manual to site your weather sensors in the best possible way Check batteries Check location Cannot locate remote sensor Press and hold DOWN button on the Weather Station control panel to search for the signal form the remote sensor Remote sensor anemometer rain gauge or temperature humidity sensor Cannot change the Press RESET after setting the 46 channel chan...

Page 24: ...angkok BKK 7 NO Dakar Senegal DKR 0 NO Barcelona Spain BCN 1 SE Dublin Ireland DUB 0 SE Beijing China BEJ 8 NO Durban South Africa DUR 2 NO Belgrade BEG 1 SE Frankfurt Germany FRA 1 SE Berlin Germany BER 1 SE Glasgow Scotland GLA 0 SE Birmingham BHX 0 SE Guatemala City GUA 6 NO Bogotá Colombia BOG 5 NO Hamburg Germany HAM 1 SE Bordeaux France BOD 1 SE Havana Cuba HAV 5 SH Bremen BRE 1 SE Helsinki ...

Page 25: ...ypt DST SH Havana Cuba DST SI Iraq and Syria DST SK Irkutsk Moscow DST SM Montevideo Uruguay DST SN Namibia DST SP Paraguay DST SQ Iran DST maybe changed annually ST Tasmania DST SU Standard American DST SZ New Zealand DST NO DST no Places that do not observe DST ON Always add 1 hour to the local standard time 50 APPENDIX 2 NWR ALERT MESSAGES ...

Page 26: ...0 100 m Barometric Pressure Measuring Range 14 75 inHg to 32 44 inHg 500 Hpa to 1100Hpa 374 5 mmHg to 823 8 mmHg Resolution 0 003 inHg 0 1 Hpa 0 08 mmHg Accuracy 0 015 inHg 0 5 Hpa 0 38 mmHg Sampling interval 20 minutes Altitude Compensation Range 657 ft to 16404 ft 200m to 5000 m Temperature Indoor Operating Range 14 2 F to 140 F 9 9 C to 60 C ...

Page 27: ...ws 98 or above Memory size Ram 128 MB or more Hard disk size 100 MB free space or more Optical Device 2 x CD Rom drive Weather Radio Radio Frequency Band from 162 400MHz to 162 500MHz Operating Range about 40 miles 65 km radius Channels Digital PLL tuning for 7 NOAA channels SAME programming All MULTIPLE for 9 counties or SINGLE Volume 16 levels Receiving Sensitivity 100 dB µV m FIPS CLC Codes Sen...

Page 28: ...ctronics Ltd Address Unit 2304 06 23 F Riley House 88 Lei Muk Road Kwai Chung New Territories Hong Kong is in conformity with Part 15 of the FCC Rules Operation is subject to the following two conditions This device may not cause harmful interference This device must accept any interference received including interference that may cause undesired operation 56 The information above is not to be use...

Reviews: