background image

122

123


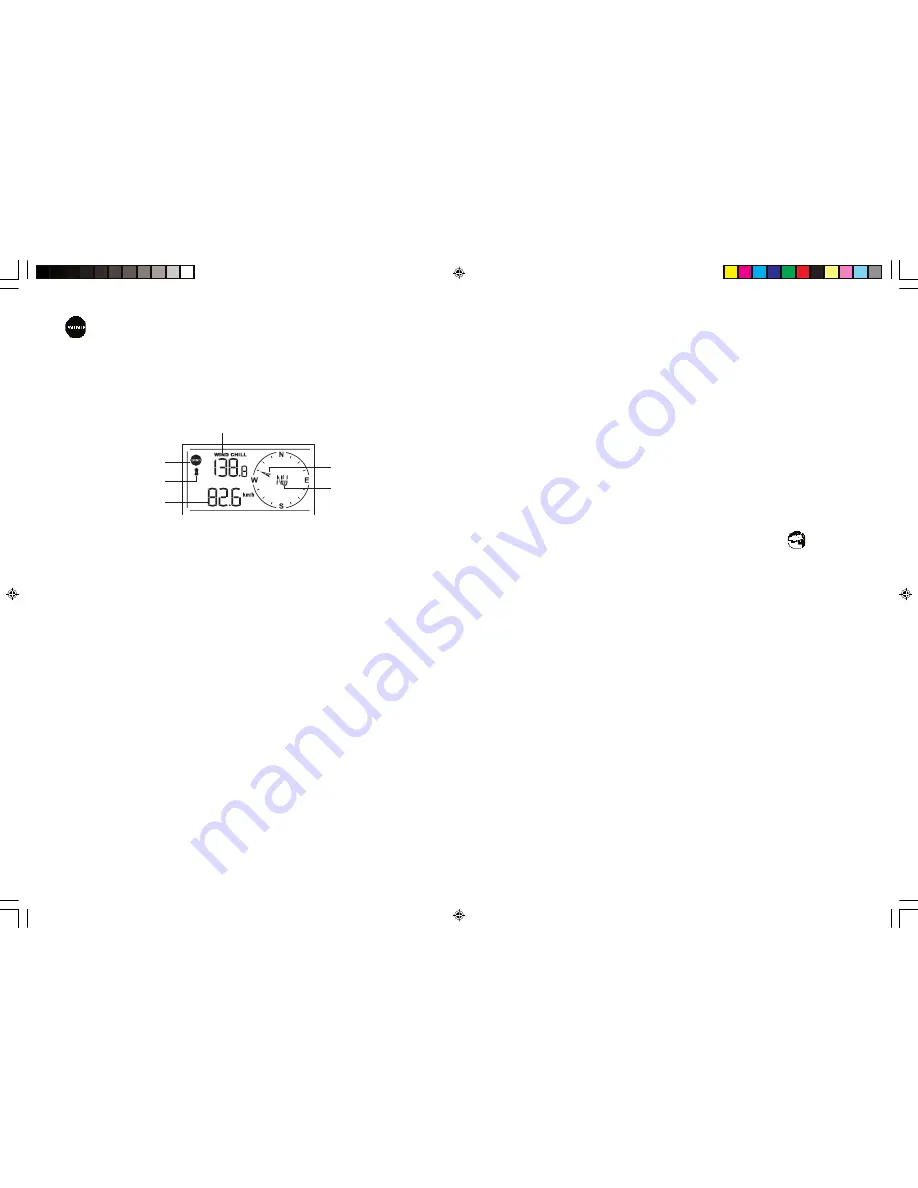
Wind Mode

- Wind Chill

- Temperature at place of anemometer

- Wind direction

- Wind speed

- Wind gust

- Alert for wind speed and wind gust speed

Customizing your Weather Station

To fully customize the weather station to your local settings and personal preferences, the following 

settings are required. Please refer to the appropriate sections for detailed instructions.

Required:

-Setting Pressure Parameters during Initial Start-Up (Pressure and Weather Forecast Mode P.127)

-Setting up the Time, Date and Language (Clock and Alarm Mode: P.129)

-Setting up the Location Data (Sunrise/Sunset Mode: P.131 )

Optional:

-Setting up the Time Alarms (Clock and Alarm Mode: P.129)

-Setting up the Temperature Alerts (Temperature and Humidity Mode P.133)

-Setting up the Wind Alerts (Winds Mode: P.136)

LED Backlight Options

The backlight of the main console unit can be turned permanently on/off or automatically toggled 

when environment lighting level is low. Use the light sensor switch at the back of the unit to select 

lighting preferences.

For the automatic backlight function, the sensitivity of the light sensor can be adjusted to high or 

low with the sensitivity switch also on the back of the console unit.

Note: Console unit must be powered with AC/DC adaptor for automatic control function.

Wind Chill Temperature/

Temp. at Wind Sensor

Wind Icon

Sensor Battery

Status 

Wind Speed/ Gust

Max. Wind speed/

Max. Gust/

Wind Alert/ Gust Alert

Wind Direction Animate

Compass Display
Wind Direction in Compass 

Points / Bearungs

Linking the Weather Station to a Computer

Data collected by the weather station can be displayed and recorded on a computer by connecting 

the main console unit with the computer via USB.

Install the software provided with the weather according to the instructions on the software manual.

Connect the main console unit with the computer using the USB cable provided.

Using the Different Weather Modes

Pressure and Weather Forecast Mode

This part of the display indicates the current pressure, sea level pressure, weather forecast, moon 

phase and pressure trend.

A number of historical statistics can also be viewed, such as the sea-level pressure values for the last 

24 hours, moon phase for the previous and next 39 days, as well as a pressure/ temperature/ humid-

ity history bar-chart.

Pressure values may be displayed inHg, hPa/mBar or mmHg, and altitude values may be displayed 

in meters or feet.

Accessing Pressure and Weather Forecast Mode

From the main console unit: Press UP or DOWN until the weather forecast icon          on the middle 

left of the display starts flashing.

Setting Pressure Parameters during Initial Start-Up

During the initial start-up of the main console unit, all functions in Pressure and Weather Forecast 

mode will be locked until the pressure settings are configured.

1. Choose Pressure Units:

    The unit icon “inHg” or “mmHg” or “hPa/mBar” should be flashing. Press 

UP

 or 

DOWN

 to  


    select pressure unit as inHg, hPa/mBar or mmHg

    Press SET to confirm your selection.

2. Choose Altitude Units:

    Press 

UP

 or 

DOWN

 to select altitude unit as feet or meters.

    Press SET to confirm your selection.

3. Set Altitude:

    Press 

UP

 or 

DOWN

 to adjust value. Press and hold either button for fast advance.

    Press SET to confirm your selection.

4. Upon completion the display will be returned to Pressure and Weather Forecast Mode.

Note: After initial start-up the altitude cannot be adjusted again until the main console unit is re-

started.

Viewing Pressure and Altitude Data

In Pressure and Weather Forecast Mode, each press of SET rotates display between:

- Sea level pressure 

- Local pressure

- Local altitude

TE821 IM (S&P) E.indd

13/11/06, 2:51 PM

122-123

Summary of Contents for TE821

Page 1: ...113 Professional Weather Center with PC Interface TE821 USER S MANUAL TE821 IM S P E indd 13 11 06 2 51 PM 113 ...

Page 2: ...ort level indicator Analyzes current environmental conditions Comfort Wet and Dry Wind Temperature at place of anemometer Temperature adjusted to wind chill factor ºC or ºF Wind direction compass display Wind direction angles available as compass points or bearings Average wind speed and gust speed mph m s knots and km h Daily Maximum wind speed and gust speed memory Wind speed alert for average w...

Page 3: ...1 Open the latch at the base of the thermo hygro sensor 2 Set the channel with a slide switch 3 Insert two 2 x UM 3 or AA size 1 5V batteries 4 Use a pin to press the RESET key which is in the battery compartment of thermo hygro Sensors after LED flash 5 Replace the latch and mount unit at desired location Placement tips The thermo hygro sensor should be in an area with free air circulation and sh...

Page 4: ...d the display will start showing some data and weather parameters Wait for a few minutes for the console to finish self calibration and for the sensor readings to show up If is still displayed for the sensor reading s check the wireless transmission path and the bat teries for the corresponding sensor Placement tips Check that wind can travel freely around the anemometer and is not distorted by ne...

Page 5: ... Level Pressure Altitude Weather Forecast History Bar chart for Pressure Tempature Humidity Moon Phase Pressure Trend History selection for Pressure and Moon Phase Pressure and Weather Forecast Mode icon Clock and Alarm Mode Radio Controlled clock showing current time and calendar Single alarm weekday alarm and pre alarm Sunrise Sunset Mode Sunrise and sunset times Longitude and Latitude of local ...

Page 6: ...d with the weather according to the instructions on the software manual Connect the main console unit with the computer using the USB cable provided Using the Different Weather Modes Pressure and Weather Forecast Mode This part of the display indicates the current pressure sea level pressure weather forecast moon phase and pressure trend A number of historical statistics can also be viewed such as...

Page 7: ...ttons are pressed for 5s the display automatically returns to Pressure and Weather Forecast Mode Viewing the Pressure Temperature Humidity Bar Charts The bar chart on the display can be configured to display the history data for sea level pressure temperature or humidity for channel 1 In Pressure and Weather Forecast Mode press and hold ALARM CHART to toggle the bar chart between Sea level pressur...

Page 8: ...Repeat the above instructions to set year month day calendar display format day month or month day time display format 12 hr 24 hr local hour and local minutes 8 Upon completion the display will return to normal Clock and Alarm Mode Note Press and hold SET anytime during the setup to return to normal Clock and Alarm Mode All settings made will be discarded Rotating between Different Clock Calendar...

Page 9: ...in console unit Press UP or DOWN until the sunrise and sunset icons on the lower right of the display start flashing Setting up the Location Data 1 In Sunrise Sunset Mode press and hold SET to enter location data setup 2 The city code in the Time and Alarm display should start flashing Set City Info Press UP or DOWN to select city code for your local area Refer to P 143 for a list of available cod...

Page 10: ...rature display between Temperature and Relative Humidity Dew Point Temperature and Relative Humidity Setting Units for Temperature Display ºC or ºF In Temperature and Humidity Mode press and hold SET to convert units between degrees Celsius ºC and degrees Fahrenheit ºF Activating Deactivating the Temperature Alerts 1 In Temperature and Humidity Mode each press of ALARM CHART rotates channel temper...

Page 11: ...ET rotates display between Temperature with wind chill wind direction in bearings Temperature with wind chill wind direction in compass points Temperature at anemometer wind direction in compass points Temperature at anemometer wind direction in bearings Setting Units for Wind Speed Display km h mph m s or knots In Wind Mode press and hold SET to convert wind speed units between km h mph m s or kn...

Page 12: ...necessary Although wireless signals can pass through solid objects and walls the sensor should ideally be within the line of sight of the console unit The following may be the cause of reception problems Distance between remote sensor and main console unit too long Maximum transmission distance in open area conditions is 100m Signal shielding materials such as metal surfaces concrete walls or dens...

Page 13: ...it use 2 pcs UM 3 or AA 1 5V battery Remote Anemometer unit use 2 pcs UM 3 or AA 1 5V battery Weight Main unit 414g without battery Remote Thermo Hygro unit 65g without battery Remote Anemometer unit 315g without battery Dimension Main unit 220 L x 165 H x 32 D mm Remote Thermo Hygro unit 55 5 L x 101 H x 24 D mm Remote Anemometer unit 405 L x 375 H x 160 D mm Appendix City Codes US and Canadian C...

Page 14: ...nama City Panama PTY 5 NO La Paz Bolivia LPB 4 NO Paris France PAR 1 SE Lima Peru LIM 5 NO Perth Australia PER 8 NO Lisbon Portugal LIS 0 SE Prague Czech Republic PRG 1 SE Liverpool England LPL 0 SE Rangoon Myanmar RGN 6 5 NO London England LON 0 SE Reykjavík Iceland RKV 0 NO Lyon France LYO 1 SE Rio de Janeiro Brazil RIO 3 sb Madrid Spain MAD 1 SE Rome Italy ROM 1 SE Manila Philippines MNL 8 NO S...

Page 15: ...ty accuracy 5 25 to 80 Humidity resolution 1 Receiving Cycle Remote Thermo Hygro around 47s Wind sensor 33s Sunrise and Sunset Accuracy 3min latitude within 50 Wind Direction Range 16 positions Wind Direction Accuracy 11 25 Wind Direction Resolution 22 5 Wind Direction Starting Threshold 3mph Wind Speed Range 0 to 199 9mph 199 9 Km h 173 7 Knots 89 3 m s Wind Speed Accuracy 2mph 5 Wind Speed Start...

Reviews: