OPERATOR MANUAL // SECTION 2: INSTALLATION
HONEYWELL
13
1. REM OVE THE DETECTOR M ODULE FROM ITS ENCLOSURE.
a.
With electrical power off, loosen the Allen-head screw at the base
of the metal enclosure top windowed cover. (Make sure that
electrical power is off by observing that the Detector's LED's do
NOT blink for at least 15 seconds.)
b.
Unscrew the top windowed cover and set it aside with its "O" ring.
Keep both clean.
c.
Loosen the modules’ three captive screws; screws should not be
removed from the circuit board.
d.
Carefully lift out the module, sliding it along the three metal
standoffs.
2. WIRE THE DETECTOR M ODULE.
a.
Insert the cables into the metal enclosure base through one of the
conduit openings.
b.
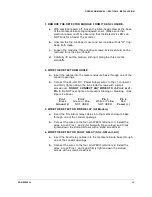
Connect the 24-volt D.C. Power Supply wires to the J1 connector
and firmly tighten down the two slotted screws with a small
screwdriver.
DO NOT CONNECT ANY WIRES TO J1-Pin 2 or J1-
Pin 3.
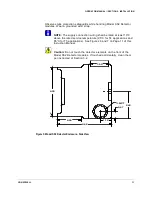
Do NOT over tighten to prevent stripping or breaking. (See
Figure 4 above.)
Pin 1
Pin 2
Pin 3
Pin 4
Black
Green or Blue
White or Yellow
Red
Ground (-)
NOT USED
NOT USED
Power (+)
3. WIRE THE DETECTOR FIRE RELAY (All M odels)
a.
Insert the Fire Alarm relay cables into the metal enclosure base
through one of the conduit openings.
b.
Connect the wires to the four pin WECO terminal J3. Install the
wires into J3 Pins 1 and 2 (for Normally Open relays) and firmly
tighten down the slotted screws with a small screwdriver.
4. WIRE THE DETECTOR FAULT RELAY (SS2 -AM and -AH)
a.
Insert the Fault relay cables into the metal enclosure base through
one of the conduit openings.
b.
Connect the wires to the four pin WECO terminal J2. Install the
wires into J2 Pins 1 and 2 and firmly tighten down the slotted
screws with a small screwdriver.


