SLATE™ LOW TORQUE ACTUATOR SERIES
32M-06009—06
4
Mounting
The actuator assembly may be installed in any
orientation.
WARNING
Keep Free of Dust and Water
• Maintain the integrity of the enclosure by
using NEMA 4X rated dust- and water-tight
electrical connectors.
• Use cable-sealing grips and strain-relief
loops for any cord or cable.
• Plug unused conduit holes. Use internal
sealing materials on all conduit connections.
Moisture can have a harmful effect on device
internals if permitted to enter through wiring
connectors.
• Ensure that the device connection is not at a
low point of the conduit to avoid
condensation run-off into the housing;
install a drip loop if necessary.
• All cover screws should be tightened to the
specified torque. See Fig. 4.
• Cover screws should be checked periodically
to ensure adequate sealing protection.
If you are mounting the SLATE™ Low Torque Actuator
using third party valves, it is important to follow the
following assembly instructions:
1.
Ensure that the SLATE™ Low Torque actuator
has sufficient torque for the valve's required
break-away torque. Also consider the line
pressure when making this calculation.
2.
Turn off the fuel supply upstream from the
applicable valve.
3.
Remove all external hardware from the third
party valve.
4.
The SLATE actuator's shaft is ½-in. diameter
with a 1/8-in. square key. For a smaller 3/8-in.
valve shaft you must insert an adapter so that
the two shafts are concentrically aligned, ensure
that the set screws solidly contact both shafts.
5.
If the bracket assembly permits, attach the
coupling to the valve and the actuator first,
ensuring exact alignment. After the coupling is
tightened, assemble and tighten the mounting
brackets. Do not tighten the mounting brackets
first.
6.
Observe the actuator while it travels over its
entire range and ensure smooth operation. If
sticking/binding is observed, or if Slate reports
actuator error codes, the actuator shaft is not
properly aligned and must be re-adjusted.
Ensure the media temperature cannot exceed the
valve or actuator ratings. Use a coupling with thermal
breaks if required. If the possibility exists for radiant
heating (such as a furnace application), install a
thermal barrier.
Ensure that pipe and ductwork are free of debris that
could impair valve function.
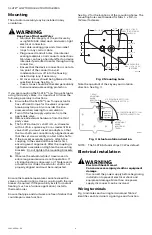
See Fig. 2 for the locations of the mounting holes. The
mounting holes are threaded for M6 x 1 x 1/2-in
(12mm) fasteners.
Fig. 2. Mounting holes.
Note the quadrant of the keyway and rotation
direction. See Fig. 3.
Fig. 3. Actuator rotation direction.
NOTE:
The SLATE Actuator ships CCW as default.
Electrical installation
WARNING
Electrical Shock Hazard.
Can cause severe injury, death or equipment
damage.
Disconnect the power supply before beginning
installation to prevent electrical shock and
equipment damage. More than one power
supply disconnect can be involved.
Wiring terminals
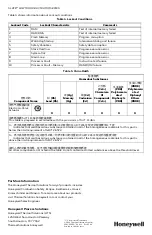
Fig. 4 indicates each wiring terminal and Table 2
identifies each terminal’s signal type and function.
2X 3-1/2 (89)
M35300
1-1/8
(28)
THREADED FOR
M6 x 1 (25) x 1/2 (12)
FASTENER
O 1/4 (6) X 17/64 (7)
DEEP FOR OPTIONAL
DOWEL PIN
1-1/8
(28)
1-1/8
(28)
1 (25)
1 (25)
2X 1-3/8
(35)
2X 1-3/8
(35)
M35301
0° IF ROTATION IS SET TO CCW
90° IF ROTATION IS SET TO CW
5° SPAN
ADJUSTMENT
RANGE
(ADDITIONAL
TRAVEL)
5° SPAN
ADJUSTMENT
RANGE
(ADDITIONAL
TRAVEL)
90° IF ROTATION IS SET TO CCW
0° IF ROTATION IS SET TO CW
SHAFT KEY
INDICATES
ROTATIONAL
POSITION

