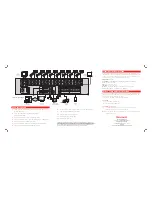

Connect cameras to video inputs, and if using, connect PTZ camera control
lines to RS485 connector.
Connect the main monitor to the VGA monitor output or
main video output - BNC.
If using, connect analog monitors to looping video ouputs.
If using, connect the monitor to SPOT video outputs (up to 3 on HRDP16 only).
If using, connect sensors to alarm signal inputs.
If using, connect alarm devices such as buzzers to alarm signal outputs.
If using, connect external controllers to RS232 connector.
1.
2.
3.
4.
5.
6.
7.
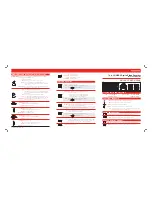
When the HRDP Performance Series DVR starts for the first time, it will take about 40-45 sec-
onds to boot up. Once boot is complete, the Install Setup window will appear. With this setup
window, users can configure basic settings of the system and also format the HDDs. If any
settings are changed, users are encouraged to reboot the system.
Video Format:
NTSC/PAL
Date Format:
ASIA (YYYY/MM/DD), US (MM/DD/YYYY) and EURO (DD/MM/YYYY).
Date:
Specify the current date.
Time:
Specify the current time.
Time Zone:
Set the local time zone.
Use DST:
Select to use DST(Daylight Saving Time), turn on this toggle option.
Disk:
To initialize HDDs, select FORMAT and press ENTER.
When more than one HRDP Performance Series DVR is installed in the same location, use one
remote controller to control multiple DVRs. To control multiple DVRs, you must change the
remote controller ID to the SYSTEM ID of the DVR.
Follow the instructions below to change the remote controller ID.
On the DVR
Go to SYSTEM > SYSTEM SETUP
Enter the desired SYSTEM ID number.
On the Remote Controller
Press and hold the ID button on the remote controller and enter the desired
SYSTEM ID number to operate the corresponding DVR.
Note
The system ID of the DVR must be two numbers. Therefore you should input 00 for the
system ID 0 and input 01 for 1.
1.
2.
3.
If using, connect a speaker and microphone to the audio input and output.
Connect a network cable to the network port.
Power on all the connected equipment.
Connect the power cord to the DVR.
Turn the power switch on.
8.
9.
10.
11.
12.
ALARM
PTZ
RS485
ALARM OUT
ALARM IN
OUT
IN
CH1
CH2
CH3
CH4
CH5
CH6
CH7
CH8
CH9
CH10
CH11
CH12
CH13
CH14
CH15
CH16
AC INPUT
NETWORK
T
U
O
O
E
DI
V
NI
O
E
DI
V
MAIN
SPOT1
SPOT3
SPOT2
T
U
O
O
E
DI
V
16 Channel model displayed
www.honeywellvideo.com
#1.800.796.CCTV (North America only)
Document 800-02090 — Rev A — 05/08
28832AA
© 2008 Honeywell International Inc. All rights reserved.
QUICK INSTALLATION
HOW TO USE IR REMOTE CONTROLLER
STARTING FOR THE FIRST TIME
© 2008 Honeywell International Inc. All rights reserved. No part of this publication may be reproduced by any
means without written permission from Honeywell Video Systems. The information in this publication is believed
to be accurate in all respects. However, Honeywell Video Systems cannot assume responsibility for any conse-
quences resulting from the use thereof. The information contained herein is subject to change without notice.
Revisions or new editions to this publication may be issued to incorporate such changes.


