

Genesis DM Monitor Quick Setup Guide
Customer Service 24/7/365
1-888-353-5404
P4500EN.02 06-13-2014 ©2014 Honeywell
Powering up the Genesis DM Monitor
Before you power up:
Check to see that you have attached all of the equipment.
1. Make sure that the scale is in the proper location. Do not move the scale once
you power up.
2. The scale will not zero correctly if there is any weight on it when the monitor
turns on. Adjust the feet on the scale if needed to level the surface.
3. Position the monitor so that the cords are out of your way and that the back
of the monitor has at least a two-inch clearance.
When you power up:
you plug it into a power source.
1. Plug the AC adapter jack into the power input on the rear of the monitor.
2. Plug the power brick into an outlet on the power strip. Make sure that the brick
3. Plug the power strip into a wall outlet and turn it on.
As soon as the monitor is plugged in, it powers up and displays a welcome message, as it
performs a series of self-checks. If the self-checks detect any problem, the Genesis DM
monitor displays an error code. For a list of error codes, refer to the
Genesis DM Program-
ming/Troubleshooting Guide.
A serious error will halt the system, and if such an error
occurs, contact Honeywell Customer Service for help.
After a successful power-up the monitor enters idle mode, and the panel displays the
current date, day of week, and time randomly across the screen. If the Genesis DM Monitor
displays a prompt that asks the user to swipe their ID card.
Sending a test message
If you will be transmitting your collected data to LifeStream or Central Station, or to
medical professional for review, you will need to verify transmission with a Test Message.
empty (null) test data packet to LifeStream or Central Station. Always test the transmission,
from the location that the monitor will be used (your home, wellness center, etc.).
For instructions on how to send a test message refer to the Transmit menu section in the
Genesis DM Programming/Troubleshooting Guide.
Take any vitals until you send a test message and verify
transmission with LifeStream or Central Station.
CAUTION - READ CAREFULLY
DO NOT
For copies of this and other Honeywell HomMed product documentation, please visit:
www.HomMed.com
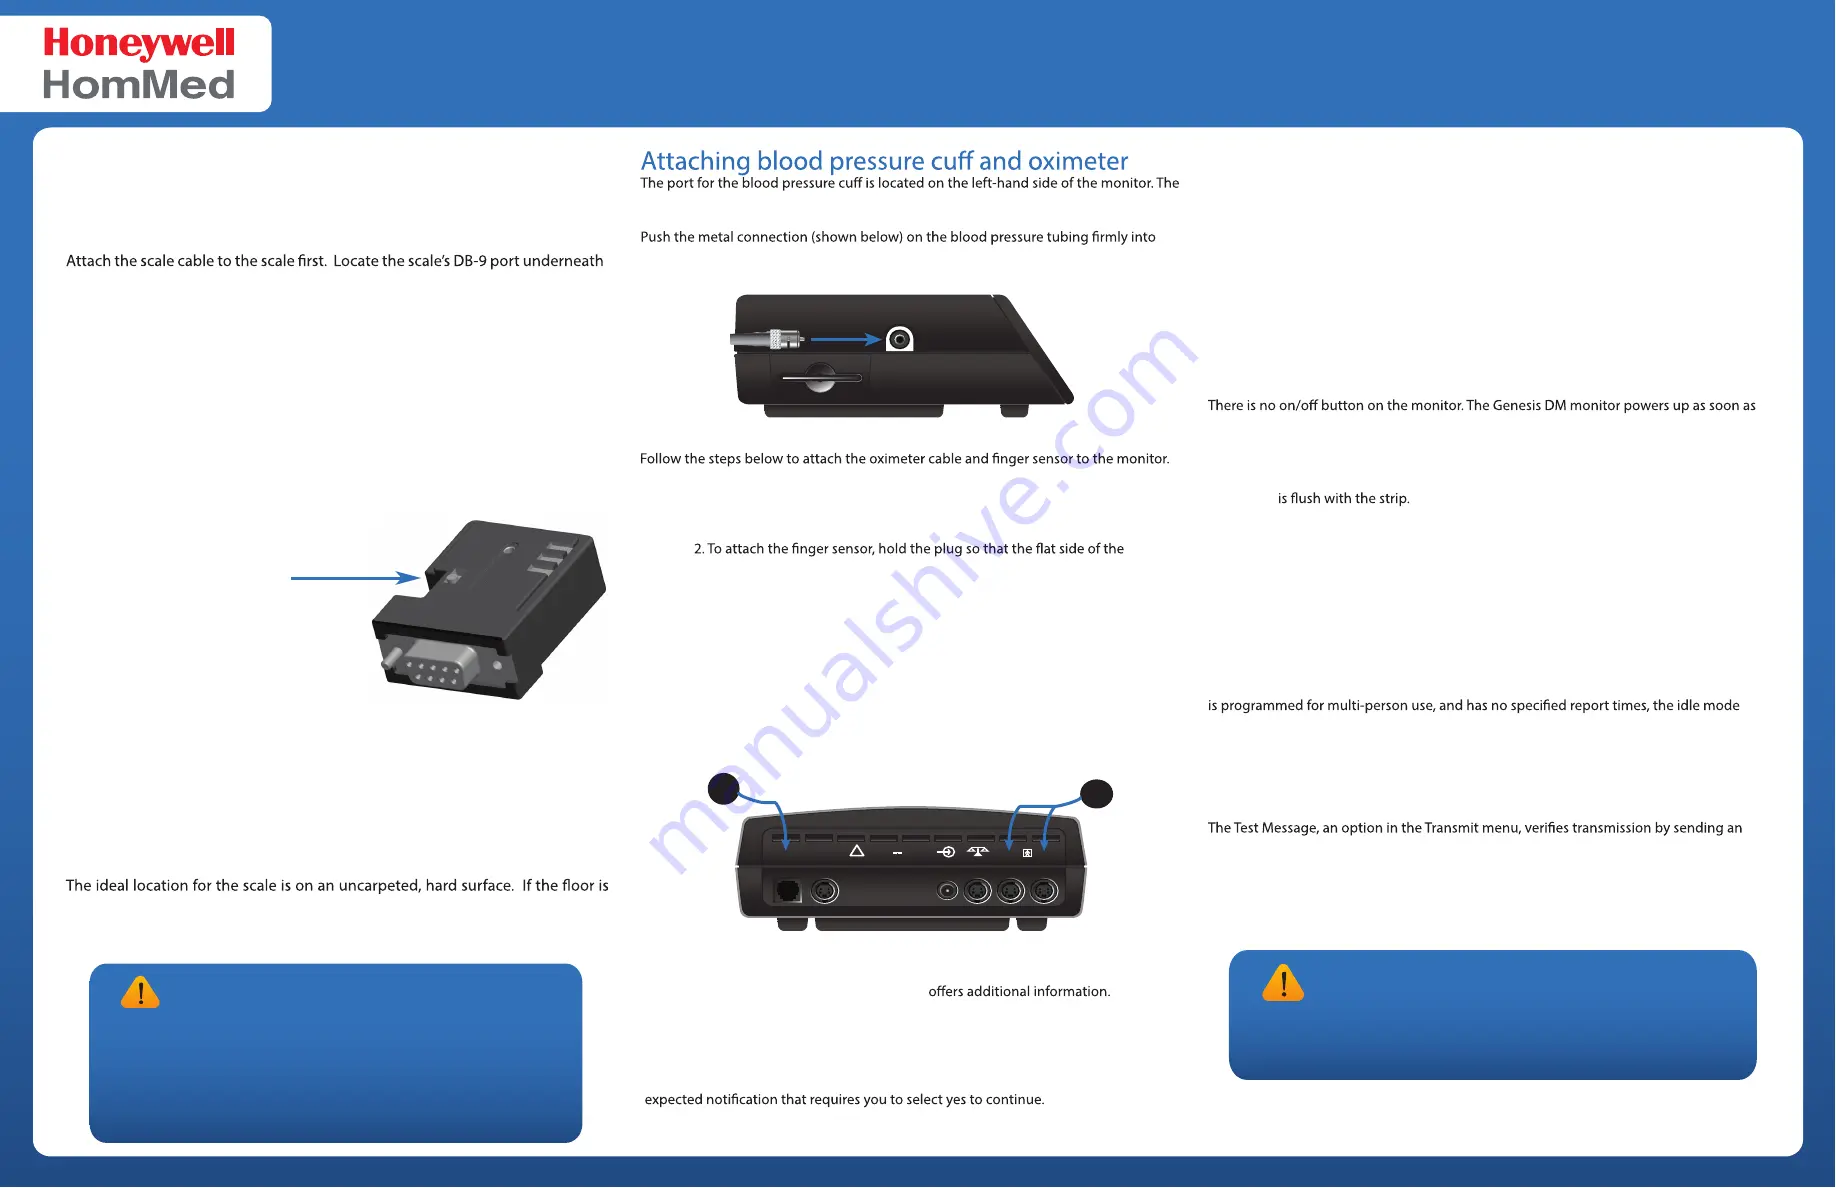
blood pressure tubing connects to the NIBP port.
the NIBP port. It should click when it locks into place.
Attaching the oximeter
1. Plug the 4-pin connector (located on the oximeter module) into the
isolated port you assigned in programming (#4 below).
connector is facing upward and the pins align.
Genesis DM Side Panel
MODEM
COM-A
COM2
COM1
SCALE
POWER
Only use AC Adapter
Input 24V 0.5A
!
4
Genesis DM Rear Panel
Connecting the modem
To connect the modem, follow the steps below.
1. Locate the MODEM connection on the back of the monitor.
2. Plug the phone cord from the wall jack into the MODEM (#1 below)
port on the back of the Genesis DM monitor. This line is now the active
modem line.
3. If you are using a Cellular Bridge Modem, use the modem port.
4. If you are using a Cellular Modem (GPRS), use the COM-A port to the right.
1
Cellular Modem Resources
For your convenience a
Cellular Modem Guide
Please visit: http://www.hommed.com/customer-service/genesis-dm-manuals/
When installing the GPRS modem, a message may appear on the Genesis DM noting
that the GPRS is detecting the network, and this process may take two minutes or more.
During this time the monitor may warn that "GPRS service is unavailable. " This is an
When installing, placing the modem near a window may improve cellular performance.
Place scale near
sources of water
(ie. sinks or bathtubs).
Move the scale
once you have set it up, this will prevent
the scale from losing calibration.
Power down the monitor before you exchange
scales.
Attach and position the new scale
before
you
turn the monitor back on.
CAUTION - READ CAREFULLY
DO NOT
DO NOT
DO
Attaching the Honeywell scale
Make sure that you use the appropriate equipment for your monitor. Be certain
you have all the correct devices, power adapter, cords and accompanying items.
Attaching the cable to the wired scale
-
the scale and insert the DB-9 connector on the scale cable into the port. Use the
two white connectors to securely snap the cable into place. Then plug the round
MiniDIN connector into the SCALE communication port.
Powering the wireless scale
Plug the adapter that came with the scale into the bottom of the Wireless scale.
Use the two white connectors to securely snap the cable into place. Then plug
the adapter into the wall.
Preparing the wireless scale
Securely connect the Adapter Cable to the Bluetooth Adapter, then plug the
Adapter Cable into the SCALE communication port.
The slide switch, shown on the right,
must be positioned toward the
Connector End.
Adapter light guide
Blue Blinking Light
Connecting/Scanning for Bluetooth devices
Red Light
Adapter powered during data transfer
Green Light
Data transfer
Finding the right location for the scale
Once the scale is level and connected to the monitor, carefully place it in
position for you, making sure that the cable is out of your way.
Read the label on
the scale connector cord to verify that you have the correct scale cable for the
monitor you are connecting to.
carpeted, make sure the bottom of the scale clears the carpet so that when you
step on the scale, pressure is placed on all four feet that contain the load cells.
You can adjust the height of the scale by screwing the feet in or out.