


+1 800 323 4576 (North America only)
https://www.honeywellsystems.com/ss/techsupp/index.html
Document 800-11874V5 – Rev A – 01/2015
Honeywell Security Products Americas
(Head Office)
2700 Blankenbaker Pkwy, Suite 150
Louisville, KY 40299, USA
+1 800 323 4576
Honeywell Security Europe/South Africa
Aston Fields Road, Whitehouse Industrial
Estate
Runcorn, WA7 3DL, United Kingdom
+44 (0) 1928 754 028
Honeywell Security Products Americas
Caribbean/Latin America
9315 NW 112th Ave.
Miami, FL 33178, USA
www.honeywell.com/security/clar
+1 305 805 8188
Honeywell Security Pacific
Level 3, 2 Richardson Place
North Ryde, NSW 2113, Australia
www.asia.security.honeywell.com
+61 2 9353 7000
Honeywell Security Asia
35F Tower A, City Center, 100 Zun Yi Road
Shanghai 200051, China
www.asia.security.honeywell.com
+86 21 2219 6888
Honeywell Security Middle East/N. Africa
Emaar Business Park, Sheikh Zayed Road
Building No. 2, Office No. 301
Post Office Box 232362
Dubai, United Arab Emirates
+971 (0) 4 450 5800
Honeywell Security Northern Europe
Ampèrestraat 41
1446 TR Purmerend, The Netherlands
+31 (0) 299 410 200
Honeywell Security Deutschland
Johannes-Mauthe-Straße 14
72458 Albstadt, Germany
+49 (0) 7431 801-0
Honeywell Security France
Immeuble Lavoisier
Parc de Haute Technologie
3-7 rue Georges Besse
92160 Antony, France
+33 (0) 1 40 96 20 50
Honeywell Security Italia SpA
Via della Resistenza 53/59
20090 Buccinasco
Milan, Italy
+39 (0) 2 4888 051
Honeywell Security España
Avenida de Italia, n° 7, 2
a
planta
C.T. Coslada
28821 Coslada, Madrid, Spain
www.honeywell.com/security/es
+34 902 667 800
© 2015 Honeywell International Inc. All rights reserved. No part of this publication may be
reproduced by any means without written permission from Honeywell. The information in this
publication is believed to be accurate in all respects. However, Honeywell cannot assume
responsibility for any consequences resulting from the use thereof. The information contained
herein is subject to change without notice. Revisions or new editions to this publication may be
issued to incorporate such changes.
Before Logging In to the Camera
The Honeywell Viewer software will be automatically installed on your PC when you
connect to the camera. Before logging in to the camera, ensure that Internet Explorer is
set up to run ActiveX controls. You can enable ActiveX controls manually or by setting the
browser’s security settings to the default level.
Logging In to the Camera
1.
Power up the camera (see
2.
Insert the installation disc into your disc drive and navigate to the Honeywell Device
Search folder.
If you want, you can copy the Device Search executable file to your computer
desktop (or other location) to run the Device Search application without the
installation disc.
3.
Double-click the Honeywell Device Search icon (
) to run the application on your
PC.
4.
Click
Device Search
to find the camera with the Honeywell Device Search tool.
By default, the camera has a dynamically assigned IP address (DHCP). After finding
the camera with the Device Search tool, you can assign a static IP address to the
camera, or otherwise modify the network settings, as needed (refer to the
HDZ
Series IP PTZ Dome Camera User Guide
for more information).
5.
Double-click the discovered camera, or enter the camera’s IP address into the
address bar of your web browser.
6.
In the Login dialog box, enter the default user name (
admin
) and password (
1234
),
and then click
OK
.
Note
The user name is case sensitive.
Using Honeywell Viewer for the First Time
When you connect to the camera, a request to install an ActiveX control will appear in the
browser’s information bar.
1.
Right-click the information bar, and then click
Allow ActiveX control
to install the
ActiveX control.
2.
In the Security Warning window, click
Install
to start the Honeywell Viewer software
installation.
3.
When the installation is complete, click
Finish
to close the installation window.
The Honeywell Viewer is now installed and the Viewer home page will open in your
browser when you log in to the camera. If the Viewer home page does not appear, check
your browser’s security settings and make sure that ActiveX controls and plug-ins are
enabled.
Note
If the live video pane does not appear in the Honeywell Viewer, you may need to
upgrade the software. To upgrade the software, uninstall Honeywell Viewer using
Control Panel, delete the temporary Internet Explorer files, and then go to the
Honeywell website and download and reinstall Honeywell Viewer on your PC.
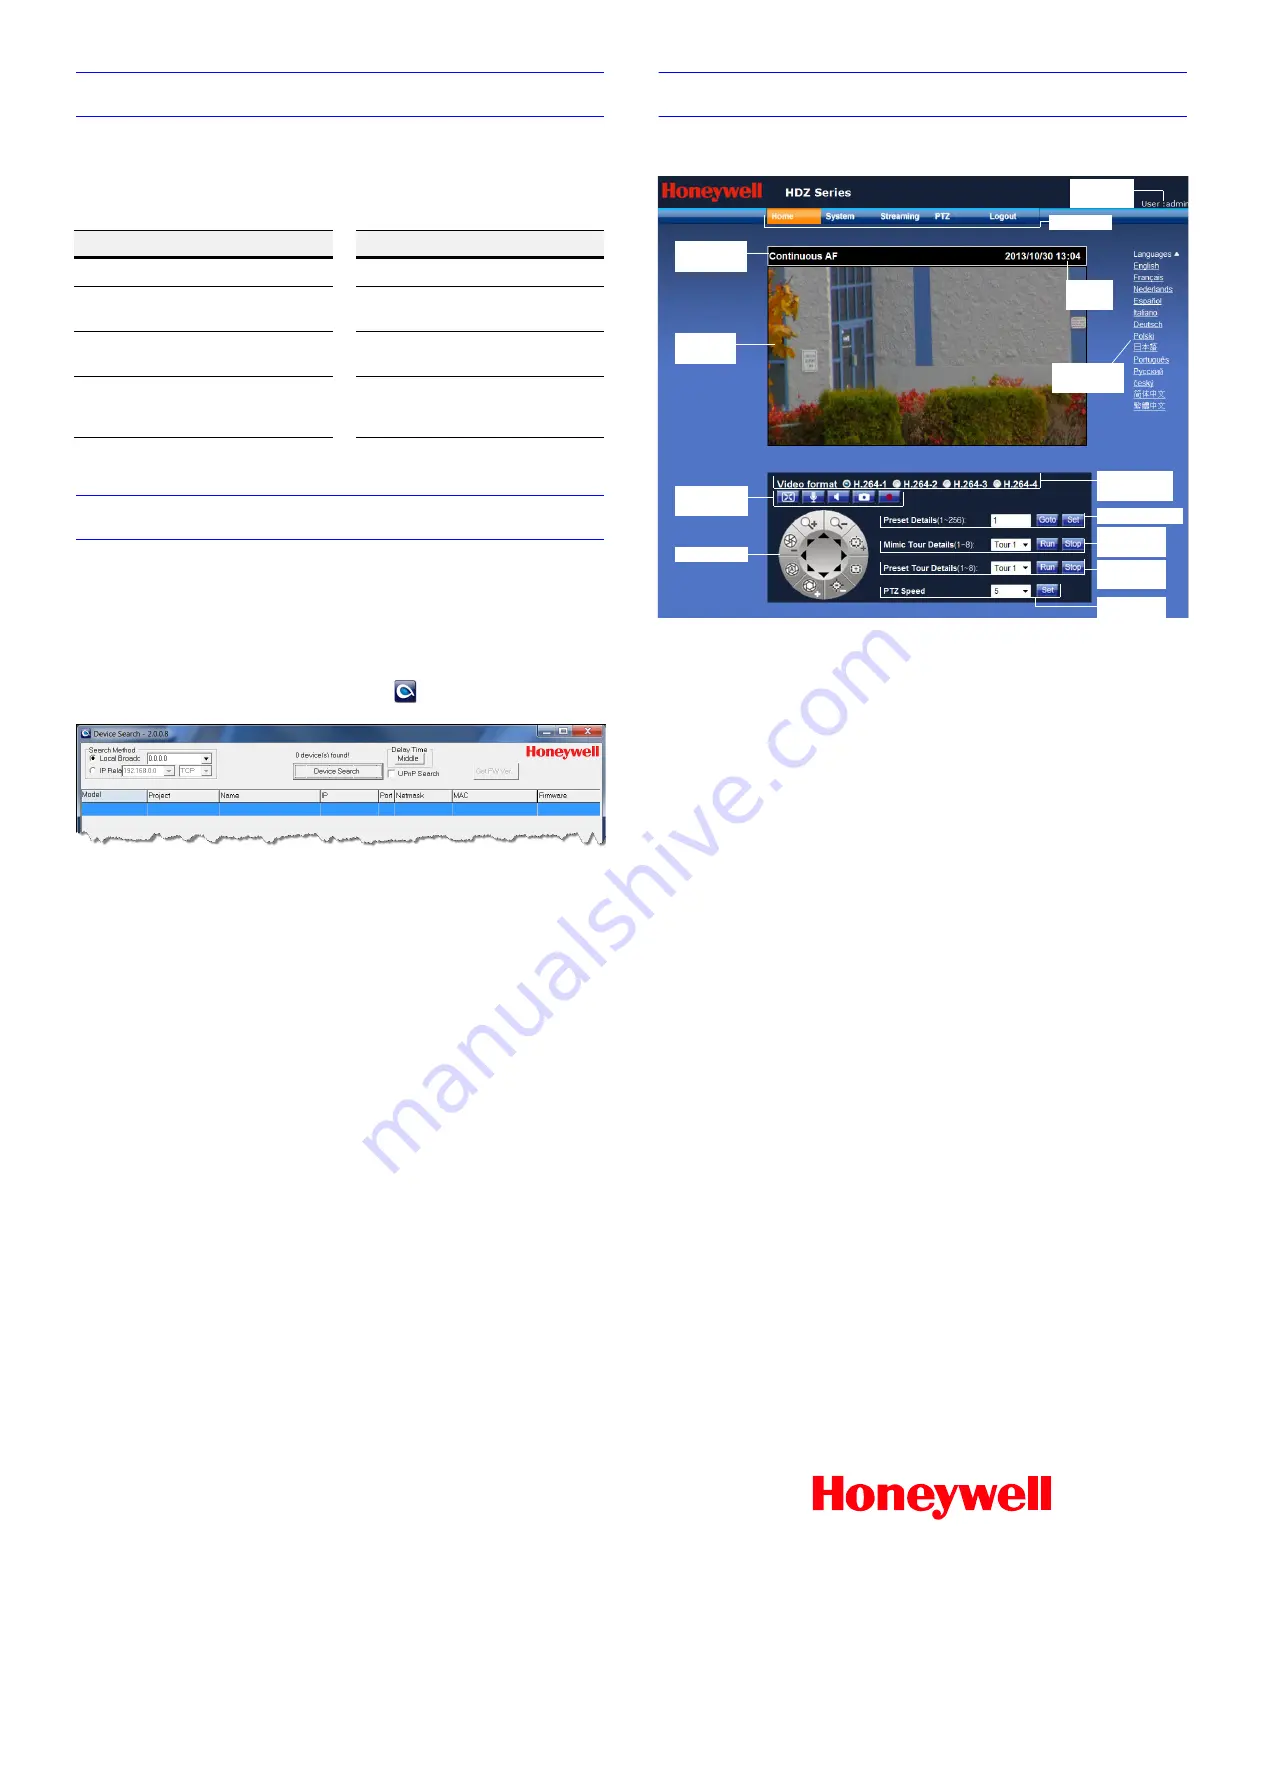
Configuring the PTZ Dome
The following figure shows the basic controls on the Honeywell Viewer home page:
Refer to the
HDZ Series IP PTZ Dome Camera User Guide
for detailed instructions on how
to configure the camera with the Viewer.
ActiveX Controls and Plug-ins Settings
Internet Security Level
1.
Open Internet Explorer.
1.
Open Internet Explorer.
2.
On the
Tools
menu, click
Internet
Options
, and then click
Security
.
2.
On the
Tools
menu, click
Internet
Options
, and then click
Security
.
3.
Click the
Internet
icon, and then
click
Custom Level
.
3.
Click the
Internet
icon, click
Default Level
and click
OK
.
4.
Set all
ActiveX controls and plug-
ins
to
Prompt
or
Enable
, and then
click
OK
.
4.
Close the browser window and
open a new one to access the
camera.
Logged in
user name
Main tabs
Time
display
Video format
selection
Preset controls
PTZ speed
selection
Preset tour
controls
Mimic tour
controls
Focus mode
display
Live video
display
Quick action
buttons
PTZ controls
Language
selection


