background image

H8908A/B HUMIDISTAT; H8908C/D DEHUMIDISTAT

69-1341EF—07

2

DUCT INSTALLATION

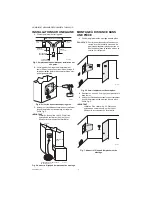
1.

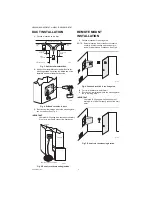
Choose a location on the duct.

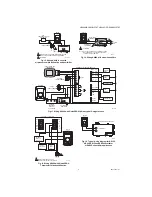
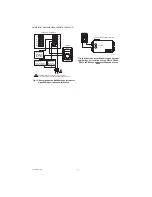
Fig. 3. Duct installation locations.

2.

Apply sticker template to duct and drill holes for 
mounting screws. Cut along the dotted line of the 

template with metal shears or tin snips.

Fig. 4. Drill and cut holes in duct.

3.

Run two-fan, low-voltage wire to the mounting loca-
tion on the duct. See Fig. 5.

IMPORTANT

Use rated 18-22 gauge wire. Leave approximately 
6 in. of wire to properly connect the humidistat.

Fig. 5. Run wire to the mounting location.

REMOTE MOUNT 
INSTALLATION

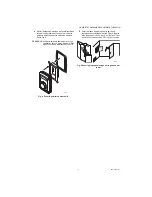
1.

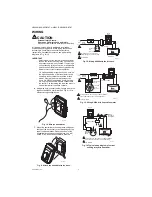
Choose a location in the living area.

NOTE: Select a location clear of drafts or excessive 

humidity. Avoid mounting near doors or win-

dows, or in bathrooms or kitchens. See Fig. 6.

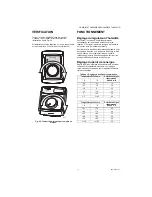
Fig. 6. Choose a location in the living area.

2.

Cut 1 in. diameter wire hole in wall.

3.

Run two-fan, low-voltage wire to the mounting loca-

tion in the living area.

IMPORTANT

Use rated 18-22 gauge wire. Leave approxi-
mately 6 in. of wire to properly connect the humi-
distat.

Fig. 7. Run wire to the mounting location.

ALTERNATE LOCATION

RETURN 
AIR

RETURN 
AIR

6 in. (152 mm) 
MINIMUM

15 in. (381 mm) 
MINIMUM

BEST 
LOCATION

RETURN AIR DUCT

M13369

M24800

M24720

TWO-FAN 18-22 GAUGE WIRE

SUPPLY

RETURN

M24718

M24721

Summary of Contents for H8908A/B

Page 1: ...ondition 2 Check the ratings given in the instructions and on the product to make sure the product is suitable for your application 3 Installer must be a trained experienced service technician CAUTION Personal Injury Hazard Power supply can cause electrical shock Disconnect power supply before beginning installation NOTE The H8908 electrical connections are not shared with the thermostat Fig 1 H89...

Page 2: ... to the mounting location REMOTE MOUNT INSTALLATION 1 Choose a location in the living area NOTE Select a location clear of drafts or excessive humidity Avoid mounting near doors or win dows or in bathrooms or kitchens See Fig 6 Fig 6 Choose a location in the living area 2 Cut 1 in diameter wire hole in wall 3 Run two fan low voltage wire to the mounting loca tion in the living area IMPORTANT Use r...

Page 3: ...ket See Fig 8 NOTE Use gasket only when mounting the control to ductwork Leave off when mounting to a wall Fig 8 Seal base bracket 5 Secure the base bracket to the duct or remote loca tion Secure to the duct with four 1 in 25 mm screws provided or to the wall with two 1 in 25 mm screws provided Fig 9 Mount base bracket to duct or remote location M24733 M24722 ...

Page 4: ...6 Using wire nuts connect the low voltage wire to the leads on the H8908 humidistat See Fig 6 19 for different wiring configurations Fig 10 Wire the humidistat 7 Mount the humidistat by hooking the two hinges at the top of the back cover to the raised edge at the top of the base bracket Press the bottom of the humidistat in to engage the base hinge You will hear a click when the humidistat is secu...

Page 5: ...THE SYSTEM FAN NOTE HUMIDIFIER TO SYSTEM FAN HUMIDISTAT TERMINALS FAN WIRING TERMINALS 24V WIRING H8908 10 OFF ON 20 30 40 50 60 EQUIPMENT INTERFACE MODULE M24724B H8908B 10 OFF ON 20 30 40 50 60 1 2 3 C R RC RH 1 2 3 24 VAC H1 U M2 D1 H M2 V1 N T2 OR L NOT USED OUT1 OUT2 IN1 IN2 DATS1 DATS2 CONV HP W1 W2 W3 Y Y2 G O B AUX AUX2 Y Y2 G TH9421 VISION PRO THERMOSTAT 24 VOLT TRANSFORMER SYSTEM TRANSFO...

Page 6: ...relative humidity every 24 hours To increase the relative humidity increase the setpoint approximately three percent relative humidity every 24 hours Setpoint Adjustment Set the humidity setpoint according to the prevailing outdoor temperature Recommended settings are available on the control and in the table below Table 1 Recommended Humidity Controller Settings M24723 Humidity Control Régulateur...

Page 7: ...H8908A B HUMIDISTAT H8908C D DEHUMIDISTAT 7 69 1341EF 07 ...

Page 8: ...Honeywell International Inc 1985 Douglas Drive North Golden Valley MN 55422 Honeywell Limited Honeywell Limitée 35 Dynamic Drive Toronto Ontario M1V 4Z9 customer honeywell com U S Registered Trademark 2010 Honeywell International Inc 69 1341EF 07 T D Rev 11 10 Printed in U S A ...

Page 9: ... produit ou de constituer un danger 2 Vérifier les caractéristiques spécifiées dans les instructions et indiquées sur le produit et s assurer que celui ci correspond à l application prévue 3 L installateur doit être un technicien d expérience ayant reçu une formation pertinente MISE EN GARDE Risque de blessure Peut donner un choc électrique Couper l alimentation avant de procéder à l installation ...

Page 10: ... DANS UNE PIÈCE 1 Choisir l emplacement de montage dans la pièce REMARQUE Choisir un emplacement à l abri des cou rants d air et de l humidité excessive Ne pas installer l appareil près des portes ou des fenêtres ni dans la salle de bain ou la cuisine Voir la figure 6 Fig 6 Choisir l emplacement dans la pièce 2 Découper un trou de 2 5 cm 1 po pour passer le fil dans le mur 3 Amener un fil double b...

Page 11: ...tiliser la garniture seulement pour une installation sur une gaine Ne pas l utiliser dans le cas d une installation sur un mur Fig 8 Poser la garniture d étanchéité 5 Poser la plaque de montage sur la gaine ou à l emplacement choisi dans la pièce Fixer à la gaine avec les quatre vis de 25 mm 1 po fournies Fixer au mur avec les deux vis de 25 mm 1 po fournies Fig 9 Poser la plaque de montage sur la...

Page 12: ...ux fils jaunes au régulateur Les deux fils rouges ne servent que dans le cas de régulateurs d humidité électroniques 6 Utiliser des connecteurs de fils pour raccorder les fils basse tension aux connecteurs de l humidistat H8908 Consulter les Fig 6 19 pour connaître les configurations possibles Fig 10 Raccorder l humidistat 7 Pour monter l humidistat accrocher les deux charnières au haut du couverc...

Page 13: ...N 20 30 40 50 60 1 2 ALIMENTATION FOURNIR AU BESOIN UN DISPOSITIF DE COUPURE ET UNE PROTECTION CONTRE LES SURCHARGES CÂBLAGE 24 V c a HUMIDIFICATEUR L1 SOUS TENSION TRANSFORMATEUR MF24731 1 1 1 SUIVRE LES INSTRUCTIONS D INSTALLATION DE L HUMIDIFICATEUR À VAPEUR POUR RACCORDER LE VENTILATEUR DU SYSTÈME REMARQUE HUMIDIFICATEUR VERS LE VENTILATEUR DU SYSTÈME BORNES DE L HUMIDISTAT BORNES DE RACCORDEM...

Page 14: ...éshumidification avec un DH90 FOURNIR AU BESOIN UN DISPOSITIF DE COUPURE ET UNE PROTECTION CONTRE LES SURCHARGES MF24725 1 1 THERMOSTAT VISIONPRO Y2 L A W2 S1 S2 RC R W Y G C H8908D 10 OFF ON 20 30 40 50 60 RELAIS DE CHAUFFAGE OU BOBINE DE LA VANNE BOBINE DU CONTACTEUR DE REFROIDISSEMENT BOBINE DU RELAIS DU VENTILATEUR VENTILATEUR DÉSHUMIDIFICATEUR MF24732 BORNES Fresh Air Ventilation System Systè...

Page 15: ...e consigne d environ trois pourcents d humidité relative aux 24 heures Pour augmenter le taux d humidité relative augmenter le point de consigne d environ trois pourcents d humidité relative aux 24 heures Réglage du point de consigne Régler le point de consigne d humidité relative en tenant compte de la température extérieure Les réglages recommandés sont indiqués sur le régulateur et dans le tabl...

Page 16: ...ernational Inc 1985 Douglas Drive North Golden Valley MN 55422 Honeywell Limited Honeywell Limitée 35 Dynamic Drive Toronto Ontario M1V 4Z9 customer honeywell com Marque de commerce déposée aux É U 2010 Honeywell International Inc Tous droits réservés 69 1341EF 07 T D Rev 11 10 Imprimé aux États Unis ...

Reviews: