background image

F76S WATER FILTERS AND MV876B AUTOMATIC-BACKWASH CONTROLS

5

62-3015—4

Commercial and Industrial Installations
(1-1/2 and 2 in. models)

Commercial and industrial installations have high flow 
requirements. For proper operation, limit flow across the F76S 
screen. For example, a two-inch pipe may have a 120 gpm flow 
at 12 fps linear velocity across a clean screen. High linear 
velocity impacts dirt deeply into the screen, making it difficult to 
backwash and causing the screen to plug up quickly. In these 
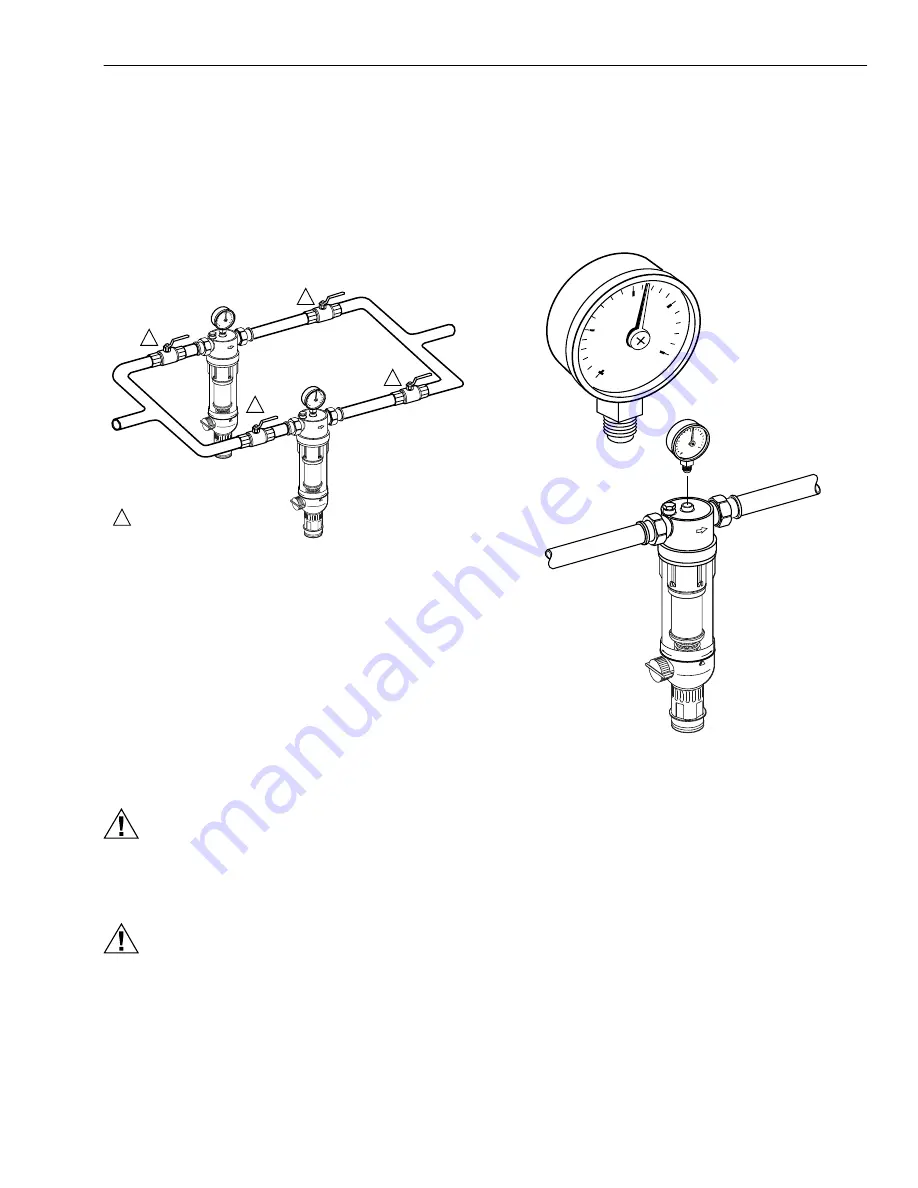
situations, install multiple F76 filters in parallel. See Fig. 3.

Fig. 3. Parallel installation of three F76S Water Filters.

Advantages of parallel installation:

Increased cleaning capacity. Backwash interval is reduced.

Elimination of system downtime. Can backwash one F76S 
while the others maintain required flow.

Another consideration in commercial and industrial 
installations is the backwash interval. Because of the high flow 
requirements, screens need cleaning on a regular basis. An 
MV876 Automatic-Backwash Control can be installed to back-
wash the F76S automatically.

INSTALLATION

CAUTION

Equipment Damage Hazard.
Excessive pressure or temperature can damage 
the device.
Ensure water temperature and pressure are below 
maximum ratings specified.

CAUTION

Equipment Damage Hazard.
Excessive heating can damage internal parts.
Before sweating, separate the tailpieces and nuts from 
the filter body.

F76S

When installing an F76S, use the following procedure:

1.

Shut off water supply by closing the water supply valve.

2.

Install the F76S in the water line with the arrow pointing 
in the direction of water flow.

3.

Install pressure gauge in the F76S center port (see Fig. 4).

IMPORTANT

When using an MV876, stop here and install the MV876.

4.

Ensure the F76S air vent is open.

5.

Slowly open the water supply valve.

6.

Once the F76S sump fills with water, close the air vent 
and fully open the water supply valve.

Fig. 4. Installing the F76S.

MV876

When adding an MV876 to an existing F76, the procedure can 
vary depending on the F76 model.

Installation on an F76S

1.

Open the backwash outlet ball valve.

2.

Remove the backwash outlet handle.

3.

Install the MV876. See Fig. 5 and 6.

NOTE:

When you rotate the MV876, it closes the 
backwash outlet ball valve.

4.

Ensure the F76S air vent is open.

5.

Slowly open the water supply valve.

6.

Once the F76S sump fills with water, close the air vent 
and fully open the water supply valve.

7.

Program the desired backwash interval by pushing the 
program button until the desired interval number 
appears in the display.

100

150

50

0

200

Honeywell
Braukmann

INLET
PIPE

M17360

100

150

50

0

200

Honeywell
Braukmann

ISOLATION VALVE.

1

1

1

1

1

100

150

50

0

200

Honeywell

Braukmann

100

150

50

0

200

Honeywell

Braukmann

M16480

Summary of Contents for Braukmann F76S

Page 1: ...cleaning with supply pressures as low as 22 psi Increased flow capacity on 1 2 in to 1 1 4 in models provides lower pressure drop Robust backwash mechanism No shut off or disassembly is required for cleaning During backwash the F76S continues to supply filtered water without interruption through a secondary screen Memory ring indicates when the next manual backwash is due MV876 MV876B1018 bayonet ...

Page 2: ...essure gauge with a range wider than the standard Differential Maximum Recommended 42 psi Operating Pressure Drop Maximum Recommended 3 psi with clean screen Temperature maximum Plastic Sump 104 F 40 C Bronze Sump 158 F 70 C Pipe Sizes in in 1 2 3 4 1 1 1 4 1 1 2 and 2 Connections Union on inlet and outlet External NPT threaded or sweat Capacity See Table 1 Screen Sizes Shipped with Device 100 mic...

Page 3: ...ench for any 1 in or 1 1 4 in F76 ZR10K 112 Sump Wrench for any 1 1 2 in or 2 in F76 ZR10K 12 Sump Wrench for 1 2 in and 3 4 in F76A G ZR10K 34 Sump Wrench for 1 2 in and 3 4 in F76S Fig 1 F76S Dimensions Table 1 Capacity in Gallons Per Minute gpm NOTE Cv is equal to capacity at 1 psi pressure drop Table 2 MV876B Timer Selections 1 2 INCH 6 11 16 170 4 5 16 110 3 13 16 97 17 11 16 449 13 13 16 350...

Page 4: ... be considered when choosing a screen and deciding to install multiple F76 Water Filters in parallel Fig 2 Installation recommendations 100 150 50 0 200 Hone ywell Brauk mann M16488 Fig 2a Ideal F76S installation A funnel mounted directly under the backwash port is the best installation layout Fig 2b Ensure the inlet pipe is not downsized Do not use 1 4 or 3 8 inch tubing on 1 2 or 3 4 inch models...

Page 5: ... Damage Hazard Excessive heating can damage internal parts Before sweating separate the tailpieces and nuts from the filter body F76S When installing an F76S use the following procedure 1 Shut off water supply by closing the water supply valve 2 Install the F76S in the water line with the arrow pointing in the direction of water flow 3 Install pressure gauge in the F76S center port see Fig 4 IMPOR...

Page 6: ...tion of the MV876 backwash outlet to the internally threaded F76A connection 5 Connect the hose fitting to the MV876 backwash outlet see Fig 7 Fig 7 Installing the MV876B on the F76A Set Pressure Gauge Needles The black needle on the pressure gauge measures the F76S outlet pressure When the F76S is running with clean screens there is a small pressure drop across the F76S 3 psi at maximum recommend...

Page 7: ...y Disconnect power supply before installation 1 Unscrew the four housing screws and set them aside see Fig 8 IMPORTANT Ensure that the connecting cable is protected from damage while the MV876 cover is loose 2 Remove the MV876 cover see Fig 8 3 Insert four AA alkaline batteries see Fig 9 4 Replace the cover 5 Replace and tighten the four housing screws NOTES 1 To avoid unnecessary battery drainage...

Page 8: ...water flow The reverse flow removes trapped sediment and debris from the lower filter This sediment drains out the backwash outlet Cleaning the lower screen requires approximately 20 seconds See Fig 12b The F76S requires no maintenance if backwashed at the proper interval Determining Backwash Interval All F76S applications are different and require backwashing at different intervals Backwash inter...

Page 9: ...B AUTOMATIC BACKWASH CONTROLS 9 62 3015 4 Fig 12 Water flow through the F76S SCREEN BACKWASH IMPELLER a F76S DURING NORMAL FLOW b F76S DURING BACKWASH CYCLE DEBRIS AND SEDIMENT M17362 ENLARGED CROSS SECTION ENLARGED CROSS SECTION ...

Page 10: ...nsert Complete new style only 20 Micron AF11S 1B AF11S 1B AF11S 1B AF11S 1B AF11S 112B AF11S 112B 50 Micron AF11S 1C AF11S 1C AF11S 1C AF11S 1C AF11S 112C AF11S 112C 100 Micron AF11S 1A AF11S 1A AF11S 1A AF11S 1A AF11S 112A AF11S 112A 200 Micron AF11S 1D AF11S 1D AF11S 1D AF11S 1D AF11S 112D AF11S 112D Includes F Barrel O Ring G Impeller and Screen Assembly J Chamber O Ring H Base Spring N A N A N...

Page 11: ...ERS AND MV876B AUTOMATIC BACKWASH CONTROLS 11 62 3015 4 Fig 13 F76S exploded view Parts are keyed to F76S Replacement Parts List 100 150 50 0 200 Honeywell Braukmann A C E B D C B D F G Q K L M H J S R P N T M18073 OR ...

Page 12: ...23 QF76Q2023 50 Micron QF76R2030 QF76R2030 QF76R2038 QF76R2038 QF76R2046 QF76R2046 100 Micron QF76S2051 QF76S2051 QF76S2059 QF76S2059 QF76S2067 QF76S2067 200 Micron QF76T2074 QF76T2074 QF76T2082 QF76T2082 QF76T2090 QF76T2090 Includes F Upper Screen H Barrel O Ring L Lower Screen Internal Seal Kit Includes H Barrel O Ring K Screen Seal Q Chamber O Ring S Joint Ring Seal N A N A N A N A N A N A Filt...

Page 13: ...RS AND MV876B AUTOMATIC BACKWASH CONTROLS 13 62 3015 4 Fig 14 F76A G exploded view Parts are keyed to F76A G Replacement Parts List 100 150 50 0 200 Honeywell Braukmann A C E T B D C B D F G H J K L M N P Q R S U M746 ...

Page 14: ...62 3015 4 14 ...

Page 15: ...15 62 3015 4 ...

Page 16: ...Building Control Home and Building Control Honeywell Inc Honeywell Limited Honeywell Limitée Honeywell Plaza 155 Gordon Baker Road P O Box 524 North York Ontario Minneapolis MN 55408 0524 M2H 3N7 Printed in U S A on recycled paper containing at least 10 post consumer paper fibers ...

Reviews: