


4-9
FIELD
TITLE and DATA ENTRIES
EXPLANATION
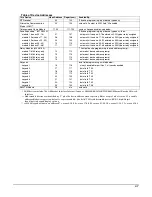
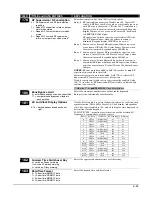
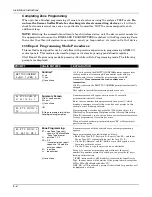
*95
Ring Count For Downloading
0 = Disable Monitoring Station initiated
downloading
1–14 = number of rings before control
answers incoming call
#+15 = Answering machine/fax defeat
Refer to the chart below and program this field accordingly.
phone answer/fax
down-
module machine
loading Set
field
∗∗∗∗
95 to…
yes
no
no
1-14 (not 0)
yes
yes
no
higher than number of rings set on
answer/fax machine (e.g., if ans/fax
machine is 4 rings, set this field to
5). This allows access via the
phone module if the answer/fax
machine is turned off.
yes
no
yes
1-14 (not 0)
yes
yes
yes
15 (bypasses answer/fax
machine
†
)
no no no 0
no yes no 0
no no yes
1-14
no yes yes
15
†
NOTE:
If “15” is entered to bypass an answering machine and a
TeleCommand Phone Module is included in the system, you should
note the following:
When calling in from an off-premises phone, the user should make the
initial call, allow 1 or 2 rings only, then hang up, then call again. The
phone module will now seize the line, and 2 long tones sound,
followed by the usual voice prompt for the access code. If this
procedure is not followed, phone module operation will not be possible.
Pager Programming Fields
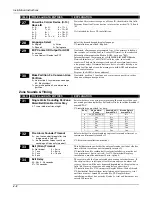
*160
Pager 1 Phone No.
Enter up to 20 digits
If you enter fewer than 20 digits, exit by pressing [
∗
] and next field
number. To clear entries from this field, press
∗
160
∗
.
*161
Pager 1 Characters
Enter up to 16 characters
Up to 16 optional characters may be sent as a prefix to the 7-digit
system status code sent to pager #1 (if used). Phone number in field
*160 must have been entered. If fewer than 16 characters, exit by
pressing [
∗
] and next field number. To clear entries from this field,
press
∗
161
∗
.
For example, use these optional 16 characters for the following:
•
PIN number (to identify a specific pager to the paging company)
•
Subscriber account number
•
∗
(enter # + 11 to send
∗
); # (enter # + 12 to send #)
•
Pause (enter # + 13 to allow a 2-second pause)*
•
Any special character(s) the end user may decide to transmit
* Some paging systems require pause(s) before the prefix.
The format for the 7-digit system status code is defined as follows:
Pager Format: XXX-YYYY where:
XXX
= 3-digit event code: 911 = Alarm
811
=
Trouble
101 = Opening (disarm)
102 = Closing (arm)
YYYY
= 4-digit user or zone number (depending on type of event).
The first digit indicates partition, followed by 0, then the
2-digit user or zone number.
Example 1.
Pager displays: 9 1 1 – 1 0 0 4
This indicates that the system is reporting an alarm (911) caused by a
fault in zone 4 in partition 1.
Example 2.
Pager displays: 1 0 2 – 2 0 0 5
This indicates that the system is reporting a closing–system arming
(102) by User 5 in partition 2.
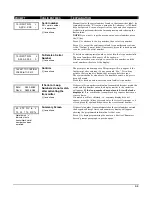
*162
Pager 1 Report Options
0 = No reports sent
1 = Open/close for all users enabled to page
†
4 = All alarms and troubles
5 = All alarms, troubles, and open/close for
all users enabled to page
12 = Alarms and troubles for zones entered
in zone list 9
13 = Alarms and troubles for zones listed in
zone list 9 and opens/closes for all
users enabled to page
Enter the types of reports to be sent to pager 1 for each partition.
† Reports to pager only when arming (close)/disarming (open) from a
keypad using a security code; auto-arming/disarming, arming with
assigned RF button, and keyswitch arming do not send pager
messages.
Summary of Contents for ADEMCO VISTA-48D
Page 2: ...ii ...
Page 28: ...Installation Instructions 3 8 ...
Page 42: ...Installation Instructions 4 14 ...