background image

HONEYWELL LOCK  APP INSTALLATION & USE

APPLICATION SETUP OPTIONS

REGISTER APP AND CREATE ACCOUNT

6

CONNECT THE BLUETOOTH SAFE

IMPORTANT: 

Your Bluetooth must be enabled and you must be within range of the lock.

    1. Slide hand across the touchscreen on the Safe to activate the Safe. (Digital keys are lit when activated).
    2. Click the 

 icon on the start screen.

    3. Select “Safe Lock”.
    4. Click on available safe.
    5. Follow prompts to name the device.
After you have connected the safe to the Bluetooth App, the Admin. Digital Passcode must be reprogrammed 
by going to the “Safe Setting” page.

Select your device and go to “Safe Settings” by selecting the “Settings icon” 

 in the top right corner of the screen.

SET ADMIN PASSCODE
IMPORTANT:

 Your Bluetooth must be enabled and you must be within range of the safe.

     1.  

Select “Admin Passcode” from the list.

     2. 

You will be prompted to enter your Honeywell Account Password.

     3. 

Enter a new 4 to 9 digit password of your choice and press “

”.

CHANGE SAFE NAME

     1. Select “Name” from the list.
     2. Input the name you want to assign to this safe and press “

”.

ACTIVATE AUTO LOCK

     1.  Select “Auto Lock” from the list.
     2.  Toggle Auto Lock On/Off. (if toggle does not work press “check time” at the bottom)
     3.  Input the Set Time for Auto Lock.
     4.  Press “OK” to Save changes.

NOTE

: Auto lock can also be programmed using the digital keypad.

ADD SAFE TO GROUP

If no groups exist you will have to create one. Press “Create Group” and enter the group name.

     1.

 Select “Group” from the list.

     2.

 To create a new group, press “Create Group” and enter the group name.

     3.

 Select the Group to place the lock in.

UPGRADE THE CONNECTED SAFE

In order to upgrade you have to be the Admin for the safe, and within Bluetooth range.
The App and the safe have been successfully connected when the green light turns on, indicating 
that the lock is upgrading.
     1. Press “Lock Upgrade” from the list to Check for Updates.
     2. Press “Upgrade’ (in case a pop up notification appears, follow it to finish the upgrade).

MANAGE SAFE SETTINGS

Summary of Contents for 5403

Page 1: ...ist to confirm all items have been received If any items are missing please contact Consumer Assistance see page 17 for contact information 1 Digital Bluetooth Steel Security Safe 1 Operation Manual 2 Override Access Keys 4 Mounting Hardware 1 Removable Shelf Model 5403 1 Digital Bluetooth Steel Security Safe ENGLISH 1 Operation Manual 4 Mounting Hardware 2 Override Access Keys 1 Removable Shelf ...

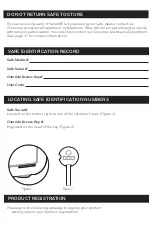
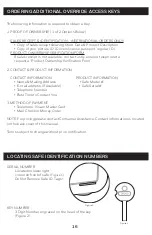
Page 2: ...umer Assistance Department See page 17 for contact information Please go to the following webpage to register your product www hymaninc com product registration Safe Serial Located on the bottom right corner of the safe door frame Figure 1 Override Access Key Engraved on the head of the key Figure 2 Safe Model Safe Serial Override Access Key User Code LOCATING SAFE IDENTIFICATION NUMBERS PRODUCT R...

Page 3: ...NLOCKING THE SAFE PAGE 3 PREPARING FOR SAFE ANCHORING PAGE 3 ANCHORING SAFE PAGE 4 SECURE LOCKOUT PERIOD PAGE 4 OVERRIDE ACCESS KEY PAGE 4 APP INSTALLATION AND USE PAGE 5 TOUCHSCREEN PROGRAMING PAGE 13 ORDERING ADDITIONAL OVERRIDE ACCESS KEYS PAGE 16 LOCATING SAFE IDENTIFICATION NUMBERS PAGE 16 CONSUMER ASSISTANCE PAGE 17 FCC COMPLIANCE PAGE 17 WARRANTY PAGE 19 INDEX ...

Page 4: ...authorized access Smartphone Application The Honeywell Lock App is available for free on Google Play and The App Store CARE AND MAINTENANCE When properly maintained your safe will continue to operate for many years In order to ensure optimum performance of your safe please follow these simple precautions CLEAN HANDS Never attempt to operate the digital keypad if your hands have excessive dirt debr...

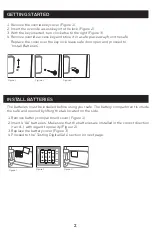
Page 5: ...d with regard to polarity Figure 2 3 Replace the battery cover Figure 3 4 Proceed to the Testing Digital Safe section on next page INSTALL BATTERIES Figure 1 Figure 2 Figure 3 GETTING STARTED 1 Remove the override key cover Figure 1 2 Insert the override access key into the lock Figure 2 3 With the key inserted turn clockwise to the right Figure 3 4 Remove override access key and store it in a saf...

Page 6: ...afedoor Figure4 4 Youmayalsousetheincluded Override Access key to unlock the safe seepage4 Figure 1 Figure 4 Figure 3 Unlock Icon Figure 2 Lock Icon PREPARE FLOOR FOR ANCHORING NOTE Bolting unbolting of the unit is at the consumer s expense and discretion LH Licensed Products Inc is not responsible for any costs incurred if the unit has to be replaced If you have any questions about mounting the s...

Page 7: ...d Bolt through the bolt hole from the inside of the safe and into the Drop in Anchor Figure 6 7 Secure the Hex Head Bolt tightly using a socket wrench Figure 7 Figure 5 Figure 1 Figure 4 Figure 3 Figure 6 Figure 2 4 Figure 7 SECURE LOCKOUT PERIOD If the wrong user code is entered 3 consecutive times in a row the keypad will automatically lockout and the user will not be able to open the safe with ...

Page 8: ... Code sent as text message Code must be entered within 60 seconds If the wrong code is entered or 60 seconds pass you must select Get Verification Code to resend a new code 5 Input received verification code 6 Select Create Account Administrator Passcode New Passcode NP Received Passcode RP VERY IMPORTANT Before connecting to a safe please ensure that Bluetooth is enabled on your phone and you are...

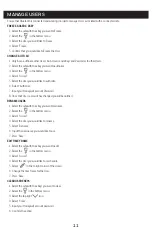
Page 9: ...ice and press CHANGE SAFE NAME 1 Select Name from the list 2 Input the name you want to assign to this safe and press ACTIVATE AUTO LOCK 1 Select Auto Lock from the list 2 Toggle Auto Lock On Off if toggle does not work press check time at the bottom 3 Input the Set Time for Auto Lock 4 Press OK to Save changes NOTE Auto lock can also be programmed using the digital keypad ADD SAFE TO GROUP If no ...

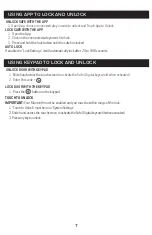
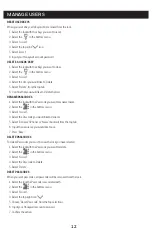
Page 10: ...0 to 900 seconds UNLOCK DOOR WITH KEYPAD 1 Slide hand across the touchscreen to activate the Safe Digital keys are lit when activated 2 Enter Passcode LOCK DOOR WITH THE KEYPAD 1 Press the button on the keypad TOUCH TO UNLOCK IMPORTANT Your Bluetooth must be enabled and you must be within range of the lock 1 TouchtoUnlock mustbeonin SystemSettings 2 Slide hand across the touchscreen toactivatetheS...

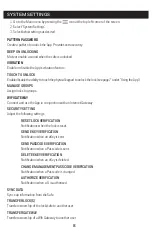
Page 11: ... Connect and use the App in conjunction with an Internet Gateway SECURITY SETTING Adjust the following settings RESET LOCK VERIFICATION Notifications when the lock is reset SEND EKEY VERIFICATION Notification when an eKey is sent SEND PASSCODE VERIFICATION Notification when a Passcode is sent DELETE EKEY VERIFICATION Notification when an eKey is deleted CHANGE MANAGEMENT PASSCODE VERIFICATION Noti...

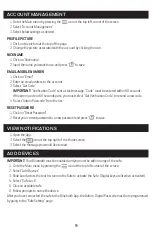
Page 12: ... new code 4 Select Admin Passcode from the list RESET PASSWORD 1 Click on Reset Password 2 Reset your current password to a new password and press to save 1 Open the App 2 Select the icon at the top right of the Home screen 3 Select the message you would like to read 9 ACCOUNT MANAGEMENT VIEW NOTIFICATIONS ADD DEVICES IMPORTANT Your Bluetooth must be enabled and you must be within range of the saf...

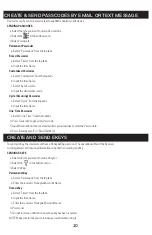
Page 13: ...top tabs 4 Press Generate to get a new Passcode 5 Input the mobile number or email address you would like to send the Passcode to 6 Press Send by email or Send Text Msg To send an eKey the receiver must have a Honeywell App account The operation will fail if the Receiver is not registered or the wrong information is input when sending an eKey SENDING EKEYS 1 Select the safe you want to send a eKey...

Page 14: ...your Honeywell account Password 8 Once that User s account has changed you will be notified RENAME USERS 1 Select the safe with the eKey you want to rename 2 Select the in the bottom menu 3 Select Issued 4 Select the User you would like to rename 5 Select Rename 6 Input the new name you would like to use 7 Press Save EDIT TIME FRAME 1 Select the safe with the eKey you want to edit 2 Select the in ...

Page 15: ...ame 2 Select the in the bottom menu 3 Select Issued 4 Select the Passcode you would like to Rename 5 Select Rename iPhone or Name Android from the top tab 6 Input the new name you would like to use 7 Press Save DELETE PASSCODES To delete Passcodes you must be near the lock you have selected 1 Select the lock with the Passcode you want to delete 2 Select the in the bottom menu 3 Select Issued 4 Sel...

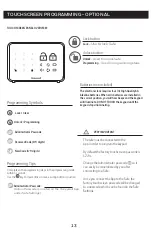
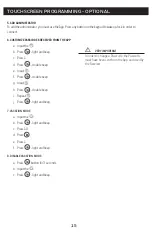
Page 16: ...P so it can easily be remembered by you after connecting to a Safe Once you connect the App to the Safe the factory touchscreen passcode will be changed to a new code which can be found in the Safe Settings Unlock Used to unlock Safe Programming Used in programming steps VERY IMPORTANT Received Code 6 9 digits Complete all the programming steps in the programming mode within 5 seconds Use the key ...

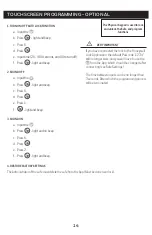
Page 17: ...he programming process will be terminated 1 TURN ON OFF AUTO LOCK FUNCTION a Input the AP b Press light and beep c Press 5 d Press e Input time 20 900 seconds and 00 to turn off f Press light and beep 2 SOUND OFF a Input the AP b Press light and beep c Press 6 d Press e Press 1 f light and beep 3 SOUND ON a Input the AP b Press light and no beep c Press 6 d Press e Press 2 f Press light and beep 4...

Page 18: ...asscode must have been sent from the App and used by the Receiver 7 VACATION MODE a Input the AP b Press light and beep c Press 10 d Press e Press 1 f Press light and beep 8 DISABLE VACATION MODE a Press button for 3 seconds b Input the AP c Press light and beep 5 ADD ADMINISTRATOR To add the administrator you must use the App Press any button on the keypad to wake up lock in order to connect VERY...

Page 19: ...ication Form 2 CONTACT PRODUCT INFORMATION CONTACT INFORMATION PRODUCT INFORMATION Name Mailing Address Safe Model E mail address If Available Safe Serial Telephone Number Best Time to Contact You 3 METHOD OF PAYMENT Telephone Visa or MasterCard Mail Check or Money Order NOTE For pricing please contact Consumer Assistance Contact information is located on the back cover of this manual Terms subjec...

Page 20: ...Mexico 01 800 288 2872 After English voice recording stops you must then enter 800 860 1677 to complete your call Toll Free Australia 0011 800 5325 7000 Toll Free Germany New Zealand 00 800 5325 7000 Toll Free Other Countries XX 310 323 5722 Toll Charges Apply XX Dial U S Country Code first US Canada 7am 5pm PST Mon Fri Other Countries 7am 8pm PST Mon Fri PST Local time in Los Angeles CA USA EMAIL...

Page 21: ...5 of the FCC rules Operation is subject to the following two conditions 1 This device may not cause harmful interference and 2 This device must accept any interference including interference that may cause undesired operation IMPORTANT Changes or modifications not expressly approved by the manufacturer could void the user s authority to operate the equipment 18 FCC COMPLIANCE ...

Page 22: ...es and tornadoes LHLP Inc shall not be liable for any incidental or consequential damages caused by the breach of any express or implied warranty or otherwise relating to the sale of this product LHLP Inc is also not responsible for costs associated with removing or installing the product damage or loss of the contents of the product nor for the unauthorized removal of the contents or damages incu...

Page 23: ......

Page 24: ... East Sandhill Avenue Carson CA 90746 www honeywellsafes com M5403 E V0 The Honeywell Trademark is used under license from Honeywell International Inc Honeywell International Inc makes no representations or warranties with respect to this product ...

Reviews: