4
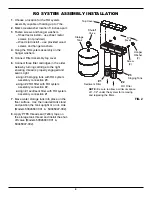
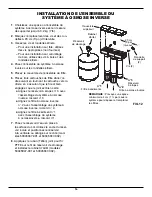
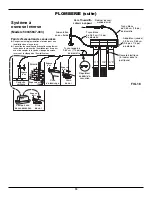
FIG. 2
RO SYSTEM ASSEMBLY INSTALLATION
1
. Choose a location for the RO system
assembly capable of holding up to 7 lbs.
2
. Mark screw/washer location 9 inches apart.
3
. Fasten screws and hanger washers.
–
Sheet metal install – use sheet metal
screws (not provided).
–
Wood stud install – use provided wood
screws and hanger washers.
4
. Hang the RO system assembly on the
hanger washers.
5
. Connect Filter Assembly top cover.
6
. Connect three filter cartridges in the order
below by turning cartridge to the right,
ensuring thread is properly engaged and
seal is tight.
Align #3 staging tank with RO system
assembly connection #3.
Align #2 RO filter with RO system
assembly connection #2.
Align #1 sediment filter with RO system
assembly connection #1.
7
. Move water storage tank into place on the
floor surface. Use the included tank stand
and position the tank upright or on its side
(Models 50045947-001 & 50045947-002).
8
. Apply PTFE thread seal (Teflon) tape on
the storage tank thread and install the shut-
off valve (Models 50045947-001 &
50045947-002).
9”
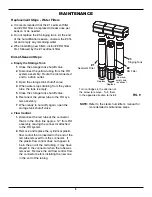
NOTE:
Be sure to allow a minimum space
of 1-1/2" under the system for removing
and replacing the filters.
Shutoff
Valve
Storage
Tank
Hanger
Washer
(2)
Screw
(2)
Top Cover
#3
Staging Tank
#2
RO Filter
#1
Sediment Filter
(level)

