2.
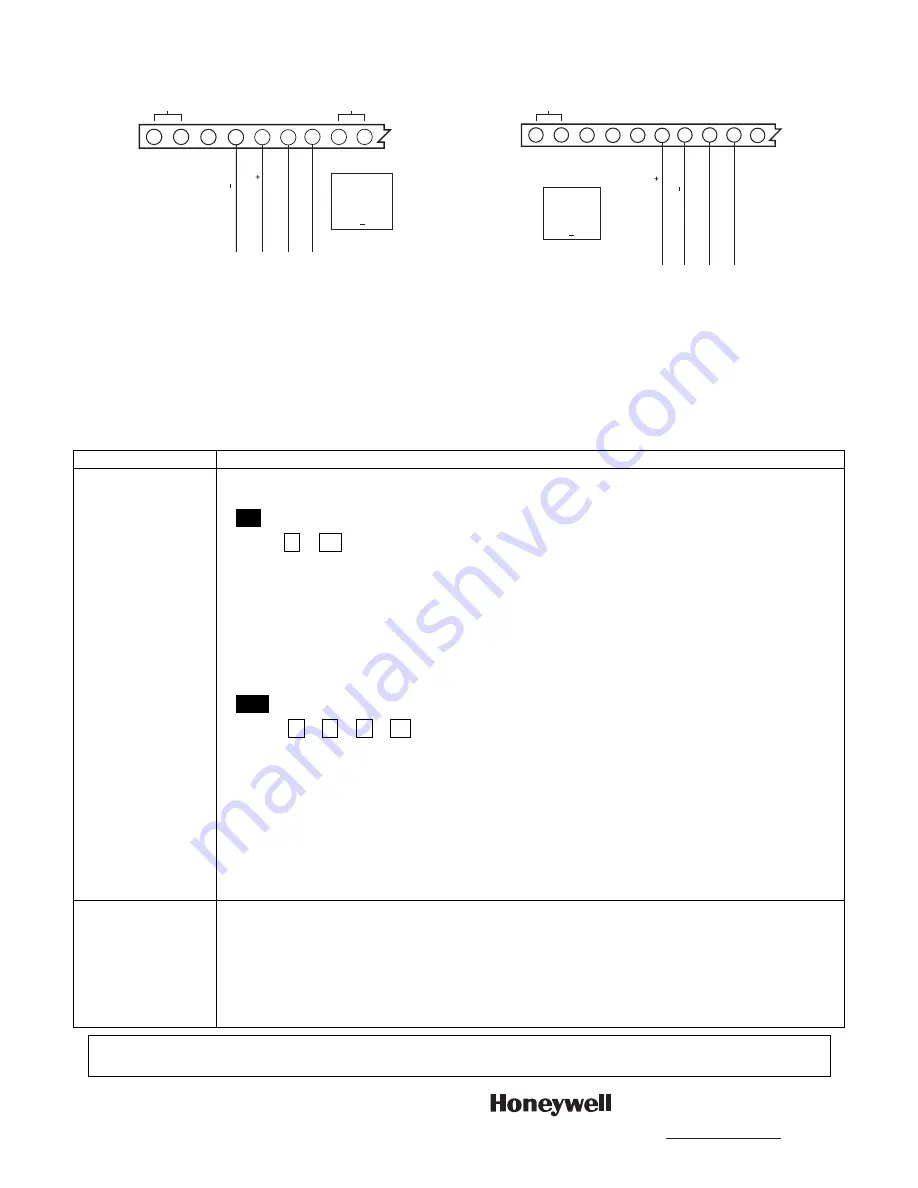
4232CBM to Control Panel Connection:
Plug the connector of the 4-wire harness (supplied) into the 4-pin
ECP connector on the 4232CBM board. Connect the flying leads to the appropriate control panel ECP
terminals as shown below.
1
2
3
ZONE 1
AC
(YEL) D
A
T
A
OUT
T
O
DEVICE
(GRN) D
A
T
A
IN FR
OM DEVICE
(RED) 12VDC
(BLK) GR
OUND
4232CBM-002-V0
4
5
7
8
9
6
CONNECT
4232CBM TO
CONTROL'S
ECP
TERMINALS
4 7
VISTA Residential Series Controls ECP Connection
(ex. VISTA-15P, VISTA-20P, VISTA-21iP)
AC
(YEL) D
A
T
A
OUT
T
O
DEVICE
(GRN) D
A
T
A
IN FR
OM DEVICE
(RED) 12VDC
(BLK) GR
OUND
4232CBM-003-V0
CONNECT
4232CBM TO
CONTROL'S
ECP
TERMINALS
6 9
1
2
3
4
5
7
8
9
10
6
VISTA Commercial Series Controls ECP Connection
(ex. VISTA-128BPT, VISTA-128BPTSIA)
Programming to Enable the Module
The 4232CBM uses up to three ECP device addresses; one address for the RIS (Remote Interactive Service)
device and either one or two emulated keypad addresses, depending on the application.
Refer to the documentation for your external equipment to determine if you also need to enable one or more
keypad addresses. These addresses should be enabled as AUI devices.
To enable RIS functionality in the control panel, follow these programming steps:
Control
Programming Notes for Enabling Remote Interactive Service (RIS)
VISTA-15P
VISTA-15PSIA
VISTA-20P
VISTA-20PSIA
VISTA-21iP
VISTA-21iPSIA
•
Field
∗∗∗∗
91 Option Selection
Enable RIS by programming data field
∗
91 Option Selection, entry 2 as follows:
∗∗∗∗
91
Option Selection (SIA Panels: Options/Call Waiting Disable & RIS Enable)
x 2
(x = see control’s programming instructions for appropriate values)
1
2
Options RIS Enable (SIA Panels: Call Waiting Disable/RIS Enable)
For Entry 2, enter “2” (SIA Panels: enter “2,” or enter “3” if Call Waiting Disable also
desired).
•
Field
∗∗∗∗
189 Touch Screen Device Enable
If the application requires emulation of a graphical keypad, then enable a virtual AUI device
address for Remote Services by programming data field
∗
189 Touch Screen Device Enable
as follows:
∗∗∗∗
189
AUI Device Enables (for Touchscreen Style Touchpads)
x
x
x x
(x = partition number for installed AUI devices)
AUI 1
AUI 2
AUI 3
AUI 4
Enable Remote Services by entering 5, 6, or 7 (depending on the partition in which
the remote services device is located) in an unused AUI location.
(5 = remote services partition 1; 6 = remote serv. partition 2; 7 = remote serv. partition 3)
Device Addresses: AUI 1 = addr. 1; AUI 2 = addr. 2; AUI 3 = addr. 5; AUI 4 = addr. 6
NOTE:
When using the 4232CBM, the selected AUI device address serves as a virtual
device used for Remote Services purposes that allows the control to receive status
information from the external equipment. Therefore, the selected address cannot be used
for an actual AUI Touchscreen.
VISTA-128BPT
VISTA-128BPTSIA
In #93 Device Programming, two device addresses must be programmed to enable remote
interactive services. Set one of these device addresses to type 12 (RIS), which enables RIS
operation. Set the other device address to type 01 (alpha keypad), which enables a virtual
keypad that is also needed for RIS operation.
Note:
The default ECP address for RIS functionality is 25. Although some applications may
allow you to change this setting from the external equipment, using the default address is
recommended.
REFER TO THE INSTALLATION AND SETUP GUIDE FOR THE CONTROL WITH WHICH THIS DEVICE IS
USED FOR WARRANTY INFORMATION AND LIMITATIONS OF THE ENTIRE SYSTEM.
Ê800-05295-1^Š
800-05295-1 6/11 Rev. B
2 Corporate Center Drive, Suite 100
P.O. Box 9040, Melville, NY 11747
Copyright © 2011 Honeywell International Inc.
www.honeywell.com/security


