19
ENGLISH
CHARGING THE BATTERY (HMEA TYPE)
The lawn mower does not have an internal charging system. A
plug-in charger is provided to recharge the battery. Use the
plug-in charger after prolonged storage or anytime you notice
a decrease in starter motor speed.
To assure maximum reliability, the battery should be
recharged (boost charged) before prolonged storage and
charged again at the beginning of the mowing season. Charge
the battery in a dry, well-ventilated area where the temperature
is moderate.
Battery posts, terminals and related accessories contain lead
and lead compounds. Wash hands after handling.
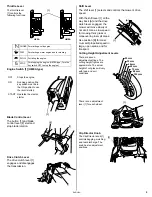
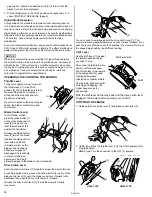
1. Remove the battery cover [1] by depressing the tabs [2] located on
the sides and releasing the tab on top of the battery cover.
2. Disconnect the battery connector [3] by depressing the connector
tab [4] and pulling the battery connector from the harness
connector [5], which is located inside the battery case, above the
battery.
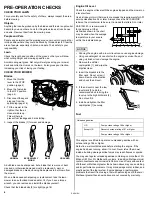
3. Connect the battery connector [3] to the charger [6] supplied with
the mower.
NOTICE
Do not attempt to charge the battery with any charger other than
the one supplied with the mower. Use of a charger other than the
one supplied may result in damage to the electrical system or fire.
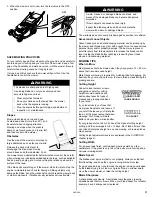
4. Plug the charger into a standard household power outlet and let
the battery charge for 20 to 24 hours. The charger may become
slightly warm during charging. This is normal.
NOTICE
Do not charge the battery for more than 24 hours or the battery
may be damaged. Disconnect the battery charger from the battery
before storing the lawn mower.
5. After the battery has charged, disconnect the charger and
reconnect the battery connector to the harness connector.
6. Replace the battery cover. Do not operate without the battery
cover installed.
REPLACING THE FUSE (HMEA TYPE)
The electric starter circuit and battery are protected by a 40 ampere
fuse. If the fuse burns out, the electric starter will not operate. The
engine can be started manually if the fuse burns out.
1. Remove the battery cover by depressing the tabs located on the
sides and releasing the tab on top of the battery cover (page 19).
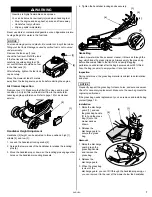
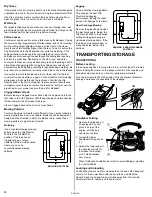
2. Locate the fuse case [1] above the battery.
3. Remove and inspect the fuse [2]. If it is burned out [3], install the
spare fuse [4] provided with the mower as shown.
NOTICE
Never use a fuse with a rating other than 40 amperes. Serious
damage to the electrical system or a fire can result.
If a frequent fuse failure occurs, it usually indicates a short circuit or
an overload in the electrical system. Take the mower to an authorized
Honda servicing dealer for repair.
TROUBLESHOOTING
ENGINE WILL NOT START
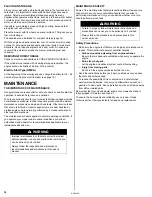
WARNING
A battery can explode if you do not follow the
correct procedure, seriously injuring anyone nearby.
Keep all sparks, open flames, and smoking
materials away from the battery.
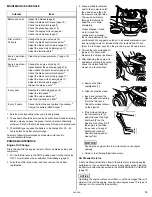
X
[2]
[1]
[3]
[5]
[4]
X
[6]
[3]
[5]
Possible Cause
Correction
Fuel valve OFF
Turn the fuel valve ON (page 4).
Throttle lever in the wrong
position
Move the throttle lever to the CHOKE
position, unless the engine is worm.
(page 10).
Key switch is OFF (HMEA type)
Turn the key switch ON to use the recoil
starter (page 5).
Out of fuel
Refuel (page 6).
Bad fuel; mower stored without
treating the gasoline, or refueled
with bad gasoline
Refuel with fresh gasoline (page 6).
Spark plug faulty, fouled, or
improperly gapped
Gap or replace the spark plug
(page 16).
Spark plug wet with fuel (flooded
engine)
Dry and reinstall the spark plug.
X
[4]
[1]
[2]
[3]
HXE.book Page 19 Monday, August 6, 2007 10:44 AM
Summary of Contents for HRX537HMEA
Page 22: ...Printed on Recycled Paper ...

