Honda HRX217HYUA Owner'S Manual Download Page 17

17

AVOIDING FUEL-RELATED PROBLEMS

When properly maintained, your Honda powered product should provide years of trouble-free operation. This includes the fuel system. 
However, petrol can quickly deteriorate (in as little as 30 days) causing starting or running problems and, in some cases, damage to the fuel 
system. Most fuel-related problems can be avoided by following the precautions listed below. Fuel system damage and engine performance 
problems resulting from deteriorated petrol are not covered by the 

Limited Warranty

 (see 

page 22

).

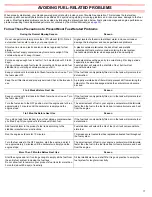
Follow These Precautions to Prevent Most Fuel-Related Problems

During the Normal Mowing Season

Reason

Do not use petrol containing more than 10% ethanol (E10). Not all 
automotive fuel is safe to use in your power product.

Higher levels of ethanol in fuel attract water, and can corrode or 
damage the fuel system and cause performance problems. 

Store fuel in a clean, plastic, sealed container approved for fuel 
storage. 
Store your fuel supply container away from direct sunlight; if the 
container has a vent, keep it closed.

A plastic container eliminates the risk of rust and metallic 
contaminants from a metal container entering the fuel system.
fuel will deteriorate faster when exposed to air and sunlight.

Purchase only enough fuel to last for 1 to 2 months (about 30 to 60 
days).
If you purchase enough fuel to last for more than 60 days, add a fuel 
stabilizer to your storage container when you fill it.

Fuel deteriorates with age so try to avoid storing it for long periods, 
especially in summer heat.
Fuel stabilizer will extend the shelf life of fuel, but it will not 
reconstitute stale fuel.

Keep your product’s fuel tank full of fresh fuel when not in use. Turn 
the fuel valve OFF.

If the fuel tank is only partially filled, air in the tank will promote fuel 
deterioration.

Keep the air filter clean and properly serviced. Check it before each 
use.

A properly maintained air filter will help prevent dirt from entering the 
carburetor. The small passages inside the carburetor can become 
blocked.

3 to 4 Weeks Before Next Use

Reason

Keep your product’s fuel tank full of fresh fuel when not in use. Turn 
the fuel valve OFF.

If the fuel tank is only partially filled, air in the tank will promote fuel 
deterioration.

Turn the fuel valve to the OFF position, start the engine and let it run 
approximately 3 minutes until the carburetor is empty and the 
engine stops. 

The small amount of fuel in your engine’s carburetor will deteriorate 
faster than the fuel in the fuel tank due to its small volume and heat 
from the engine.

1 to 3 Months Before Next Use

Reason

If you did not add fuel stabilizer to your fuel storage container when 
you filled it up, fill your product’s fuel tank with fresh fuel. 

If the fuel tank is only partially filled, air in the tank will promote fuel 
deterioration.

Add fuel stabilizer to the product’s fuel tank according to the 
stabilizer manufacturer’s instructions. 

Fuel stabilizer will extend the life of fuel, but it will not reconstitute 
stale fuel.

Run the engine outdoors for 10 minutes. 

This makes sure treated fuel has replaced untreated fuel throughout 
the fuel system.

Turn the fuel valve to the OFF position, start the engine, and let it 
run approximately 3 minutes until the carburetor is empty and the 
engine stops. 

The small amount of fuel in your engine’s carburetor will deteriorate 
faster than the fuel in the fuel tank due to its small volume and heat 
from the engine.

More Than 3 Months Before Next Use

Reason

Start the engine and let it run long enough to empty all the fuel from 
the entire fuel system, including the fuel tank. 
Do not allow fuel to remain in your product’s fuel tank for more than 
3 months (about 90 days) of inactivity.

All fuel stabilizers have a shelf life. It is good practice to empty the 
fuel system for long term inactivity.

Summary of Contents for HRX217HYUA

Page 1: ... OPERATION 7 Fuel 14 Dealer Locator Information 18 Safe Mowing Practices 7 Oil 14 How to Contact Honda 18 Operating the Controls 8 Cleaning 14 Honda Publications 18 Operating the Controls 8 Storage Location 14 LIMITED WARRANTY 22 Starting the Engine 9 Handlebar 14 OWNER S MANUAL HRX217HYUA LAWN MOWER Before operating the mower for the first time please read this Owner s Manual Even if you have ope...

Page 2: ... three signal words DANGER WARNING or CAUTION Each message tells you what the hazard is what can happen and what you can do to avoid or reduce injury These signal words mean Damage Prevention Messages you will also see other important messages that are preceded by the word NOTICE This word means Important Message to Parents The safety of children and adolescents is important to Honda Lawn mowers a...

Page 3: ...est holes raises the handlebar to its highest position 3 Turn the handlebar adjust knobs 90 degrees into the lock position making sure both sides are positioned at the same height 4 Remove all the cardboard from around the handlebar SHIFT LEVER P 8 REAR DISCHARGE GUARD P 5 FUEL TANK CAP P 7 MUFFLER P 13 OIL FILLER CAP P 12 HANDLEBAR ADJUST KNOB 2 P 4 RECOIL STARTER GRIP P 9 CUTTING HEIGHT ADJUSTME...

Page 4: ...ase of an emergency Check Your Mower For your safety and to maximize the service life of your lawn mower it is very important to take a few moments before you operate the lawn mower to check its condition Be sure to take care of any problem you find or have your servicing dealer correct it before you operate the lawn mower Make sure the lawn mower is on a level surface Look around and underneath t...

Page 5: ...ector knob all the way to the BAG position Check the appearance of the lawn As the knob is moved towards the MULCH position more grass will be recycled back into the lawn Adjust the Clip Director knob until the desired result is achieved Rear Discharge To discharge clippings to the rear remove the grass bag and position the Clip Director knob in the BAG range Maximum rear discharge will occur when...

Page 6: ...adjust cutting height pull each adjustment lever toward the wheel and move it into another notch Move all four adjustment levers to the same position forward for tall grass and rearward for short grass If you are not sure what cutting height to select start with a high setting and check the appearance of the lawn after mowing a small area Then readjust the cutting height if necessary Check the Oil...

Page 7: ... damage with walk behind mowers can be prevented if you follow all instructions in this manual and on the mower The most common hazards are discussed below along with the best way to protect yourself and others Avoid Rotating Blades Rotating blades can cause serious cuts and even amputate fingers hands toes or feet Keep away from the mower deck whenever the engine is running If you need to adjust ...

Page 8: ...perating the Controls Throttle Lever For best cut quality always mow with the throttle lever in the FAST position When the blades rotate at the preset fast speed they create a strong fan action that lifts and cuts grass more efficiently Do not try to increase the preset engine speed the blades could fracture and come apart Blade Control Lever To start blade rotation hold down the yellow button on ...

Page 9: ...asic hand tools Other service tasks that are more difficult or require special tools are best handled by professionals and are normally performed by a Honda technician or other qualified mechanic The maintenance schedule applies to normal operating conditions If you operate your mower under severe conditions such as sustained high load high temperature or unusually wet or dusty conditions consult ...

Page 10: ...of use 50 hours of use or every 6 months 100 hours of use or every year 150 hours of use or every two years See page Rear shield Check O 5 Blades Inspect O 11 Blade mounting bolts Inspect O 11 Engine oil Check O 6 Change O O 2 O O 12 Air filter Check O 12 Clean O 1 O 1 O 1 Replace O Grass bag Check O 6 Blade control operation Check O O 8 Spark plug Check O 13 Replace O Spark arrester optional part...

Page 11: ...ea 3 Install the sharpened or replacement blades using the two blade bolts and special washers as shown below The blade bolts and washers are specially designed for this application When replacing bolts and washers use only Honda Genuine replacement parts 4 Tighten the blade bolts with a torque wrench to the specified torque Use a wooden block to prevent the blades from turning when tightening the...

Page 12: ...our area is within the recommended range The SAE oil viscosity and service category are in the API label on the oil container Honda recommends API service category SJ or later oil Air Filter Clean the air filter after the first 25 hours of use Thereafter clean the filter every 6 months or 50 hours of use Clean the filter more often when used in dusty areas Replace the filter every 2 years or 150 h...

Page 13: ...optional part The spark arrester must be serviced every 100 hours to keep it functioning as designed 1 Allow the engine to cool and disconnect the spark plug cap 2 Remove the three flange bolts and the heat shield Remove the setscrew and the spark arrester from the muffler 3 Check for carbon deposits on the spark arrester and the exhaust port Use a brush to remove any carbon deposits from the scre...

Page 14: ...Water contacting a hot engine can cause damage If the engine has been running allow it to cool before washing Grass Bag Remove the bag from the mower and wash it with a garden hose or pressure washer Allow the bag to dry completely before storage Drying After washing the lawn mower wipe dry all accessible surfaces Place the mower with its wheels on a level surface Start the engine outdoors and let...

Page 15: ...wer deck is clogged Clean out the mower deck page 14 Air filter is clogged Clean or replace the air filter page 12 Bad fuel mower stored without treating petrol or refueled with bad petrol Refuel with fresh petrol page 7 Fuel filter clogged carburetor malfunction ignition malfunction valves stuck etc Take the mower to an authorised Honda servicing dealer for repair Possible Cause Correction Grass ...

Page 16: ...odified carburetor may cause the engine to overheat and result in serious engine damage For use at low altitudes have your servicing dealer return the carburetor to original factory specifications Specifications Mower Features Dimensions and Weights Engine Design and Performance Transmission Design and Performance Maintenance HRX2174HYUA Honda rotary mower 530mm mower deck Clip Director hydrostati...

Page 17: ...Keep the air filter clean and properly serviced Check it before each use A properly maintained air filter will help prevent dirt from entering the carburetor The small passages inside the carburetor can become blocked 3 to 4 Weeks Before Next Use Reason Keep your product s fuel tank full of fresh fuel when not in use Turn the fuel valve OFF If the fuel tank is only partially filled air in the tank...

Page 18: ...obile please call 03 9270 1348 Monday to Friday 8 00 a m 7 00 p m EST 9 00 a m 1 00 p m Saturday enquire via weblink contact hondampe com au email customer relations honda com au website www hondampe com au When you write or call please give us this information Model and serial numbers page 16 Name of the dealer who sold the lawn mower to you Name and address of the dealer who services your lawn m...

Page 19: ...any hours you get from a tank of fuel and then simply record the number of tanks used TANK x HOURS per TANK TOTAL HOURS USE Refer to the Maintenance Schedule on page 10 Hours Use Tanks x Hrs Tank Date Notes Servicing Dealer Stamp Date Hours Use Tanks x Hrs Tank Date Notes Servicing Dealer Stamp Date Hours Use Tanks x Hrs Tank Date Notes Servicing Dealer Stamp Date Hours Use Tanks x Hrs Tank Date N...

Page 20: ...tank of fuel and then simply record the number of tanks used TANK x HOURS per TANK TOTAL HOURS USE Refer to the Maintenance Schedule on page 10 Hours Use Tanks x Hrs Tank Date Notes Servicing Dealer Stamp Date Hours Use Tanks x Hrs Tank Date Notes Servicing Dealer Stamp Date Hours Use Tanks x Hrs Tank Date Notes Servicing Dealer Stamp Date Hours Use Tanks x Hrs Tank Date Notes Servicing Dealer Sta...

Page 21: ...21 ...

Page 22: ... assemblies of snow throwers tiller tines of roto tillers mower blades and mower deck housings are specifically not warranted against impact damage including but not limited to abrasive damage Disclaimer of Consequential Damage and Limitation of Implied Warranties Honda disclaims any responsibility for loss of time or use of the product transportation commercial loss or any other incidental or con...

Page 23: ...23 ...

Page 24: ...24 www hondampe com au HPE 2014 06 Printed in U S A ...

Reviews: