background image

18

PRE-OPERATION CHECKS

4.

ARE YOU READY TO MOW?

CHECK YOUR LAWN

Objects

People and Pets

Lawn

For your safety and for the safety of others, always inspect the area
before mowing.

Anything which can be picked up by the blade and thrown is a
potential hazard to you and others. Look for things like stones, sticks,
bones, and wire. Remove them from the mowing area.

People and animals near the mowing area can move into your path or
into a position where they could be struck by thrown objects. Clear the
area of people and pets, especially children. Their safety is your
responsibility.

Check the length and condition of the grass, so you will know what
cutting height and mowing speed to use.

Avoid mowing wet grass. Not only will wet grass clog your cutter
housing and collect in clumps on the lawn, it also gives poor traction,
increasing your risk of losing your footing.

Be sure to wear protective clothing. Long pants and eye protection can
lower your risk of injury from thrown objects. Wear footwear that
protects your feet and won’t let you slip if you mow on slopes or
uneven ground.

12/02/01 15:34:01 42VK3810_018

Summary of Contents for HRJ196

Page 1: ...eserves the right to make changes at any time without notice and without incurring any obligation No part of this publication may be reproduced without written permission You will also see other impor...

Page 2: ...odel 16 Front Guard 17 ARE YOU READY TO MOW 18 CHECK YOUR LAWN 18 CHECK YOUR MOWER 19 Blade 19 Engine Oil Level 22 Fuel 23 Air Cleaner 24 Grass Bag PWHH and TWHH Types 24 Cutting Height 26 MOWING PREC...

Page 3: ...ORAGE 46 THE IMPORTANCE OF MAINTENANCE 47 MAINTENANCE SAFETY 48 MAINTENANCE SCHEDULE 49 ENGINE MAINTENANCE 50 Engine Oil Change 50 Engine Oil Recommendations 51 Air Cleaner Service 52 Flywheel Brake L...

Page 4: ...nd avoid creating any source of ignition until the gasoline vapors have dissipated Add fuel before starting the engine Never remove the cap of the fuel tank or add gasoline while the engine is running...

Page 5: ...you Stop the blade if the lawn mower has to be tilted for transporting when crossing surfaces other than grass and when transporting the lawn mower to and from the area to be mowed Never operate the l...

Page 6: ...he tank inside a building where fumes may reach an open flame or spark Allow the engine to cool before storing in any enclosure To reduce the fire hazard keep the engine muffler battery compartment if...

Page 7: ...ury Carefully read the meaning of each label If a label comes off or becomes hard to read contact your dealer for a replacement Also after a repair or parts replacement check that the label is attache...

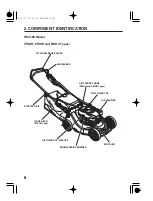
Page 8: ...l PDHH PWHH and PWHX Types FLYWHEEL BRAKE LEVER ENGINE SERIAL NUMBER OIL FILLER CAP DIPSTICK STARTER GRIP HANDLEBAR MUFFLER FUEL FILLER CAP AIR CLEANER HOSE PWHH and PWHX Types AIR CLEANER GRASS BAG P...

Page 9: ...9 THROTTLE LEVER DISCHARGE GUARD FRAME SERIAL NUMBER SPARK PLUG CAP CUTTER HOUSING FRONT GUARD FUEL VALVE HANDLEBAR LOCKING KNOB 2 CUTTING HEIGHT ADJUSTMENT LEVER 12 02 01 15 33 01 42VK3810_009...

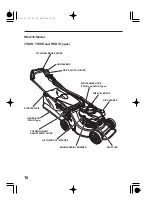
Page 10: ...LER CAP DIPSTICK STARTER GRIP HANDLEBAR DRIVE CLUTCH LEVER FUEL FILLER CAP AIR CLEANER HOSE TWHH and TWHX Types AIR CLEANER MUFFLER CUTTING HEIGHT ADJUSTMENT LEVER GRASS BAG TWHH Type HRJ216 Model TDH...

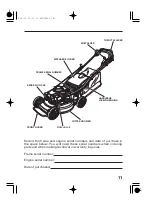
Page 11: ...BAR LOCKING KNOB 2 THROTTLE LEVER Engine serial number Record the frame and engine serial numbers and date of purchase in the space below You will need these serial numbers when ordering parts and whe...

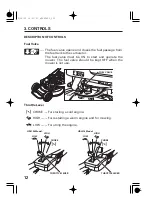
Page 12: ...H LOW HIGH 3 The fuel valve opens and closes the fuel passage from the fuel tank to the carburetor The fuel valve must be ON to start and operate the mower The fuel valve should be kept OFF when the m...

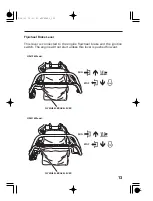
Page 13: ...216 Model FLYWHEEL BRAKE LEVER FLYWHEEL BRAKE LEVER STOP RUN RUN STOP This lever is connected to the engine flywheel brake and the ignition switch The engine will not start unless this lever is pushed...

Page 14: ...LEVER ENGAGE DISENGAGE The drive clutch lever engages push forward and disengages release the transmission that drives the rear wheels The drive clutch lever should only be engaged after the engine h...

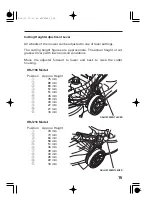
Page 15: ...t figures are approximate The actual height of cut grass will vary with lawn and soil conditions Move the adjuster forward to lower and back to raise the cutter housing Position Approx Height 75 mm 69...

Page 16: ...The shift lever selects and controls the self propelled drive speed For mowing thick grass or maneuvering in small areas For intermediate self propelled mowing speed For maximum self propelled transpo...

Page 17: ...216 Model FRONT GUARD FRONT GUARD Do not step on the front guard Do not use the front guard to lift the lawn mower Replace the front guard at an authorized Honda service dealer whenever it is deformed...

Page 18: ...uld be struck by thrown objects Clear the area of people and pets especially children Their safety is your responsibility Check the length and condition of the grass so you will know what cutting heig...

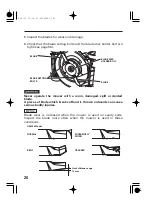
Page 19: ...ALVE O OF FF F Before each use check the cutter blade for damage or excessive wear Stop the engine and turn the fuel valve to the OFF position Disconnect the spark plug cap from the spark plug see pag...

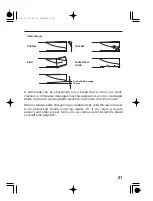
Page 20: ...E BLADE SETTING BOLTS HRJ196 Model NORMAL EXCESSIVELY WORN BENT CRACKED Limit of blade usage 10 mm Inspect the blades for wear and damage Blade wear is increased when the mower is used on sandy soils...

Page 21: ...wise damaged must be replaced A worn or damaged blade can break causing blade pieces to be thrown from the mower When a blade needs sharpening or replacement take the lawn mower to an authorized Honda...

Page 22: ...wipe the dipstick clean Insert and remove the dipstick without screwing it into the filler neck Check the oil level shown on the dipstick If the oil level is low add the recommended oil see page to r...

Page 23: ...tank if the fuel level is low Refuel carefully to avoid spilling fuel Do not overfill there should be no fuel over the limit mark After refueling tighten the fuel filler cap securely Never refuel the...

Page 24: ...nce Refer to page for air cleaner service A lawn mower works like a vacuum cleaner it blows air through the bag which traps the grass clippings Always empty the grass bag before it becomes filled to t...

Page 25: ...ase the discharge guard to secure the grass bag in place Raise the discharge guard grasp the grass bag handle and remove the grass bag Release the discharge guard When the grass bag is clear of the di...

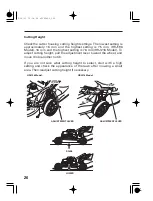
Page 26: ...proximately 16 mm and the highest setting is 75 mm HRJ196 Model 16 mm and the highest setting is 76 mm HRJ216 Model To adjust cutting height pull the adjustment lever toward the wheel and move it into...

Page 27: ...as a garage Your mower s exhaust contains poisonous carbon monoxide gas which can collect rapidly in an enclosed area and cause illness or death Before operating the mower for the first time please re...

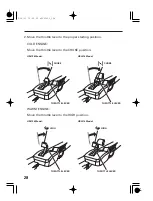
Page 28: ...el HRJ216 Model CHOKE THROTTLE LEVER THROTTLE LEVER THROTTLE LEVER Move the throttle lever to the proper starting position COLD ENGINE Move the throttle lever to the CHOKE position WARM ENGINE Move th...

Page 29: ...e lever against the handlebar the engine will stop if you release the lever Keep your hands and feet away from the cutter housing at all times when starting and running the engine Pull the starter gri...

Page 30: ...e preset engine speed the blade could fracture and come apart When you need to leave the mower for any reason always turn the engine OFF by releasing the flywheel brake lever The lever must be pushed...

Page 31: ...drive clutch lever with a quick and complete motion so the drive clutch is either fully engaged or released Hold the drive clutch lever against the handlebar during self propelled mowing This will he...

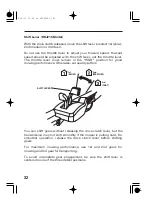
Page 32: ...ain in the HIGH position for good mowing performance Otherwise cut quality suffers You can shift gears without releasing the drive clutch lever but the transmission may not shift smoothly if the mower...

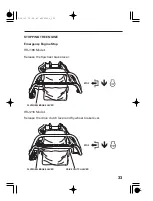
Page 33: ...y Engine Stop FLYWHEEL BRAKE LEVER FLYWHEEL BRAKE LEVER DRIVE CLUTCH LEVER STOP STOP Release the flywheel brake lever Release the drive clutch lever and flywheel brake lever HRJ196 Model HRJ216 Model...

Page 34: ...op THROTTLE LEVER HRJ196 Model HRJ216 Model THROTTLE LEVER LOW LOW DRIVE CLUTCH LEVER DISENGAGE Move the throttle lever to the LOW position Release the drive clutch lever HRJ216 Model 1 2 12 02 01 15...

Page 35: ...HRJ216 Model FLYWHEEL BRAKE LEVER FLYWHEEL BRAKE LEVER FUEL VALVE OFF STOP STOP Release the flywheel brake lever When the mower is not in use turn the fuel valve to the OFF position 3 4 12 02 01 15 35...

Page 36: ...eep all four wheels on the ground and be careful to avoid losing your footing and your control of the mower Keep a firm grip on the handlebar and walk never run with the mower Be very careful when mow...

Page 37: ...d anything that sticks up above the surface of the lawn If the blade hits something or if the mower starts to vibrate stop the engine immediately disconnect the spark plug cap and check for damage see...

Page 38: ...wn Let the grass recover between mowings Your mower will work better and your lawn will look better If your grass gets too tall cut it once at the highest cutting height setting then mow again in 2 or...

Page 39: ...oblem water your lawn the day before mowing Mow when the grass is dry to your touch but the soil is still moist Wet grass is slippery and can make you lose your footing Also wet grass clippings will c...

Page 40: ...a clockwise mowing pattern This will give the best bagging performance leaving the least amount of clippings on the lawn Your Honda mower will work most efficiently if you use the following mowing pa...

Page 41: ...te some materials Disconnect the spark plug cap from the spark plug see page The handlebar can be folded so the mower will take up less space see page Position the mower so all four wheels are on the...

Page 42: ...sing a garden hose or pressure washing equipment to clean the cutter housing be careful to avoid getting water into controls and cables or anywhere near the engine air cleaner or muffler opening Befor...

Page 43: ...days or even less if the gasoline was not fresh when you filled the fuel tank The Warranty does not cover fuel system damage or engine performance problems resulting from neglected storage preparatio...

Page 44: ...approved container Turn the fuel valve to the ON position see page This will allow fuel in the fuel tank to drain through the carburetor b o w l A f t e r th e f u e l i s completely drained reinstal...

Page 45: ...HRJ216 Model held by your hand Don t allow the cables and air cleaner hose applicable type to be bent or pinched Loosely install the two handlebar locking knobs Squeeze the flywheel brake lever and d...

Page 46: ...on a level surface Tilting can cause fuel or oil leakage The handlebar can be folded for compact storage see page With the engine and exhaust system cool cover the mower to keep out dust A hot engine...

Page 47: ...ll also help reduce air pollution To help you properly care for your mower the following pages include a maintenance schedule routine inspection procedures and simple maintenance procedures using basi...

Page 48: ...sion be careful when working around gasoline Use only a nonflammable solvent not gasoline to clean parts Keep cigarette sparks and flames away from all fuel related parts Read the instructions before...

Page 49: ...ss you have the proper tools and are mechanically proficient Refer to the Honda shop manual for service procedures Service more frequently when used in dusty areas Check that Air cleaner hose does not...

Page 50: ...r on its right side The used oil will drain through the filler neck Allow the oil to drain completely Please dispose the used motor oil and the containers in a manner that is compatible with the envir...

Page 51: ...ss oil may get transferred to the air cleaner housing and air cleaner Running the engine with a low oil level can cause engine damage Screw in the oil filler cap dipstick securely SAE 10W 30 is recomm...

Page 52: ...ucing engine performance If you operate the mower in very dusty areas clean the air cleaner more often than specified in the MAINTENANCE SCHEDULE Operating the engine without an air filters or damaged...

Page 53: ...rag Be careful to prevent dirt from entering the air duct that leads to the carburetor Reinstall the filters and cover and tighten the air cleaner nuts securely Start the engine outdoors and move the...

Page 54: ...o compress the washer If reinstalling the old spark plug tighten 1 8 to 1 4 turn after the spark plug seats If installing a new spark plug tighten 1 2 turn after the spark plug seats Install the spark...

Page 55: ...power will decrease about 3 5 for each 300 meters increase in altitude The effect of altitude on horsepower will be greater than this if no carburetor modification is made Use unleaded gasoline with a...

Page 56: ...e sharpened by trained staff at an authorized Honda servicing dealer If replacing the blade use a Honda genuine replacement blade or equivalent Turn the fuel valve to the OFF position Disconnect the s...

Page 57: ...DE WASHER 2 SPRING WASHER 2 BLADE SETTING BOLT 2 BLADE DISC Illustration showing the blade disc holder bolt washer blade blade disc blade holder woodruff key and thrust washer removed Remove the blade...

Page 58: ...d self lock nut to the blade disc using the blade setting bolt as described below Tighten the self lock nuts with a torque wrench Prevent the blade disc from turning when tightening the self lock nuts...

Page 59: ...RENCH BLADE DISC HOLDER BOLT ENGINE S BOLT FLAT BLADE SCREWDRIVER BLADE DISC S HOLE BLADE DISC Install the thrust washer woodruff key blade holder blade blade disc washer and blade disc holder bolt Ho...

Page 60: ...uthorized Honda servicing dealer tighten the blade setting bolts and the blade disc holder bolt before you use the mower If the blade setting bolts and the blade disc holder bolt are overtightened the...

Page 61: ...ash the bag with a garden hose and allow it to dry completely before use a wet bag will clog quickly Replace a worn or damaged bag with a Honda genuine bag or its equivalent Unclip the plastic edges o...

Page 62: ...cing dealer or refer to shop manual Throttle not set to HIGH Grass too tall to cut Cutter housing clogged Air filter clogged Bad fuel mower stored without treating or draining gasoline or refueled wit...

Page 63: ...the throttle lever is in the HIGH position Reduce forward speed Check cutting height adjustment levers Check grass bag if equipped Check cutter housing and blade Engine speed is too slow to cut well...

Page 64: ...acity HRJ196 MADC PWHH Manually propelled 505 mm 1 025 mm PDHH 41 kg 39 kg 1 560 mm 440 mm 458 mm 470 mm 16 75 mm HRJ216K2 MACC PWHX TDHH TWHH TWHX Self propelled 1 715 mm 570 mm 1 025 mm 38 kg 45 kg...

Page 65: ...rpm in accordance with SAE J1349 in accordance with SAE J1349 Engine Max Net Torque 2 7 kW 3 6 HP at 3 000 rpm PWHH and TWHH types 3 2 kW 4 3 HP at 3 600 rpm PDHH and TDHH types The power rating of t...

Page 66: ...level dB A Measured sound power level dB A Uncertainty dB A Measured sound power level at operator s ears dB A Uncertainty dB A MODEL Type Measured Hand Transmitted Vibration level m s Uncertainty m s...

Page 67: ...section of the cutter housing Set the lower section of the handlebar to the handlebar mounting section of the cutter housing enough so you can raise the handlebar into the normal position Loosely ins...

Page 68: ...View from arrow of sections WIRE BAND 4 WIRE BAND 2 400 mm 220 mm 200 mm 30 mm Secure the wires and air cleaner hose with the wire band as shown below PWHH and TWHH Types Secure the wires with the wi...

Page 69: ...View from arrow of sections WIRE BAND 4 WIRE BAND 2 View from arrow of sections 70 mm 100 mm 40 mm 170 mm 40 mm 210 mm 70 mm HRJ216 Model TWHH Type HRJ216 Model TDHH Type 12 02 01 15 40 48 42VK3810_0...

Page 70: ...ification for Altitude Operation 51 ARE YOU READY TO MOW 18 TROUBLESHOOTING 62 STOPPING THE ENGINE 33 Shift Lever HRJ216 Model 16 32 Engine Oil Change 50 Spark Plug Service 53 CONTROLS 12 DESCRIPTION...

Page 71: ...tment Lever 15 MOWING PRECAUTIONS 27 OPERATING THE CONTROLS FOR MOWING 30 MOWING TIPS 38 Fuel 23 Fuel Valve 12 Index 70 Engine Oil Recommendations 51 Fuel Recommendations 55 Throttle Lever 12 30 TRANS...

Page 72: ...Published by Honda Motors Co Ltd Jialing Honda Motors Co Ltd NO 1 Guan Yuenan Road Yubei District Chongqing P R China Phone 86 23 62793100 2012 04 Printed in China SDT No GB26509 2011 12 02 01 15 41 0...

Reviews: